If you have got ten minutes of active kitchen prep time, you can have this gorgeous cake ready to bake before your morning tea cools.

Baking a celebratory treat should feel like a joy, not a chore that keeps you cleaning dishes until midnight. This spectacular Cookies and Cream Birthday Cake pairs fluffy vanilla crumb layers with a velvety cream frosting that comes together without any complicated steps. We are skipping the elaborate piping and hard techniques for an honest, flavor-forward bake that anyone can master. You will love how easily this centerpiece comes together using simple ingredients from your weekly grocery run. It is the type of cake you can bake in pajamas on a weekend morning while the kettle boils on the stove.
What Makes This Cookies and Cream Birthday Cake Shine
Prep: 15 min · Serves: 12 · Difficulty: Easy
- Fluffy cake layers with crumb texture
- Creamy frosting made with real cream
- Quick assembly that saves your Saturday
- Basic pantry staples you already have
- Sliced thick for a cozy celebration
This reliable birthday cake will make your next celebration feel completely special with minimal kitchen effort.
Get The Full Cake Recipe
Print
Cookies and Cream Birthday Cake
- Total Time: 48 mins
- Yield: 12 servings
Description
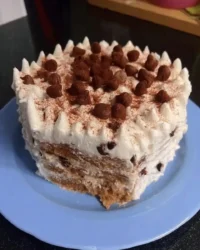
This delightful cookies and cream cake features tender, fluffy vanilla sponge layers studded with chocolate sandwich cookies. It is finished with a silky, cloud-like buttercream, making it an easy and impressive centerpiece for any celebration.
Ingredients
- 300g all-purpose flour
- 1 tablespoon cornstarch
- 1 teaspoon baking soda
- 1 teaspoon baking powder
- 1/2 teaspoon salt
- 1 cup unsalted butter, softened
- 1/2 cup vegetable oil
- 1 1/2 cups granulated sugar
- 3 large eggs, room temperature
- 1 tablespoon vanilla extract
- 1 teaspoon white vinegar
- 1 cup buttermilk, room temperature
- 28 chocolate sandwich cookies, divided
- 3 cups icing sugar
- 2 tablespoons milk
Instructions
- Prep the equipment. Preheat oven to 160°C (320°F) and grease two 8-inch cake tins, lining the bottoms with parchment paper.
- Chop the cookies. Roughly chop 14 chocolate sandwich cookies into medium-sized chunks for the cake batter.
- Whisk dry ingredients. Sift the flour, cornstarch, baking soda, baking powder, and salt together in a large bowl.
- Cream butter mixture. Use an electric mixer to beat the butter, oil, and sugar until pale and fluffy.
- Incorporate wet ingredients. Beat in the eggs one by one, then add the vanilla, vinegar, and half the buttermilk.
- Combine the batter. Fold in the dry ingredients alternating with the remaining buttermilk until just combined, then fold in the chopped cookies.
- Bake the layers. Pour batter into prepared pans and bake for 33 minutes or until a toothpick inserted into the center comes out clean.
- Cool completely. Allow layers to cool in pans for 20 minutes before transferring to a wire rack to cool fully.
- Whip the frosting. Beat butter, icing sugar, vanilla, and milk until fluffy, then fold in 14 crushed cookies.
- Assemble the cake. Frost the cooled layers, stacking them and covering the exterior, then decorate with extra cookie crumbs.
Notes
- Ensure all dairy and egg ingredients reach room temperature before mixing to prevent the butter from curdling.
- Use a digital scale to measure your flour precisely to maintain the intended moisture levels in the crumb.
- Avoid over-mixing the batter once the flour is added to ensure the cake layers remain light and tender.
- Dip your knife in hot water and wipe it dry between cuts for perfectly clean, professional-looking cake slices.
- Prep Time: 15 mins
- Cook Time: 33 mins
- Category: Dessert
- Method: Baking
- Cuisine: American
Pantry Lineup

Making a memorable dessert does not require a trip to a specialty baking shop. We are using standard, reliable pantry staples that you likely already have tucked away in your kitchen cupboards. These simple ingredients come together to create a luxurious texture and deep flavor profile that feels fancy but remains incredibly easy to prepare.
- All-Purpose Flour: This forms the sturdy base of our layers, giving us a soft yet structure-retaining crumb. We use three hundred grams to ensure the liquid-to-dry ratio is perfectly balanced.
- Buttermilk: Store-bought buttermilk provides the essential acidity needed to make our crumb tender and light. It reacts with our leavening agents to create a beautiful, airy rise.
- Unsalted Butter: Using room temperature butter allows for proper creaming, which traps air for a fluffy rise. It also gives the cake its classic rich, bakery-style flavor.
- Vegetable Oil: canola or light vegetable oil keeps our crumb incredibly soft even after a night in the fridge. This combination of butter and oil gives us the absolute best texture.
- Chocolate Sandwich Cookies: Roughly chopped cookies fold beautifully into the batter to create those classic pockets of chocolate and cream flavor. We use fourteen in the batter and more for decorating.
- Cornstarch: A small amount mixed with the flour mimics the texture of cake flour for a delicate, melt-in-your-mouth bite. It helps lower the gluten content of our all-purpose flour.
- Granulated Sugar: This sweetens our cake while keeping the layers incredibly moist and tender. It locks in the moisture as the cake bakes in the oven.
- White Vinegar: A tiny splash of vinegar acts as an extra boost for our baking soda. It guarantees our cake rises high and even without needing a fancy stand mixer.
| Ingredient | Why It Matters |
|---|---|
| Flour & Cornstarch | Creates a soft, light texture that rivals professional bakery crumbs. |
| Real Buttermilk | Softens the gluten strands and adds a subtle, pleasant tang. |
| Soft Butter & Oil | Delivers the best of both worlds with rich butter flavor and oil-based softness. |
| Chocolate Cookies | Provides the signature crunch and deep cocoa taste in every single bite. |
| White Vinegar | Reacts with the baking soda to give our layers a beautiful rise. |
From Bowl to Oven

Step 1: Prep the Oven and Cake Pans
Preheat your oven to 160°C (320°F) with the fan on and grease two eight-inch round baking tins. Line the bottoms with circles of parchment paper to prevent any sticking. Roughly chop fourteen chocolate sandwich cookies on a cutting board, leaving them in medium-sized chunks that will offer a satisfying crunch. The cookies should have a mix of small crumbs and larger pieces that will look beautiful scattered throughout the baked crumb.
Step 2: Mix the Dry Base Ingredients
Sift the all-purpose flour, cornstarch, baking soda, baking powder, and salt into a large mixing bowl. Whisk these dry ingredients together with a wire whisk until they are fully blended. This step ensures that the leavening agents are distributed evenly throughout the flour for a consistent rise. As you whisk, you will notice the flour mixture becoming light, airy, and free of any large lumps.
Step 3: Cream the Fats and Sugar
Add your softened unsalted butter, vegetable oil, and granulated sugar into a clean mixing bowl. Use an electric hand mixer on medium speed to cream these ingredients for two minutes until the mixture looks pale and feels fluffy. This process traps essential air pockets that give the cake its light texture. You will watch the coarse sugar and solid butter transform into a smooth, glistening cream that smells sweet and rich.
Step 4: Add the Eggs and Liquid Flavorings
Beat your room-temperature eggs into the creamed mixture one by one, mixing for fifteen seconds after each addition. Pour in your vanilla extract, white vinegar, and the first half-cup of your room-temperature buttermilk. Mix on low speed until the batter looks uniform and smells sweet with vanilla. The batter will look thin at this stage, but it should be entirely smooth without any separated patches.
Step 5: Fold the Batter Gently by Hand
Set your electric mixer aside and grab a silicone spatula to finish the batter by hand. Fold in half of your whisked dry ingredients, followed by the remaining cup of buttermilk, and then the rest of the dry mixture. Stir only until the flour streaks disappear, keeping the gluten relaxed for a tender bake. Your hands will feel the batter thicken into a velvety, luscious mixture as the dry flour fully incorporates.
Step 6: Bake the Cookies and Cream Birthday Cake
Gently fold the chopped cookie chunks into your finished batter with three or four gentle turns of your spatula. Distribute the batter evenly between your two prepared pans and bake for thirty-three minutes. You will know they are ready when the kitchen smells like chocolate cookies and the tops of the cakes feel springy. A toothpick inserted deep into the center should emerge clean with no wet batter clinging to it.
Step 7: Cool the Layers Completely
Allow the hot pans to sit on your counter for twenty minutes before turning the layers out onto a wire cooling rack. The cake must cool completely to room temperature before you attempt to frost it. While they cool, you can clean your mixing bowl and prepare for the buttercream stage. As the cakes cool, the sweet vanilla aroma will fill your kitchen and the crust will settle into a beautiful matte finish.
Step 8: Whip the Cookie Buttercream
Whip your butter, icing sugar, vanilla, and milk together on high speed for ten minutes until the frosting looks like clouds. Pulse fourteen cookies in a food processor until they are fine crumbs, then fold them into your fluffy buttercream. The frosting should look speckled and hold its shape beautifully when scooped. You will taste a spoonful to find a silky, airy texture with a deep chocolate cookie flavor in every bite.
Step 9: Assemble the Festive Layers
Place your first layer on a stand, cover it with buttercream, and sprinkle crushed cookies for extra texture. Top with the second layer, frost the top and sides, and use a piping bag with a star tip to create decorative swirls. Press extra cookie crumbs onto the lower sides of the cake for a classic finish. The final cake will look like a bakery masterpiece, with dark cookie crumbs contrasting beautifully against the pale frosting.
Easy-Baker Notes

Using room temperature ingredients is the most important factor when putting this recipe together. If your buttermilk or eggs are too cold, they will cause the creamed butter to seize up, resulting in a curdled batter that bakes into dense, heavy layers. Let your ingredients sit on the counter for at least an hour before you begin mixing. This simple step makes a massive difference in how smoothly your batter blends.
If your cake layers turn out dense and do not rise properly, here is why and how to fix it. This common issue happens when the batter is over-mixed after the flour is added, which activates too much gluten and creates a rubbery structure. To fix this next time, put your electric mixer away after adding the wet flavorings and use a rubber spatula to fold the dry ingredients with slow, gentle strokes. Stop stirring the very second the last dry flour streak disappears into the wet mixture.
To get clean, professional slices when cutting your oreo cake, use a long, sharp knife dipped in hot water and wiped dry between each cut. The warm metal will slide through the buttery frosting and cookie chunks without tearing the delicate crumb. This extra step keeps your dessert looking beautiful on the serving plates. It also prevents the chocolate cookie crumbs from smearing across the clean white buttercream.
For the best frosting texture, make sure you sift your icing sugar before whipping it with the butter. Small clumps of sugar can survive the whipping process, leaving tiny pockets of dry sugar in your finished buttercream. Taking two minutes to run the sugar through a fine-mesh sieve guarantees a velvety, melt-in-your-mouth texture. This ensures your piping bag tip does not get clogged with hard sugar lumps while you create your decorative swirls.
Weighing your dry ingredients on a digital kitchen scale is highly recommended for accurate results. Flour is notoriously easy to pack too tightly into measuring cups, which adds unwanted weight and dries out your bake. A simple scale ensures you get exactly three hundred grams of flour every single time. It takes the guesswork out of baking and guarantees a reliable result with every single batch you make.
Should you want to bake the layers ahead of time, wrap the cooled cake rounds tightly in plastic wrap and store them in the freezer. Frozen layers are actually much easier to frost because they release fewer crumbs as you glide your spatula across the surface. Let the assembled cake thaw slowly in the refrigerator before serving it to your guests. This makes the assembly process completely relaxed and split across two easy sessions.
According to baking science, how to properly measure flour for baking can make or break the delicate fat-to-liquid ratio in high-fat recipes like this one. Always fluff your flour with a spoon, scoop it gently into your measuring cup, and level it off with the back of a table knife. This prevents you from accidentally adding up to twenty percent more flour than the recipe requires, which would make your cake dry.
Frequently Asked Questions
Can I use store-bought frosting instead of making Oreo buttercream?
Yes, you can use tub frosting in a pinch if you are short on time. However, whipping your own buttercream takes only ten minutes and offers a much richer flavor. Simply fold fine cookie crumbs into store-bought vanilla frosting to get a similar look. This is a quick shortcut that still tastes wonderful.
How do I store leftovers of this cookies and cream cake?
Keep any leftover cake in an airtight container or under a cake dome at room temperature for up to three days. If your kitchen is warm, store it in the refrigerator to keep the buttercream firm. Let the slices come back to room temperature before eating to enjoy the softest texture. This keeps the cake tasting fresh and moist.
Can I make this recipe gluten-free?
You can make this cake gluten-free by replacing the all-purpose flour with a high-quality 1-to-1 gluten-free baking blend. Make sure to use certified gluten-free chocolate sandwich cookies as well. The baking time and method will remain exactly the same. Your guests will never be able to tell the difference.
Why did my cookie chunks sink to the bottom of the cake pans?
Cookie chunks will sink if they are chopped too large or if the cake batter is too thin. Chopping them into smaller, lighter pieces helps them suspend in the thick batter. You can also toss the chopped cookies in a tablespoon of flour before folding them in. This flour coating helps them cling to the batter as it bakes.
Can I use homemade buttermilk instead of store-bought?
Homemade buttermilk made with milk and vinegar is thinner than store-bought buttermilk. If you choose to use a homemade version, reduce the total amount to one and a quarter cups. This adjustment prevents the cake batter from becoming too wet and heavy. For the absolute best rise, store-bought buttermilk is always recommended.
Can I freeze the assembled cake?
Yes, you can freeze the fully decorated cake for up to two months. Place the cake in the freezer uncovered for one hour to firm up the buttercream, then wrap it tightly in plastic wrap. Thaw it overnight in the refrigerator before slicing and serving. This is an excellent option for party planning.
What can I use if I do not have two eight-inch cake pans?
You can bake this recipe in a 9×13-inch metal sheet pan for an easy weekday dessert. Increase the baking time by five to ten minutes, keeping a close eye on the center. This option eliminates the need for stacking and makes cleaning up a breeze. It is perfect for a casual Tuesday night treat.
Simple Swaps
You can easily transform this recipe into a rich chocolate layer cake by replacing half a cup of the all-purpose flour with high-quality unsweetened cocoa powder. This simple adjustment deepens the chocolate flavor in the sponge while still highlighting the sweet cream pockets from the cookie pieces. Be sure to sift the cocoa powder along with the flour to avoid any bitter clumps in your batter. The resulting cake will have a gorgeous dark color and a deep, intense cocoa aroma that pairs beautifully with the sweet frosting.
For a fun and colorful twist, turn this dessert into an ultimate celebration bake by folding half a cup of rainbow sprinkles into the batter along with the chopped cookies. The colorful sprinkles will melt slightly during baking, creating a beautiful confetti appearance that looks wonderful against the dark chocolate cookie chunks. Kids and adults alike will love the bright pop of color in every single slice. You can also use seasonal sprinkles to match any holiday theme, from festive red and green to pastel spring shades.
If you want a lighter, fruitier option, try swapping out the classic chocolate cookies for golden sandwich cookies and folding fresh raspberries into the layers. The tartness of the fresh berries cuts through the sweet vanilla buttercream, offering a perfectly balanced bite that is ideal for warm spring afternoons. You can even add a thin layer of raspberry jam between the cake rounds for an extra burst of fruit flavor. This variation is a wonderful way to adapt the recipe for those who prefer fruity desserts over heavy chocolate treats.
Slice & Serve
This spectacular layer cake is the ideal centerpiece for a cake 18th birthday celebration or any cozy family gathering. When bringing it to the table, let it sit at room temperature for about thirty minutes if it was stored in the fridge. This brief wait allows the butter in the frosting to soften, restoring its cloud-like texture and making it incredibly easy to slice. Cutting into a perfectly softened cake is a sensory delight that makes the serving process feel effortless.
Serve each thick slice alongside a warm cup of freshly brewed black coffee or a tall glass of cold milk. The bitter notes of the coffee balance the sweet buttercream beautifully, while cold milk enhances the classic chocolate sandwich cookie flavor. For an extra touch of luxury, place a single whole cookie on the side of each plate. This simple pairing turns a slice of cake into a complete afternoon experience.
If you are hosting a larger party, you can arrange the sliced cake on a vintage wooden platter surrounded by fresh berries. Strawberries or blackberries add a beautiful contrast of color and a fresh acidity that cuts through the rich frosting. This simple presentation makes your homemade dessert feel like a special bakery purchase. Your guests will love the combination of rich cake, creamy frosting, and fresh, juicy berries.

Bake It Soon
Baking does not have to be a complicated, all-day project that leaves you exhausted with a sink full of dirty dishes. This simple recipe proves that basic ingredients and easy techniques can create something truly spectacular for your next celebration. Gather your ingredients, turn on your favorite music, and enjoy the relaxing process of creating this delicious treat. It is a wonderful way to slow down and create something special for the people you love.
If you make this birthday cake at home, I would truly love to see how it turns out for you. Share your baking photos with me so we can celebrate your kitchen success together.
You can find more easy baking inspiration and connect with our wonderful community on Pinterest, Facebook, and Telegram. Let this be the sweet start of your next kitchen adventure.
Let this be the cake that brings everyone together around your kitchen counter this week. There is nothing quite like the happy quiet that falls over a room when everyone takes their first delicious bite of homemade cake. It is proof that simple bakes can bring the greatest joy to our daily lives. Happy baking, and may your kitchen always be filled with the sweet aroma of warm vanilla and chocolate!


