You do not need an expensive mixer, a specialty pan, or a trip to a fancy grocery store to bake the best dessert of your life right in your own kitchen.

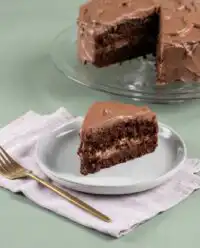
Baking this classic Hershey’s Perfectly Chocolate Cake brings the simple joy of old-fashioned scratch baking right back to your table. You only need a single bowl, a sturdy wooden spoon, and everyday staples that are likely sitting in your pantry right this second. It is a forgiving recipe that delivers a remarkably tender crumb and a rich flavor that somehow tastes even better the next morning.
What Makes Hershey’s Perfectly Chocolate Cake Pure Comfort
Prep: 15 min · Serves: 12 · Difficulty: Easy
There is something deeply reassuring about a cake that does not ask you to be a professional pastry chef. When the craving for a rich, comforting dessert strikes, this straightforward recipe is the one that always delivers.
- Requires only one bowl to mix easily.
- Delivers an incredibly tender chocolate crumb.
- Uses simple pantry ingredients you own.
- Stays remarkably soft and delicious tomorrow.
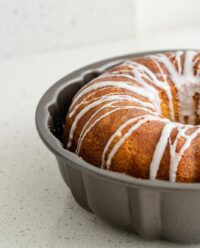
- Bakes beautifully in basic round pans.
You can easily make this old fashioned chocolate cake even if you have never baked a single thing from scratch before in your life. This is the trustworthy dessert that has earned its permanent spot on my counter for decades.
Get The Full Cake Recipe
Print
Hershey’s Perfectly Chocolate Cake
- Total Time: 50 mins
- Yield: 12 servings
- Diet: Vegetarian
Description
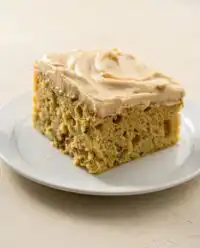
This classic, single-bowl chocolate cake is a beloved pantry-staple recipe that delivers a remarkably tender crumb and rich, nostalgic flavor. Perfect for beginners, it requires no fancy equipment to bake a deeply comforting and professional-quality dessert right at home.
Ingredients
- 2 cups granulated sugar
- 1 3/4 cups all-purpose flour
- 3/4 cup unsweetened cocoa powder
- 1 1/2 teaspoons baking powder
- 1 1/2 teaspoons baking soda
- 1 teaspoon salt
- 2 large eggs
- 1 cup whole milk
- 1/2 cup vegetable oil
- 2 teaspoons vanilla extract
- 1 cup boiling water
- 1/2 cup butter, melted (for frosting)
- 2/3 cup cocoa powder (for frosting)
- 3 cups powdered sugar (for frosting)
- 1/3 cup milk (for frosting)
- 1 teaspoon vanilla extract (for frosting)
Instructions
- Prepare the oven. Preheat your oven to 350 degrees F and grease and flour two nine-inch round baking pans.
- Whisk dry ingredients. Combine the sugar, flour, cocoa, baking powder, baking soda, and salt in a large bowl until uniform.
- Combine wet ingredients. Add the eggs, milk, oil, and vanilla to the dry mixture and beat with a wooden spoon for exactly two minutes.
- Add boiling water. Carefully stir in the boiling water until the batter is thin and well-incorporated.
- Fill the pans. Pour the batter evenly into the prepared pans and tap them on the counter to release trapped air bubbles.
- Bake the layers. Bake for 30 to 35 minutes until a toothpick inserted into the center comes out clean.
- Cool the cake. Rest the cakes in the pans for ten minutes, then carefully invert them onto wire racks to cool completely.
- Frost the cake. Combine the melted butter, cocoa, powdered sugar, milk, and vanilla to create a smooth, spreadable frosting, then apply to the cooled layers.
Notes
- Ensure your baking soda and powder are fresh by testing a pinch in vinegar before starting.
- Use a spoon to fluff and measure your flour to avoid packing it, which can lead to a dry cake.
- Bring your eggs and milk to room temperature to prevent the oil from separating during mixing.
- Stir in an extra teaspoon of milk if your frosting becomes too stiff to spread smoothly over the cake.
- Prep Time: 15 mins
- Cook Time: 35 mins
- Category: Dessert
- Method: Baking
- Cuisine: American
Pantry Basics

Opening your cabinet to find simple, honest ingredients is the first step toward baking a masterpiece. This recipe relies on everyday staples that come together to create a deeply satisfying cocoa flavor and a velvety texture. Let us take a close look at the hardworking ingredients that make this magic happen.
- Hershey’s Cocoa: This plain unsweetened cocoa powder brings that nostalgic, deep chocolate flavor we all grew up loving. It mixes easily with the dry ingredients without needing any melting step.
- Boiling Water: Adding boiling water at the very end melts the cocoa particles and coaxes out their fullest chocolate flavor. It also thins the batter, which is the secret to a remarkably light and tender crumb.
- Vegetable Oil: Unlike butter, vegetable oil remains liquid at room temperature, which guarantees your layers stay soft and moist for days. It is remarkably forgiving and keeps the crumb from drying out.
- Granulated Sugar: This simple sweetener does more than make the cake sweet; it holds onto moisture and keeps the structure light and tender.
- Whole Milk: Standard whole milk provides a rich, comforting flavor and tenderizes the gluten in the flour. It keeps the texture perfectly soft.
- Baking Powder and Baking Soda: This double lift team works together with the milk and cocoa to make the cake rise up beautifully in your oven.
- Eggs: Two standard large eggs at room temperature provide the necessary structure to bind everything together into a cohesive batter.
| Ingredient | Why It Matters |
|---|---|
| Hershey’s Cocoa | Provides the classic, deep chocolate flavor without any fuss |
| Boiling Water | Blooms the cocoa powder and thins the batter for a soft crumb |
| Vegetable Oil | Guarantees the finished cake stays incredibly moist for days |
| Granulated Sugar | Sweetens the layers while locking in essential moisture |
| Whole Milk | Adds richness and works with the leaveners to soften the crumb |
The Simple Method

Step 1: Prepare Your Baking Pans and Oven
Before you touch a single ingredient, heat your oven to 350 degrees F. Take two standard nine-inch round baking pans and grease them thoroughly with a bit of shortening or butter. Sprinkle a small handful of flour into each pan, shaking it around until the bottom and sides are fully coated, then tap out the excess over your sink. This creates a reliable barrier so your baked layers will slide out easily without sticking or tearing.
Step 2: Whisk the Dry Ingredients Together
Find your largest mixing bowl and measure in the granulated sugar, all-purpose flour, cocoa powder, baking powder, baking soda, and salt. Use a simple wire whisk to stir these dry ingredients together until they form a uniform, soft brown mixture. You want to make sure there are no pockets of pure baking soda or cocoa left hiding at the bottom of the bowl. This dry mix should look completely blended and feel light before you introduce any liquids.
Step 3: Mixing Your Hershey’s Perfectly Chocolate Cake Batter
Crack two room-temperature eggs directly into the bowl with your dry ingredients, then pour in the milk, vegetable oil, and vanilla extract. Take a sturdy wooden spoon and beat the mixture on medium speed for exactly two minutes. As you mix, you will see the thick, pale batter pull away from the sides of the bowl and turn a beautiful, glossy chocolate brown. Make sure to scrape the bottom of your bowl once or twice to catch any dry flour that might be trying to stay dry.
Step 4: Stir in the Boiling Water
Carefully measure out one cup of boiling water and pour it slowly into the thick cake batter. Stir the water in gently with your wooden spoon, keeping your hand steady so the hot liquid does not splash out of the bowl. Do not be alarmed when your cake mixture becomes remarkably thin and watery, as this is exactly how it is supposed to look. The heat from the water instantly blooms the cocoa, releasing a rich aroma that will fill your kitchen.
Step 5: Fill Your Prepared Baking Pans
Divide the thin, liquid chocolate batter evenly between your two prepared round baking pans, eye-balling them to make sure they are equal. Since the batter is so thin, you can easily pour it directly from your mixing bowl without needing to scrape much down. Give each pan a very gentle tap on your kitchen counter to help any trapped air bubbles rise to the surface and pop. This simple step guarantees your finished layers will rise evenly with a flat, beautiful top.
Step 6: Bake the Layers to Perfection
Place both pans carefully onto the middle rack of your preheated oven, making sure they do not touch each other or the oven walls. Bake the layers for 30 to 35 minutes, keeping the oven door closed so you do not let the warm air escape. You will know they are done when the edges start to pull away slightly from the sides of the pans and a wooden toothpick inserted into the center comes out clean. The kitchen will smell unusually rich and sweet when these layers are ready to come out.
Step 7: Cool the Cake Layers Slowly
Remove the pans from the oven and set them gently onto wire cooling racks to rest for exactly ten minutes. During this brief window, the delicate hot cake will firm up slightly, making it safe to handle without falling apart. Run a thin butter knife carefully around the inside edge of each pan to ensure nothing is sticking. Flip the pans over to release the layers onto the wire racks, then let them cool completely to room temperature before you think about frosting them.
Step 8: Prepare the Rich Chocolate Frosting
While your layers are cooling, melt half a cup of butter in a saucepan, then stir in the cocoa powder until it forms a smooth paste. Alternately add the powdered sugar and milk to the chocolate mixture, beating with a spoon until it reaches a thick, spreadable consistency. Stir in the vanilla extract at the very end to round out the rich sweetness. This classic frosting should look glossy, thick, and hold its shape beautifully when you run a spoon through it.
Plain-Kitchen Notes

When you are baking without fancy equipment, success comes down to understanding the simple behavior of your ingredients. One of the best habits you can build is checking your baking soda and baking powder for freshness by dropping a little pinch into water or vinegar. If they do not bubble up instantly, it is time to replace them, as stale leaveners are the primary reason a simple chocolate cake fails to rise properly.
If your cake layers turn out with a high dome or cracked tops, it usually means your oven is running too hot. You can easily resolve this by purchasing a simple, inexpensive oven thermometer to place on your center rack. Knowing the actual temperature inside your oven keeps your baked goods from baking too fast on the outside while remaining wet on the inside.
Always make sure your eggs and milk are at room temperature before you start mixing the batter. Cold ingredients from the refrigerator will chill the oil in the bowl, which can cause the batter to separate and bake unevenly. Setting your eggs in a bowl of warm tap water for five minutes is a quick, safe way to take the chill off.
For the best results, use a light hand when measuring your flour. Scooping your measuring cup directly into the bag packs the flour down, which leads to a heavy, dry cake. Instead, use a spoon to gently fluff your flour, spoon it into your measuring cup, and sweep the excess off with the flat back of a knife.
If your frosting appears too thick or stiff to spread easily over the delicate layers, do not panic. Stir in an extra splash of milk, one teaspoon at a time, until the mixture softens to a spreadable consistency. Taking your time with this step prevents you from accidentally tearing the tender crumb of your homemade chocolate cake as you frost it.
To get more detailed advice on improving your baking temperatures and techniques, you can read this detailed baking guide from experienced home bakers who have tested this classic dessert in many different kitchens.
Frequently Asked Questions
What makes Hershey’s chocolate cake so moist?
The combination of vegetable oil and boiling water is the secret behind the remarkable moisture in this dessert. Unlike butter, vegetable oil remains a liquid at room temperature, which prevents the cake from drying out. The boiling water in the batter also ensures a very delicate and tender crumb structure.
Why is the cake batter so thin?
This cake batter is remarkably thin because of the high liquid content, especially the addition of a full cup of boiling water. This thin consistency is completely normal and is exactly what allows the cocoa to bloom fully. It also helps create an incredibly light, airy texture once it rises in the hot oven.
Can I substitute boiling water with hot coffee?
Yes, substituting boiling water with hot brewed coffee is a highly recommended variation. The heat of the coffee blooms the cocoa powder in the exact same way, while the coffee flavor acts as a natural enhancer for the chocolate. Your finished cake will not taste like coffee, but it will have a much deeper, richer chocolate flavor.
What kind of cocoa powder should I use?
You should use standard unsweetened natural cocoa powder, such as classic Hershey’s Cocoa, for this recipe. Avoid using Dutch-process cocoa powder, as it has a different acidity level and will not react properly with the baking powder and baking soda. Stick to the classic pantry staple for the best rise and flavor.
What frosting goes best with this recipe?
The classic Hershey’s Perfectly Chocolate Chocolate Frosting included in the recipe is the absolute best match for these layers. Its rich, buttery cocoa flavor complements the tender crumb without overpowering it. However, a simple vanilla buttercream or a rich cream cheese frosting also makes a wonderful alternative.
Can I make this cake ahead of time?
This is the kind of cake that actually tastes better the next day, making it perfect for preparing ahead of time. You can bake the layers, wrap them tightly in plastic wrap once cooled, and store them at room temperature overnight. Frost the cake the next morning, and it will remain incredibly soft and delicious for your gathering.
Easy Switch-Ups
While the classic version of this dessert is hard to beat, there are times when you might want to try something a little different. One simple way to change things up is to substitute the boiling water with hot, freshly brewed black coffee. The coffee does not make the cake taste like coffee; instead, it deepens the cocoa flavor, giving you a rich taste that is very similar to a classic chocolate cake recipe from a fancy bakery.
You can also easily bake this versatile batter in a standard 9×13-inch rectangular metal pan instead of round pans. This single-layer sheet cake is perfect for carrying to church potlucks, family picnics, or casual Sunday dinners. Just increase the baking time slightly to about 35 to 40 minutes, and let it cool completely right in the pan before spreading the rich frosting over the top.
Another wonderful option is to stir a half-cup of semi-sweet chocolate chips directly into the batter just before pouring it into your baking pans. The chips will sink slightly as the cake bakes, creating pockets of rich, melted chocolate throughout the tender crumb. This simple addition adds a lovely texture that kids and adults alike will love.
At the Kitchen Table
Serving a fresh cake is all about creating a warm, welcoming moment for whoever happens to walk through your front door. For a truly classic experience, place a generous slice of this cake on a small dessert plate alongside a tall glass of cold milk or a steaming mug of hot black coffee. The bitter notes of the coffee cut through the sweet chocolate frosting, making each bite feel delightfully balanced.
If you are serving this at a family gathering or a Sunday dinner, try presenting the whole cake on an old-fashioned glass stand under a clear dome. There is something incredibly comforting about seeing a beautiful chocolate layer cake waiting on the counter for everyone to enjoy. It sets a relaxed, hospitable tone for the entire afternoon, inviting people to sit down and stay a while.
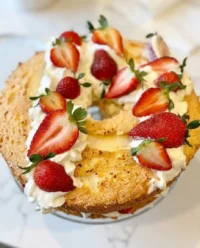
During the warm summer months, you can serve individual slices with a handful of fresh red raspberries or sliced strawberries on the side. The bright, slightly tart flavor of fresh berries cuts through the rich chocolate, adding a lovely freshness to your plate. A simple scoop of homemade vanilla bean ice cream melting slowly against the side of a warm slice is another simple way to bring joy to your table.

Keep This One Close
There is a good reason this simple recipe has been passed down through generations of home bakers. It does not demand perfection, expensive equipment, or rare ingredients to yield a dessert that feels like a warm hug. When you bake this cake, you are participating in a long, beautiful tradition of simple comfort from the heart.
I hope you will write this recipe down on a blank index card and tuck it into your own family box. If you find yourself craving a slice of classic devils food cake but want something simpler to whip up on a quiet Sunday afternoon, this reliable favorite will always be there to guide you.
Please let me know how your cake turns out by leaving a comment below, or share your beautiful kitchen photos with our baking community. You can also connect with us on Pinterest, follow our latest home-baked creations on Facebook, catch quick kitchen tips on TikTok, or join our warm circle on Telegram for more daily comfort food inspiration.

