When your clock strikes nine on a quiet weekday evening and that deep craving for a slice of sweet, tender cake hits, you do not need to pull out a mountain of heavy equipment.

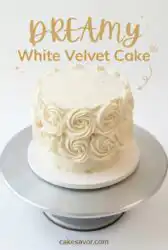
This beautiful White Velvet Cake is our answer to the ideal weeknight baking project because it uses pantry staples you likely already have on hand. Instead of fussy steps and complicated instructions, we rely on a straightforward mixing technique that creates a remarkably soft, melt-in-your-mouth texture. You will love how the layers bake up flat and even without the need for fancy pan strips or special kitchen tools. Best of all, the cleanup is so fast you can have your kitchen tidy before the oven timer even goes off. Baking a cake should always bring joy to your evening, and this recipe delivers that cozy feeling with minimal effort.
Why This White Velvet Cake Is a Keeper
Prep: 10 min · Serves: 24 · Difficulty: Easy
- No fancy cake decorating equipment required.
- Tender crumb comes from real buttermilk.
- Soft layers bake flat every time.
- Ideal for quick weeknight baking sessions.
- One bowl baking makes cleanup a breeze.
There is something wonderfully comforting about a baking project that does not require you to clear your entire Saturday schedule. This recipe is designed specifically for busy bakers who still want bakery-quality results without the fuss of complicated steps. It fits beautifully into a quiet evening at home, giving you a delicious reward with very little hands-on effort.
If you have been searching for a companion to your favorite classic vanilla butter cake, this tender crumb will win you over immediately. It uses standard pantry ingredients to create a dessert that is elegant enough for a special party but easy enough for a casual Tuesday night. This is the sweet reward you deserve after a long day of work.
Get The Full Cake Recipe
Print
White Velvet Cake
- Total Time: 1 hour 5 mins
- Yield: 24 servings
- Diet: Vegetarian
Description
This White Velvet Cake features an exceptionally tender, fine crumb and a delicate flavor profile achieved through the reverse creaming method. It is a perfect weeknight project that uses pantry staples to create a sophisticated, bakery-quality dessert with minimal effort.
Ingredients
- 2 1/2 cups cake flour
- 1 3/4 cups granulated sugar
- 1 tsp salt
- 1 tbsp baking powder
- 1/2 tsp baking soda
- 1 cup buttermilk, divided
- 1/2 cup vegetable oil
- 6 large egg whites
- 1 tsp vanilla extract
- 3/4 cup unsalted butter, softened
- 1/2 cup whole milk
Instructions
- Prepare oven and pans. Preheat oven to 335°F and line two 8-inch round cake pans with parchment paper, coating the sides with non-stick spray.
- Combine dry base. Whisk cake flour, sugar, salt, baking powder, and baking soda in a stand mixer bowl on low for ten seconds.
- Measure liquid components. Whisk egg whites, vanilla, and a portion of buttermilk in one bowl; combine remaining buttermilk and oil in another container.
- Blend butter in. Add softened butter to the dry ingredients and mix on low until the texture resembles coarse, wet sand.
- Mix the batter. Pour the buttermilk and oil mixture into the dry base and beat on medium for two minutes until smooth.
- Add egg whites. Gradually incorporate the egg white mixture in three additions, scraping the sides of the bowl to ensure full integration.
- Bake the layers. Divide batter into pans and bake for 35 to 40 minutes until a toothpick inserted into the center comes out clean.
- Tap and cool. Tap the pans firmly on the counter immediately after removing from the oven, then let the cakes rest in pans for ten minutes before cooling on a wire rack.
- Toast flour mixture. Whisk flour and sugar in a saucepan over medium heat for two minutes, then gradually stir in milk until it thickens into a pudding.
- Whip the frosting. Beat softened butter until fluffy, then gradually add the cooled flour pudding and vanilla until the buttercream is smooth and satiny.
Notes
- Use a digital scale for measuring flour to ensure the cake does not turn out dry or dense.
- Bring all refrigerator-chilled ingredients to room temperature before starting to prevent the batter from curdling.
- Chill your baked cake layers for at least two hours or overnight to make the crumb sturdier for easier frosting.
- Always use an oven thermometer to ensure your oven hits the precise 335°F required for an even rise.
- Prep Time: 25 mins
- Cook Time: 40 mins
- Category: Dessert
- Method: Baking
- Cuisine: American
Pantry Lineup

Gathering your ingredients beforehand makes the baking process run smoothly and keeps your kitchen peaceful. These simple items are easily found in any local grocery store or your home pantry cabinet, meaning you can start baking whenever the craving strikes. Taking a few moments to measure everything accurately by weight will guarantee a successful outcome.
- Cake Flour: This low-protein flour creates the delicate, airy structure that gives the layers their signature soft bite. Unlike standard all-purpose flour, it keeps the crumb remarkably light and prevents the cake from becoming tough or chewy.
- Granulated Sugar: It sweetens the batter while helping to keep the crumb tender by holding onto moisture during the baking process. It also aids in caramelization, giving the cake a subtle depth of flavor that balances the rich frosting.
- Buttermilk: The natural acidity reacts with the rising agents to yield an extraordinarily soft and velvety texture. It also adds a very subtle tang that cuts through the sweetness of the sugar, creating a balanced flavor profile.
- Egg Whites: Using only the whites keeps the crumb bright white and prevents the batter from turning yellow. It also contributes to the light, cloud-like texture of the cake layers by providing structural support without heavy fats.
- Vegetable Oil: Adding a splash of oil keeps the finished layers wonderfully moist even if you bake them a day in advance. It works alongside the butter to make sure every bite melts in your mouth.
- Unsalted Butter: Creaming softened butter into the dry ingredients adds a rich, comforting flavor that defines classic baking. It provides the necessary fat to coat the flour proteins, which is key to the reverse creaming method.
- Baking Powder and Soda: These two leaveners work together to give the cake its gentle rise and airy feel. They react with the buttermilk to create tiny air pockets, ensuring the layers bake up light and fluffy.
| Ingredient | Why It Matters |
|---|---|
| Cake Flour | Establishes a delicate and light crumb structure by reducing gluten development. |
| Buttermilk | Delivers essential moisture and activates the rising agents for a velvet texture. |
| Egg Whites | Maintains a clean white color while providing a lightweight structural base. |
| Softened Butter | Infuses traditional rich dairy flavor and tenderizes the baked layers. |
| Vegetable Oil | Keeps the crumb extremely moist and soft for several days after baking. |
From Bowl to Oven

Step 1: Prep Your Oven and Pans
Before you start mixing, set your oven to 335ºF to guarantee a gentle, even heat that prevents the edges of your cake from browning too quickly. Line two eight-inch round cake pans with parchment paper circles and coat the sides thoroughly with non-stick baking spray. Having your pans fully prepared beforehand prevents the cake batter from sitting on the counter and losing its lift while you search for supplies. You will feel much more relaxed when everything is ready to go.
Step 2: Combine the Dry Base
Whisk the cake flour, granulated sugar, salt, baking powder, and baking soda directly in the bowl of your stand mixer. Run the machine on low speed with the paddle attachment for ten seconds to distribute the rising agents evenly through the flour. You should see a uniform, powdery mixture that is completely free of large lumps. This quick step guarantees that every slice of your cake rises flawlessly even.
Step 3: Measure the Liquid Ingredients
Measure your buttermilk, vegetable oil, egg whites, and vanilla extract into separate clean containers using a digital scale. Whisk the egg whites, vanilla, and a portion of the buttermilk together in a medium bowl until the mixture looks frothy and slightly pale. In a separate small container, stir the remaining buttermilk and the vegetable oil together until they are fully integrated. Keeping these liquids separate at first helps them incorporate smoothly into the batter later.
Step 4: Blend the Butter into Flour
Drop the softened unsalted butter into your dry ingredients and turn your mixer on its lowest speed setting. Let the paddle attachment work the butter into the flour for about thirty seconds until the mixture resembles coarse, wet sand with no large butter chunks visible. This classic reverse creaming method coats the flour proteins in fat, which limits gluten development and guarantees a tender bite. The mixture will look slightly damp and smell wonderfully rich.
Step 5: Mix the White Velvet Cake Batter
Pour the buttermilk and oil mixture into your dry ingredients and stir on low speed until the flour is completely moistened. Increase the mixer speed to medium and let it run for two full minutes to develop the essential structure of the batter. You will notice the batter become pale, thick, and beautifully smooth as it whips in the bowl. If you skip this timing, your cake layers might collapse in the center while baking.
Step 6: Add the Egg Whites Gradually
Reduce the mixer speed back to low and pour in your egg white mixture in three separate additions, waiting fifteen seconds between each pour. Use a flexible spatula to scrape down the bottom and sides of the bowl to gather any pockets of unmixed flour. The final batter should look thick, luxurious, and feel completely uniform when you stir it by hand. It will have a lovely vanilla aroma that fills your kitchen.
Step 7: Bake to Golden Perfection
Divide the smooth batter evenly between your two prepared baking pans, filling them about three-quarters of the way to the top. Slide the pans onto the center rack of your preheated oven and bake for thirty-five to forty minutes. Watch for the top to turn a very pale golden color and check that a wooden toothpick inserted into the center comes out clean. The sweet scent of vanilla will let you know the baking is almost complete.
Step 8: Tap and Cool the Layers
Remove the hot pans from the oven and immediately tap each pan firmly once on your kitchen counter to release trapped steam. This quick tap prevents the delicate layers from shrinking away from the sides as they cool. Let the cakes rest in their pans on a wire rack for ten minutes before carefully turning them out to cool completely. The layers will feel remarkably soft and springy to the touch.
Step 9: Toast the Flour for Frosting
Combine your flour and sugar in a medium saucepan over medium heat, whisking constantly for two minutes. This dry toasting step is crucial because it cooks out the raw flour taste, leaving you with a clean flavor base. Slowly pour in the whole milk while whisking vigorously to prevent any lumps from forming in the pan. Continue cooking until the mixture thickens into a dense, pudding-like consistency that easily coats the back of a spoon.
Step 10: Whip the Silky Buttercream
Beat your room-temperature unsalted butter in a clean mixer bowl until it looks pale, airy, and fluffy. Add the cooled flour pudding one tablespoon at a time, keeping the mixer running on medium-high speed to guarantee a smooth texture. Once all the pudding is incorporated, stir in the salt and vanilla extract until the frosting is creamy and ready to spread. It will have a beautiful, satin-like shine and a cloud-like texture.
Easy-Baker Notes

Always weigh your dry ingredients with a digital kitchen scale instead of using standard measuring cups. This small habit makes a massive difference in your baking, especially when compared to a traditional vanilla cake recipe where flour volume can vary wildly depending on how it is scooped. Accurate weights guarantee that your crumb remains wonderfully soft and consistent every single time you bake.
For the best velvet texture, follow the reverse creaming method closely rather than traditional creaming. You can read more about this technique in this detailed original reverse creaming method guide which explains how fat coats the flour to block gluten development. This professional approach is what gives the layers their signature delicate, melt-in-your-mouth feel.
If your cake layers turn out dense and heavy instead of light and fluffy, you likely used cold ingredients. Make sure your buttermilk and egg whites are truly at room temperature before mixing, or they will cause the butter to curdle and ruin the rise. Letting your ingredients sit on the counter for an hour beforehand is the easiest way to prevent this common mistake.
Let your baked cake layers chill in the refrigerator for at least two hours before you begin frosting them. Cold cake is much sturdier and sheds far fewer crumbs, making the decorating process wonderfully clean and simple. You can even wrap the cooled layers in plastic wrap and freeze them overnight to lock in their natural moisture.
Take your time when cooking the flour and sugar mixture for your homemade ermine frosting. Letting the flour toast dry in the saucepan for two minutes removes the raw starch flavor, leaving you with a clean, milky taste. Whisking continuously during this stage prevents scorching and guarantees your custard base remains perfectly smooth.
Keep a close eye on your oven temperature and use an inexpensive oven thermometer to verify its accuracy. Many ovens run hotter or cooler than the digital display shows, which can lead to overbaked, dry edges. Baking at a true 335ºF allows the cake to rise evenly without forming a dome or browning too much on the outside.
Frequently Asked Questions
What is White Velvet Cake vs. White Cake?
While traditional white cake relies on whipped egg whites for a light structure, this velvet version includes buttermilk and a unique mixing method. The addition of acid breaks down the gluten, creating a crumb that is far softer and more tender than standard vanilla layers. It offers a rich, melt-in-your-mouth feel that ordinary white cake cannot match.
What is the Difference Between White Velvet Cake and Red Velvet Cake?
The primary difference lies in the cocoa powder and food coloring used in the red version. Both recipes utilize buttermilk to create a soft texture, but this recipe focuses entirely on clean vanilla flavor. The white version has no cocoa, allowing the sweet dairy notes to shine through beautifully.
Why is My White Velvet Cake Turning Yellow?
This discoloration usually happens if you use whole eggs instead of pure egg whites. Egg yolks contain natural yellow fats that will tint your batter. Additionally, using dark vanilla extract instead of clear vanilla can add a warm amber hue to the finished layers.
What Ingredients Make White Velvet Cake Moist?
The combination of buttermilk and vegetable oil keeps this crumb exceptionally soft. While butter provides a rich flavor, the oil remains liquid at room temperature to prevent the cake from drying out. The acidity in the buttermilk also tenderizes the flour proteins during baking.
What Frosting Goes Best with White Velvet Cake?
A traditional cooked flour frosting, also known as ermine frosting, is the classic pairing because of its silky texture and balanced sweetness. Cream cheese frosting is another excellent choice if you prefer a slight tang. Standard American buttercream can also work, though it is often much sweeter and can overwhelm the delicate crumb.
Can I freeze these cake layers ahead of time?
You can easily freeze these layers by wrapping them tightly in plastic wrap once they have cooled completely. Store them in the freezer for up to three months before assembling. Thaw the wrapped layers on your kitchen counter so they retain their natural moisture.
Should I use room temperature ingredients for this recipe?
Letting your dairy and eggs reach room temperature is absolutely critical for this batter. Cold ingredients will cause the batter to curdle and separate, resulting in an uneven bake and a dense texture. Simply set your ingredients on the counter an hour before you plan to start baking.
Does this cake work well for stacking and decorating?
Using this sturdy yet tender recipe makes it excellent for stacked celebration cakes. The layers hold their shape beautifully under the weight of frosting without compressing. Just be sure to chill the layers before assembling to make handling them much easier.
Simple Swaps
You can easily brighten up this classic dessert by adding the fresh zest of a lemon or orange directly to your sugar before mixing. This simple addition infuses the entire crumb with a clean, bright aroma that pairs beautifully with the sweet frosting. For another citrus treat, you might also enjoy our refreshing lemon velvet cake on a warm spring afternoon. It is a fantastic option for sunny weekend gatherings.
Swap out one teaspoon of the vanilla extract for a half teaspoon of pure almond extract in both the batter and the buttercream. This quick change gives the layers a warm, nutty aroma reminiscent of classic wedding cake. It is a simple way to make a Tuesday night bake feel very special without adding any extra steps or dirtying another bowl. Your kitchen will smell like an upscale bakery as it bakes.
Gently press fresh raspberries or blueberries into the batter once you have poured it into the baking pans. The berries will soften as they bake, creating pockets of juicy tartness that cut through the rich cooked frosting. Be sure to use fresh berries rather than frozen ones to prevent the juices from bleeding and turning your pale batter purple. This variation adds a gorgeous pop of color to every slice.
Slice & Serve
This elegant dessert is wonderful for celebrating birthdays, bridal showers, or cozy weekend gatherings with family. For a beautiful dessert table spread, place this cake alongside a traditional red velvet cake to give your guests a gorgeous contrast of colors and flavors. The white layers look striking when sliced, showing off their fine crumb against the creamy frosting.
Serve each slice with a handful of fresh red berries like raspberries or strawberries to balance the sweet vanilla notes. A hot cup of black coffee or a delicate earl grey tea makes the excellent drink pairing for an afternoon treat. You can also add a dollop of lightly whipped cream to each plate for an extra touch of indulgence.
A simple presentation often looks the most beautiful on a casual afternoon. Arrange the cake on a vintage pedestal stand in the center of your table to let its clean design shine. Your guests will love the contrast between the silky cooked frosting and the soft, velvet-like cake underneath.

Bake It Soon
Baking should always feel like a comforting ritual rather than a stressful chore. This simple recipe proves that you do not need hours of free time or a sink full of dirty dishes to create something truly beautiful. The next time you want to treat your family to a sweet surprise, head to your kitchen and whip up these delicate layers.
If you enjoyed this baking project, you might also love making our decadent red velvet cheesecake for your next big celebration. Sharing your baking creations with friends is half the fun of being a home baker. It brings people together over something homemade and delicious.
Please share your beautiful cakes with us online and let us know how your baking day turned out. Follow us on Pinterest, check out our updates on Facebook, and watch our quick tutorials on TikTok for more kitchen inspiration. We love seeing your creations bring joy to your home.
