You do not need a fancy stand mixer, a special springform pan, or a trip to a specialty grocery store to bake this comforting treat.

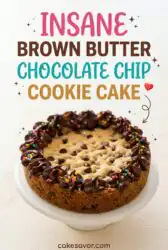
Gathering around a warm table with family is made even better with a fresh slice of this Brown Butter Chocolate Chip Cookie Cake. It combines the deep, nutty flavor of toasted butter with a soft, rich crumb that stays tender for days. There is no need for complicated baking techniques here, only honest ingredients you likely have in your pantry right now. This is a cake meant to sit on your counter under a glass dome, ready for whoever happens to drop by for a visit.
What Makes This Brown Butter Chocolate Chip Cookie Cake Comfort
Prep: 20 min · Serves: 8 · Difficulty: Easy
- Browned butter adds a rich, nutty flavor.
- Soft and chewy texture in every single bite.
- Requires only one bowl and a wooden spoon.
- Tastes even better the very next morning.
- Keeps wonderfully on the counter under a dome.
This classic cookie cake is built for sharing with the folks you love most. It takes very little effort to bring together, yet it brings immense comfort to everyone at your table. The buttery edges and chewy middle make it a true crowd-pleaser.
This is the honest recipe your family will request every single Sunday afternoon.
Get The Full Cake Recipe
Print
Brown Butter Chocolate Chip Cookie Cake
- Total Time: 45 mins
- Yield: 8 servings
Description
This decadent cookie cake features a rich, nutty brown butter base and a soft, chewy interior studded with melty chocolate chips. Perfect for any gathering, this simple one-bowl dessert stays tender for days and is easily customized with your favorite additions.
Ingredients
- 1 cup unsalted butter
- 1 cup packed brown sugar
- 1/2 cup granulated sugar
- 1 large egg, room temperature
- 2 teaspoons vanilla extract
- 2 cups all-purpose flour
- 1 teaspoon baking soda
- 1/2 teaspoon salt
- 1 1/2 cups semi-sweet chocolate chips
Instructions
- Toast the butter. Melt butter in a light-colored saucepan over medium heat, swirling until browned and fragrant, then pour into a heatproof bowl to cool.
- Prepare the pan. Preheat oven to 350°F and grease a 9-inch round cake pan or line it with parchment paper.
- Mix dry ingredients. In a medium bowl, whisk together the flour, baking soda, and salt until well combined.
- Combine wet base. Stir the cooled browned butter with brown and granulated sugars in a large bowl until the mixture is smooth.
- Add eggs and vanilla. Beat in the egg and vanilla extract until the mixture is smooth and forms a shiny ribbon when lifted.
- Incorporate flour mixture. Gradually stir the dry ingredients into the wet mixture until just combined, taking care not to overwork the dough.
- Fold in chocolate. Fold in the chocolate chips by hand, reserving a small handful to sprinkle on top before pressing the dough into the prepared pan.
- Bake the cake. Bake for 20 to 25 minutes until the edges are golden brown and the center is set, then cool thoroughly before serving.
Notes
- Ensure the browned butter has cooled to room temperature to prevent scrambling the egg during mixing.
- Use room temperature eggs to keep the butter from seizing and creating an uneven dough texture.
- Measure flour by spooning it into a measuring cup and leveling it off rather than scooping directly from the bag.
- Allow the cake to cool fully in the pan to ensure it sets properly and does not crumble when sliced.
- Prep Time: 20 mins
- Cook Time: 25 mins
- Category: Dessert
- Method: Baking
- Cuisine: American
Simple Ingredients

Baking a comforting dessert does not require a long list of unusual items. You only need standard staples that are likely sitting in your kitchen right now. Let us take a look at the simple components that give this sweet treat its deep, traditional flavor.
- Brown Butter: This is the heart of the recipe, providing a rich, toasty flavor that regular butter cannot match. Heating it gently on the stove top coaxes out those warm, nutty aromas that make the cake smell like an old-fashioned bakery.
- Brown Sugar: We use a generous amount of packed brown sugar to create a moist, chewy crumb. The molasses inside the sugar reacts beautifully with the other ingredients, yielding a soft center that stays tender for days.
- Granulated Sugar: This helps to crisp the edges of the cake ever so slightly. It balances the moisture from the brown sugar, giving you those beloved contrasting textures between the center and the outside crust.
- All-Purpose Flour: A simple, dependable flour acts as the sturdy foundation for our dough. It keeps the structure of the giant cookie sound, making sure it holds together when you slice it for your guests.
- Baking Soda: This leavening agent is essential for giving the cake a tiny lift. It keeps the crumb from becoming too dense or heavy, while still allowing the center to remain wonderfully dense and fudgy.
- Semi-Sweet Chocolate Chips: Standard semi-sweet chips provide classic chocolate pockets throughout the dough. They melt gently during the bake, creating beautiful pools of warm chocolate that contrast with the rich, buttery crumb.
- Vanilla Extract: Real vanilla extract ties all these cozy elements together with its comforting aroma. It rounds out the sweetness of the sugars and highlights the deep, caramelized notes of our browned butter.
| Ingredient | Why It Matters |
|---|---|
| Brown Butter | Creates a deep, nutty, caramelized background flavor that defines the cake. |
| Brown Sugar | Guarantees a dense, chewy, and soft center that does not dry out quickly. |
| Flour & Baking Soda | Provide structural support and a slight lift to keep the crumb tender. |
| Chocolate Chips | Offer sweet, melty pockets of chocolate in every single forkful. |
| Vanilla Extract | Unifies the sweet and buttery notes with a familiar, warm fragrance. |
The Simple Method

Step 1: Toast Your Butter on the Stove
Start by melting your unsalted butter in a light-colored saucepan over medium heat. Swirl the pan occasionally as the butter melts, foams, and begins to crackle gently. Watch it closely as the crackling subsides and little golden-brown specks begin to settle at the bottom of the pan. Once you smell a rich, nutty fragrance, immediately pour the golden liquid into a heatproof bowl to cool for a few minutes.
Step 2: Prepare Your Pan and Oven
Preheat your oven to 350 degrees Fahrenheit so it is nice and warm when the dough is ready. Grease a standard nine-inch round cake pan thoroughly with a bit of butter or non-stick baking spray. Place a round piece of parchment paper at the bottom of the pan if you want extra security when removing the cake later. This preparation keeps the edges from sticking and helps the giant cookie release cleanly after it has cooled.
Step 3: Mix the Dry Ingredients Together
In a medium-sized bowl, combine your all-purpose flour, baking soda, and salt. Use a basic hand whisk to stir these dry ingredients together until they are evenly distributed. Sifting is not strictly necessary, but a quick whisk guarantees there are no pockets of baking soda hidden in the flour. Set this dry mixture aside so it is ready to join the wet ingredients shortly.
Step 4: Beat the Butter and Sugars
Pour your cooled brown butter into a large mixing bowl and add both the brown and granulated sugars. Use a wooden spoon or a basic hand mixer to stir the mixture until it is smooth and well combined. Avoid beating it until it becomes pale and fluffy, as adding too much air will make your cookie cake dry and crumbly. You want a thick, wet-sand consistency that will keep the final treat dense and chewy.
Step 5: Incorporate the Wet Ingredients and Flour
Crack your room-temperature egg into the buttery sugar mixture and pour in the vanilla extract. Beat the ingredients steadily until they form a smooth, shiny ribbon when you lift your spoon. Gradually pour in your dry ingredients and stir gently, mixing only until the flour disappears into the dough. Overworking the dough at this stage can make the crumb tough, so keep your touch light and patient.
Step 6: Fold in Your Chocolate Chips
Toss your semi-sweet chocolate chips into the thick dough. Use a sturdy spatula or your wooden spoon to fold them in by hand, making sure they are distributed evenly throughout the mixture. The dough will feel heavy, thick, and very fragrant with the aroma of caramelized sugar and warm butter. Save a small handful of extra chocolate chips to sprinkle on top of the dough once it is in the pan.
Step 7: Press Your Brown Butter Chocolate Chip Cookie Cake Into the Pan
Transfer the thick dough into your prepared nine-inch round pan. Use your clean fingers or the back of a measuring cup to press the mixture into an even, flat layer across the entire bottom. Scatter your reserved chocolate chips over the surface, pressing them in gently so they stay in place. Slide the pan onto the middle rack of your warm oven and bake for twenty to twenty-five minutes until the edges are golden brown and the center looks dry.
Little Things That Matter

Letting your browned butter cool slightly before mixing it with the sugars is highly recommended. If you pour boiling hot butter directly onto the sugars and egg, it can melt the sugars completely and scramble your egg. Let the toasted butter sit on the counter for about ten minutes until it is warm to the touch but no longer steaming. This simple pause helps protect the texture of your dough.
Make sure your egg is truly at room temperature before you begin mixing. A cold egg will cause the melted butter to seize and harden in the bowl, creating an uneven dough. If you forgot to pull your egg out of the refrigerator ahead of time, place it in a bowl of warm water for five minutes. This quick trick brings the egg up to temperature without any fuss, preserving the smooth consistency of your brown butter fresh peach cake story baking routine.
If your cookie cake sinks in the middle, here is why and how to fix it. This common issue usually happens when the oven temperature is slightly too low, or if the cake is pulled out of the oven too early. To make sure your oven is correct, check the temperature with an inexpensive thermometer to ensure it reads a true 350 degrees. If the center still looks pale and wet when the timer goes off, let it bake for an extra three to five minutes until the top is dry and lightly golden.
Measuring your flour correctly is another step that keeps your bake reliable. Scooping flour directly out of the bag with a measuring cup packs it down, adding too much flour to your dough and making the cake dry. Instead, fluff your flour with a spoon, scoop it gently into your measuring cup, and level it off with the back of a butter knife. This simple method guarantees a tender, chewy crumb every single time you bake, much like these helpful tips for baking a cookie cake evenly.
Do not rush to remove the baked cookie from its pan. It continues to cook and firm up from the residual heat of the hot pan long after you pull it from the oven. If you attempt to transfer it to a serving plate while it is still warm, it will likely crumble and break. Let the pan rest on a wire cooling rack for at least forty-five minutes before trying to invert it.
If you want a beautiful presentation without fancy tools, use a simple plastic food storage bag to pipe your frosting. Spoon your homemade chocolate buttercream into the bag, seal it tightly, and snip a small corner off with scissors. This basic technique allows you to squeeze pretty borders onto your cooled dessert without needing professional piping tips. It is an easy way to make the cake look special for family birthdays or weekend gatherings.
Frequently Asked Questions
What does browning the butter do?
Browning butter toasts the milk solids in the butter, creating tiny golden specks with a deep, nutty flavor. It changes the flavor profile from simple sweetness to a rich, caramelized depth that makes your cookie cake taste wonderfully homemade. It is an easy step that transforms a basic dessert into something truly special.
Should I use brown sugar or white sugar?
This recipe uses a combination of both sugars to achieve the ideal chewy texture. Brown sugar contains molasses, which adds moisture and creates a soft, tender center. White sugar helps the edges crisp up beautifully in the pan, giving you the best of both worlds.
Can I use chocolate chips instead of chopped chocolate?
Yes, chocolate chips are the traditional choice for this recipe and work beautifully. They hold their shape well during baking, providing neat little pockets of rich chocolate throughout the cake. Chopped chocolate can also be used if you prefer larger, irregular pools of melted chocolate.
Do I need to chill the dough?
There is no need to chill this dough before baking, which saves you precious time. Because we press the dough directly into a cake pan, we do not have to worry about cookies spreading too much on a flat sheet. You can go straight from mixing your ingredients to pressing them into the pan.
Why did my cookie cake sink in the middle?
A sunken center is usually caused by under-baking or a slightly cool oven. The middle of a giant cookie takes longer to cook than the edges, so it needs those full twenty to twenty-five minutes. Make sure the surface looks dry and lightly browned before you pull it out of the oven.
What is the best pan to use?
A standard nine-inch round metal cake pan is the absolute best option for this recipe. Metal pans conduct heat evenly, which helps the edges brown beautifully while keeping the center soft. A glass dish can be used, but you may need to lower the oven temperature slightly to prevent the edges from burning.
How do I store a cookie cake?
Keep the cake under a glass dome or in an airtight container at room temperature for up to four days. It stays remarkably soft and chewy, and some folks believe it tastes even better the next day. If you want to keep it longer, you can wrap individual slices in plastic wrap and freeze them.
Family Variations
You can easily stir in a half-cup of chopped pecans or walnuts to give this dessert a cozy crunch. Toasting the nuts lightly in a dry skillet before folding them into the dough pairs wonderfully with the caramelized notes of the butter. This addition brings a traditional Southern texture that feels like it came straight from a family recipe card.
For a fun twist on the classic chocolate pockets, try replacing half of the chocolate chips with butterscotch chips or white chocolate chunks. The sweet, buttery flavor of butterscotch highlights the deep, toasted butter base beautifully. If you enjoy experimenting with different baking styles, you might also like trying cake mix cookies for a quick afternoon project with grandchildren.
Adding a pinch of cinnamon or nutmeg to the flour mixture is a wonderful option for the holiday season. These warm spices complement the rich brown sugar and toasted butter, filling your kitchen with a comforting, festive aroma as the cake bakes. It is an effortless way to transform a simple year-round dessert into a memorable holiday treat for your family table.
At the Kitchen Table
Serving this warm treat on a quiet Sunday afternoon is one of the simple pleasures of baking. Place the cake on a sturdy glass pedestal or a simple wooden board in the middle of the kitchen table. Let everyone cut their own thick slices with a sharp knife, revealing the melty chocolate pools and tender crumb inside. It is the perfect centerpiece for a relaxed family gathering where laughter is loud and stories are shared.
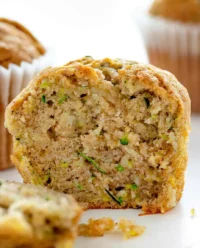
A tall glass of ice-cold milk is the traditional companion for this rich dessert. For the adults in the family, a hot cup of black coffee pairs beautifully with the caramelized, nutty flavors of the browned butter. If you are looking for other comforting treats to share during these sweet family moments, these chocolate chip zucchini muffins story memories offer another classic option that everyone will enjoy.
If you want to dress up a slice for a special celebration, add a simple scoop of homemade vanilla bean ice cream right on top. The cold ice cream melts slowly into the warm cookie cake, creating a decadent sauce that is hard to resist. A light dusting of powdered sugar or a few extra sprinkles around the border can also add a festive touch without requiring any fancy equipment or hours of decoration.

Keep This One Close
Baking does not have to be complicated to bring joy to your home. This simple dessert relies on basic pantry ingredients and straightforward steps to deliver comfort that stays in your memory. It is the kind of recipe that survives moves, decades, and dozens of family bakers because it is reliable and honest.
The next time you need a treat for a birthday, a potluck, or even a quiet afternoon at home, we hope you will pull out your worn cake pan and give this recipe a try. If you enjoy simple desserts that keep well on the counter, you might also want to try our classic chocolate cake recipe for your next gathering. It is another family favorite that brings people together around the table.
We would love to hear how this recipe turned out in your own kitchen. Please feel free to share your baking journey with us and join our community of home bakers online. You can connect with us on Pinterest, follow our updates on Facebook, or join our discussions on Telegram. Happy baking, and may your kitchen always smell of warm butter and chocolate.

