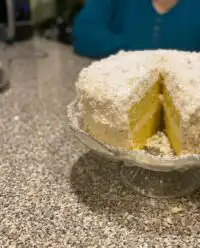
My grandmother always believed that the best desserts hold a little secret, something to make you smile when you least expect it. This Pinata Cake is the perfect example of that simple joy, hiding a tumble of colorful candy inside a reliable, tender vanilla sponge. It captures that childlike wonder of breaking open a piñata, but with the comfort of a homemade slice of cake.

Don’t be intimidated by the layers; this recipe relies on a sturdy, straightforward batter that stands up well to stacking. It is a forgiving bake that actually slices better after settling for a bit, making it a stress-free option for celebrations. The result is a fun, honest cake that tastes just as good as it looks.
A Fun Surprise for Any Celebration
There is something undeniably special about cutting into a cake and watching a cascade of candy spill out. It turns a standard birthday treat into a moment of pure excitement. What I love most about this recipe is that it looks incredibly impressive, but the technique is surprisingly simple.
You don’t need fancy architectural skills here. It is just a matter of stacking layers and hiding a sweet treasure in the middle. The cake itself is buttery and dense enough to hold the structure, yet tender enough to melt in your mouth. It is the kind of bake that creates memories without requiring a degree in pastry arts.
Print
Pinata Cake
- Total Time: 1 hour 10 mins
- Yield: 12 servings
- Diet: Vegetarian
Description
A vibrant vanilla layer cake that hides a playful surprise of colorful candies inside every slice. This sturdy yet tender sponge is colored in bright hues and paired with a rich cream cheese frosting, making it the ultimate centerpiece for birthdays and special celebrations.
Ingredients
- 1 cup unsalted butter, room temperature
- 2 cups granulated sugar
- 5 large eggs
- 1 tablespoon vanilla extract
- 3 cups all-purpose flour, sifted
- 1 teaspoon baking powder
- 1/2 teaspoon baking soda
- 1/2 teaspoon salt
- 1 cup buttermilk
- Gel food coloring (green, blue, purple, pink)
- 1 cup assorted small candies (M&Ms, jelly beans, or sprinkles)
- 8 oz cream cheese, softened
- 1/2 cup unsalted butter, softened (for frosting)
- 4 cups powdered sugar
- 2 tablespoons heavy cream
Instructions
- Preheat oven to 350°F (175°C) and grease and flour four 9-inch cake pans.
- Whisk together the flour, salt, baking powder, and baking soda in a medium bowl and set aside.
- In a stand mixer, beat 1 cup of butter for 1 minute, then add sugar and beat on high for 5 minutes until light and fluffy.
- Lower the speed and add eggs one at a time, followed by the vanilla extract.
- Add the flour mixture in three parts, alternating with buttermilk, and mix until just smooth.
- Divide the batter into four bowls, tint each with a different gel color, and pour into the prepared pans.
- Bake for 25 minutes or until a toothpick comes out clean, then let cool completely on wire racks.
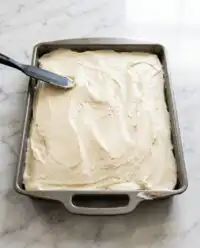
- Prepare the frosting by beating the cream cheese and 1/2 cup butter, then mixing in powdered sugar, heavy cream, and vanilla.
- Use a 4-inch round cutter to remove the center circles from two of the cooled cake layers.
- Place one solid cake layer on a plate, frost the top, stack the two cake rings (frosting between them), and fill the hollow center with candy.
- Top with the final solid cake layer, then frost the entire exterior of the cake and decorate.
Notes
To ensure the cleanest cuts when removing the centers of the cake layers, chill the sponges in the refrigerator for at least 30 minutes before using the cutter. Using a crumb coat—a thin first layer of frosting—will help keep the final exterior smooth and free of colorful cake crumbs. Always use gel food coloring for the most vibrant results without altering the batter’s consistency.
- Prep Time: 45 mins
- Cook Time: 25 mins
- Category: Dessert
- Method: Baking
- Cuisine: American
Simple Pantry Staples

To make this festive treat, you will need standard ingredients found in most kitchens. We keep it basic to ensure the flavor is honest and comforting.
- Unsalted Butter: You will need this for both the cake and the frosting. Make sure it is at room temperature so it creams properly with the sugar.
- All-Purpose Flour: Sift it before measuring to keep the crumb tender. This provides the structure needed for the layers.
- Buttermilk: This adds a lovely tang and tenderness to the cake. If you don’t have it, a simple milk and vinegar substitute works fine.
- Eggs: Five large eggs give this cake richness and stability.
- Gel Food Coloring: I prefer gel over liquid because it gives vibrant color without thinning the batter. You’ll need green, blue, purple, and pink.
- Candy Filling: Assorted small candies like M&Ms, jelly beans, or sprinkles work best for the “pinata” effect.
How to Make It
Step 1: Prep Your Ingredients
Preheat your oven to 350°F (175°C). Grease and flour four 9-inch cake pans. I like to use baking strips or parchment rounds to ensure the cakes come out easily. Whisk your flour, salt, baking powder, and baking soda together in a medium bowl and set it aside.
Step 2: Cream the Butter and Sugar
In a stand mixer fitted with the paddle attachment, beat the room temperature butter until it is creamy, which takes about one minute. Add the sugar and beat on high speed for about 5 minutes. This step is crucial for aerating the batter. Lower the speed and add the eggs one at a time, followed by the vanilla extract.
Step 3: Make the Batter
Add the flour mixture to the butter mixture in three parts, alternating with the buttermilk. Start and end with the flour. Mix just until the batter is smooth and slightly thick; be careful not to overmix, or the cake might become tough.
Step 4: Color and Bake
Divide the batter evenly into four bowls. Tint each bowl with a different color (green, blue, purple, pink) and pour them into the prepared pans. Bake for about 25 minutes, or until a toothpick comes out clean. Let them cool in the pans for a few minutes before moving them to wire racks to cool completely.
Step 5: Prepare the Layers
Once the cakes are cool, whip up the cream cheese frosting by beating the butter and cream cheese, then adding sugar, cream, and vanilla. Take two of the cooled cake layers and use a 4-inch round cutter to remove the centers, creating large rings.
Step 6: Assemble the Pinata
Place an intact cake layer on your serving plate and spread a layer of frosting on top. Place one of the cake rings on top of that. Frost the ring, then stack the second ring on top. Now, fill the hollow center hole with your assorted candies and sprinkles. Top with the final intact cake layer to seal it all in. Frost the outside of the cake and decorate as desired.
Jesse’s Simple Tips

One of the easiest ways to ensure your layers stack neatly is to chill the cakes before you cut the centers out. A cold cake crumbles less and holds its shape better under the knife. If the frosting feels too soft while you are stacking, pop the whole thing in the fridge for ten minutes to firm up.
For the filling, stick to small, hard candies or sprinkles. Chocolate can sometimes melt if the cake is in a warm room, so coated candies are a safer bet. Also, make sure you apply a “crumb coat” (a thin layer of frosting) to seal the crumbs before doing your final decorative layer.
If you are planning a big bash, check out our guide on party-cakes-events for more planning tips. This cake is sturdy enough to transport, which is always a bonus.
Simple Swaps
You can easily change the flavor profile of this cake to suit your tastes. While vanilla is classic, a touch of almond extract in the batter adds a lovely warmth. If you prefer a different color palette, you can stick to one shade for an ombre effect or leave the cake plain for a stark contrast with the colorful candy inside.
For the filling, try using seasonal treats. Candy corn works for fall, or peppermint pieces for winter. If you love citrus flavors, you might enjoy the zestiness found in our lemon-rainbow-cake, which uses a similar layering technique but with a bright, fruity twist.
Comfort Time

Serve this cake at room temperature to ensure the frosting is creamy and the cake is soft. It pairs beautifully with a simple scoop of vanilla ice cream or a cold glass of milk. The visual of the candy spilling out is the main event, so you don’t need much decoration on the plate.
If you are looking for another colorful dessert to serve alongside this, our ribbon-cake is another visually stunning option that uses simple techniques to create a beautiful striped effect.
Simple Truth
There is a simple truth to baking: it is about sharing joy. This Pinata Cake might look complicated to the guests, but you will know it was just a matter of stacking and filling with love. It is a wonderful way to bring a little magic to the table without needing professional tools.
For another fun project that kids adore, you might want to try our roblox-cake. And for those interested in seeing how other cultures tackle surprise cakes, I found this lovely French take on the concept quite inspiring. Happy baking, and enjoy the smiles!
Follow us for more simple comfort:


