My grandmother always said that the best way to show someone you love them is with a simple, honest treat from your own kitchen. This Valentines Day Cake is a perfect example of that kitchen wisdom, focusing on reliable results and basic ingredients that never let you down. It is a no-fuss recipe that brings a lot of heart to the table without requiring a professional pastry kit.

We use a white cake mix here to keep things approachable and consistent every time you bake. The pink and white marble effect inside is a happy surprise that looks like you spent hours on it, but it is truly quite simple to achieve. This is the kind of cake that tastes even better the next day after the flavors have a chance to really settle together.
Simple Comfort from the Heart
This recipe is a keeper because it focuses on the joy of baking rather than the stress of complicated techniques. You will love how the tender crumb of the white cake pairs with a rich, buttery vanilla frosting that feels like a warm hug. It is a dependable choice for a holiday celebration, and because it uses familiar pantry staples, you can whip it up whenever the mood strikes.
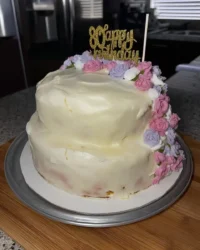
There is something special about a cake that does not try too hard to be fancy. The beauty lies in the soft pink swirls and the classic maraschino cherries on top. It is a nostalgic dessert that reminds us that the most cherished gifts are often the ones we make with our own two hands. Plus, the structure is forgiving, making it a great project for bakers of any skill level.
Print
Valentines Day Cake
- Total Time: 1 hour 30 mins
- Yield: 12 servings
- Diet: Vegetarian
Description
This beginner-friendly Valentines Day Cake features a beautiful pink and white marble interior achieved with simple pantry staples. Topped with a rich homemade vanilla buttercream and nostalgic maraschino cherries, it is the perfect heartfelt treat for any skill level.
Ingredients
- 2 boxes white cake mix
- Egg whites
- Water
- Canola oil
- Unsalted butter, softened
- Powdered sugar
- Heavy cream
- Vanilla extract
- Pink gel food coloring
- Maraschino cherries
- Sprinkles
Instructions
- Preheat your oven to 350 degrees Fahrenheit and prepare your cake pans with non-stick spray.
- In a large bowl, beat together the cake mixes, egg whites, water, and oil until the batter is smooth.
- Divide the batter into two separate bowls, tinting one bowl with pink gel food coloring and leaving the other white.
- Using a 1/4 cup scoop, alternate dropping scoops of white and pink batter into the prepared pans to create a marbled effect.
- Bake for 28 to 32 minutes until a toothpick inserted into the center comes out clean.
- Cool the cakes in their pans for 10 minutes before transferring them to a wire rack to cool completely.
- Whip the softened butter, powdered sugar, heavy cream, and vanilla extract in a mixer until stiff peaks form.
- Separate the frosting and tint portions into light and dark pink shades, keeping a portion white.
- Level the cake layers, stack them with white frosting in between, and apply a thin crumb coat before chilling for 30 minutes.
- Decorate with pink frosting drips, a piped heart design, dollops of frosting, and maraschino cherries.
Notes
For the cleanest marble effect, avoid stirring the batter once it is scooped into the pans; the natural spreading during baking creates the best design. If your kitchen is warm, chill the frosting for 15 minutes before piping to ensure the decorations hold their shape perfectly.
- Prep Time: 30 mins
- Cook Time: 30 mins
- Category: Dessert
- Method: Baking
- Cuisine: American
Basic Ingredients for Honest Flavor

I believe in keeping the pantry simple. You do not need anything exotic to make a cake that tastes this wonderful. We start with two boxes of white cake mix because they provide a consistent base that we can dress up with a few extra egg whites and oil for moisture.
- White Cake Mix: This serves as our reliable foundation, ensuring a light and airy texture.
- Egg Whites: Using only the whites keeps the cake color snowy and bright, which makes the pink swirls pop.
- Canola Oil: This is my secret for a moist cake that stays soft for days.
- Unsalted Butter: Real butter makes the frosting rich and smooth, just like grandmother used to make.
- Maraschino Cherries: These add a touch of nostalgia and a bright bit of color to the top.
- Pink Gel Food Coloring: A little goes a long way in creating those beautiful Valentine shades without changing the consistency of your batter or frosting.
Easy Steps to a Beautiful Cake
Step 1: Prep and Mix
Preheat your oven to 350 degrees Fahrenheit (175 degrees Celsius). Prepare your cake pans with non-stick spray to ensure the layers pop out easily. In a large bowl, use a hand mixer to beat together the cake mixes, egg whites, water, and oil until the batter is smooth and well combined.
Step 2: Create the Colors
Divide your cake batter evenly into two separate bowls. Add a few drops of pink gel food coloring into one bowl and stir it until you have a vibrant pink shade. Leave the second bowl of batter white to create a nice contrast.
Step 3: Layer the Batter
To get that tie-dye look, take a 1/4 cup scoop. Alternate between the white and pink batter, dropping scoops directly on top of each other in the prepared pans. The batter will naturally spread out and create a marbled effect as it bakes.
Step 4: Bake and Cool
Place the pans in the oven and bake for 28 to 32 minutes. You will know it is done when a toothpick inserted into the center comes out clean. Let the cakes cool in the pans for about ten minutes, then turn them out onto a wire rack to cool completely. Never try to frost a warm cake!
Step 5: Whip the Frosting
In a standing mixer, beat the softened butter, powdered sugar, heavy cream, and vanilla extract. Keep mixing until the frosting is stiff enough to hold a peak. Set aside some white frosting, then tint the rest with varying amounts of pink coloring to create light and dark shades.
Step 6: Assemble the Layers
Level your cake layers by cutting off the rounded tops. Place the first layer on your cake board and spread a thick layer of white frosting over it. Repeat with the second and third layers, then cover the entire outside of the cake with a thin coat of white frosting. Chill it for 30 minutes to set.
Step 7: Final Decorating
Use the light pink frosting to create drips down the sides by slightly warming it in the microwave. Use a heart-shaped cookie cutter to mark a guide on the front, then fill it in with the darker pink frosting. Finish by piping dollops on top and adding your cherries and sprinkles.
Jesse’s Simple Wins

For the best results, always make sure your butter is truly softened at room temperature before you start the frosting. If it is too cold, you will get lumps, and if it is too melted, it will not hold its shape. If you are looking for more design inspiration, you might enjoy our valentine-cake tips for a different finish.
Another simple secret is to chill your cake layers after they have cooled but before you start leveling them. A cold cake crumbles much less than a room-temperature one, which makes the assembly much cleaner. This recipe is very forgiving, so do not worry if your marble effect looks different every time; that is part of the charm of a homemade treat.
Simple Swaps for Variety
You can easily change the flavor profile of this cake by using different extracts. While vanilla is a classic choice, a little almond extract in the batter adds a lovely, professional touch. For a more intense pink look, you can follow our valentines-cake method which uses strawberry-flavored components.
If you prefer a more natural approach, you can skip the food coloring in the batter and use finely chopped maraschino cherries to add pink flecks throughout. You could also swap the vanilla frosting for a simple cream cheese frosting if you like a bit of tanginess to balance out the sweetness of the white cake.
Simple Enjoyment

This cake is best served in generous slices with a cold glass of milk or a hot cup of black coffee. It is meant to be enjoyed casually, perhaps even standing at the kitchen counter while you share a moment with someone special. For more ideas on how to present your holiday treats, take a look at our heart-cake serving guide.
I find that this cake is a wonderful center-piece for a small gathering of friends. Since it is so reliable, you can focus on the company rather than worrying about the dessert. If you have leftovers, they keep beautifully in a sealed container and taste just as good the following morning with breakfast.
Simple Truth for Baking
There is a real sense of peace that comes from baking a classic recipe like this Valentines Day Cake. It reminds us that comfort does not have to be complicated and that basic ingredients can create something truly memorable. If you enjoyed this project, you should also try our rose-cake for another beautiful and easy floral design. For even more inspiration, check out the lovely ideas over at Kitchen Fun With My 3 Sons.
I would love to see how your cake turned out! Please share your photos and stories with us on Facebook, Pinterest, or Instagram. Happy baking, and I hope this cake brings a little extra warmth to your home.

