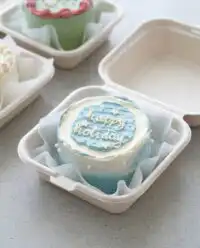
I stumbled upon the secret to the most amazing treats while playing with a simple box of vanilla mix one rainy afternoon. It was the moment I added a splash of homemade vanilla syrup that everything changed, turning a basic sponge into a moist, bakery-style masterpiece. Seeing these tiny cakes nestled into their own little boxes felt like discovering a tiny gift of pure joy. It is the kind of unexpected flavor transformation that makes you want to share the magic with everyone you know!

This Lunch Box Cake is the ultimate way to show someone you care without spending all day in the kitchen. It is a simple game-changer for your baking routine, combining the ease of a mix with the “wow” factor of custom decorations. Whether you are making these for a picnic or a birthday surprise, they always steal the show with their vibrant look and incredible taste. Trust me, the extra minute spent on the syrup makes all the difference!
The Simple Magic
You are going to fall in love with these cakes because they take the stress out of baking while delivering a high-end result. There is something so special about a cake that is sized just for one or two people! It makes every bite feel like a personal celebration. This recipe is wonderful because it uses a simple base but introduces a flavor pop through a signature vanilla soak that keeps the cake incredibly moist for days.
Another reason to adore these is the creative freedom they offer. You can decorate each one differently, making them perfect for gifting to multiple friends. It is a fantastic way to practice your piping skills without the pressure of a giant three-layer cake. The whipped cream frosting is light, airy, and not too sweet, providing a fresh contrast to the rich cake. It is truly a gift of flavor and fun all wrapped up in a tiny box!
Print
Lunch Box Cake
- Total Time: 50 mins
- Yield: 3 mini cakes
- Diet: Vegetarian
Description
Create charming, personalized mini cakes that are as delicious as they are adorable. This recipe transforms a simple box mix into a professional-style treat using a signature vanilla soak and light whipped cream frosting.
Ingredients
- 1 box vanilla cake mix
- Ingredients required by cake mix (eggs, oil, water)
- 1/2 cup granulated sugar
- 1/2 cup water
- 1 tablespoon vanilla extract or paste
- 2 cups heavy whipping cream, chilled
- 1/4 cup powdered sugar
- 1 pinch salt
- Assorted sprinkles or fresh berries for decoration
Instructions
- Preheat oven to 350°F (180°C) and grease a 9×13-inch pan lined with parchment paper.
- Prepare the vanilla cake mix according to package directions, pour into the pan, and bake until a toothpick comes out clean.
- While the cake cools, combine 1/2 cup water and 1/2 cup sugar in a saucepan over medium heat, stirring until dissolved; let cool and stir in vanilla extract.
- In a chilled bowl, beat the heavy whipping cream on high for one minute, then add powdered sugar, vanilla, and salt, whipping until stiff peaks form.
- Using a 3-inch round cutter, punch out six cake circles from the cooled sheet cake.
- Place one cake round on a parchment square, brush with vanilla syrup, and spread a layer of whipped cream on top.
- Add a second cake round, brush with more syrup, and frost the top and sides with the remaining whipped cream.
- Decorate with sprinkles or berries and carefully place into a small lunch box or container.
Notes
To ensure the cleanest cuts for your mini cakes, chill the sheet cake in the refrigerator for 30 minutes before using the cookie cutter. If your whipped cream begins to soften while decorating, return it to the fridge for a few minutes to firm up again.
- Prep Time: 20 mins
- Cook Time: 30 mins
- Category: Dessert
- Method: Baking
- Cuisine: American
The Flavor Stars

To create these little wonders, you only need a few pantry staples and one or two fresh additions to make the flavors really pop. Here is what you will need to gather:
- Vanilla Cake Mix: This is our reliable base. It provides a consistent crumb that holds up perfectly to being cut into rounds.
- The Cake Trio: You will need the eggs, oil, and water as specified on your specific box to get the party started.
- Granulated Sugar and Water: These simple ingredients combine to create our secret weapon—the soaking syrup.
- Vanilla Extract: Use a high-quality extract or even vanilla bean paste for those beautiful little black specks and a deep, aromatic flavor.
- Heavy Whipping Cream: Make sure it is ice cold! This is the foundation of our cloud-like frosting.
- Powdered Sugar: Just enough to add a touch of sweetness and help stabilize the cream.
- A Pinch of Salt: This is the most important part! It balances the sugar and makes the vanilla flavor really stand out.
The Simple Process
Step 1: Bake the Cake
Start by preheating your oven to 350 °F (180 °C). Grease a 9 x 13-inch pan and line it with parchment paper, making sure the paper hangs over the sides for easy lifting. Prepare the vanilla cake mix according to the box directions. Pour the batter into the prepared pan and smooth the top. Bake until a toothpick comes out clean. Once done, let the cake cool completely in the pan. This is vital because a warm cake will crumble when we try to cut our circles!
Step 2: Make the Vanilla Syrup
While the cake cools, let’s make that flavor-boosting syrup. In a small saucepan over medium heat, combine the water and sugar. Stir gently until the sugar completely dissolves. Remove from the heat and let it cool down. Once it is no longer hot, stir in your vanilla extract. This syrup is the secret to a professional texture that stays fresh and moist.
Step 3: Whip the Cream
For the best results, place your mixing bowl and beaters in the freezer for 15 minutes before starting. Pour the cold heavy cream into the chilled bowl and beat on high speed for about one minute. Add the powdered sugar, vanilla, and a pinch of salt. Continue whipping until you reach stiff peaks—this means the cream holds its shape when you lift the beaters. Keep this in the fridge until you are ready to frost.
Step 4: Cut and Layer the Cake
Lift the cooled cake out of the pan using the parchment handles. Use a 3-inch round cookie cutter to punch out six cake circles. You will pair these to make three double-layer cakes. Place a 5×5-inch square of parchment on your counter and add a small dab of frosting to keep the cake from sliding. Lay down the first cake round, brush it generously with your vanilla syrup, and spread a thick layer of whipped cream on top.
Step 5: Decorate and Pack
Place the second cake round on top and brush with more syrup. Coat the top and sides of the cake with the remaining whipped cream. Use an offset spatula to smooth the edges for a clean, minimalist look. Add your favorite sprinkles or a few fresh berries to make it pop! Carefully lift the parchment square and nestle the finished cake into a lunch box or small container. Keep them chilled until you are ready to surprise your favorite people.
Jasmine’s Flavor Tips

To make the absolute best version of these treats, I have a few tricks up my sleeve. First, if you want a richer cake, replace the water in the box mix with whole milk and the oil with melted butter. This creates a tighter, more buttery crumb that feels completely homemade. When cutting your circles, dip your cutter in hot water and wipe it dry between each cut to keep the edges sharp. For those looking for more inspiration on tiny treats, check out my guide on mini-cakes. Also, make sure your cream is very cold before whipping; if it gets too warm, it will not hold its shape. For a deep dive into the history of this trend, you can look at this Lunch Box Cakes guide which shows how these became a global sensation. If you find your cake domes too much in the oven, simply place a piece of parchment over the warm cake and press down lightly with another flat pan to level it out while it is still soft.
Other Pops
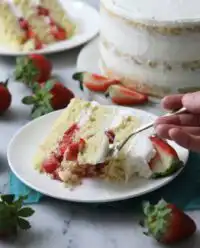
You can easily change the personality of this recipe with just one or two simple swaps. If you want a citrus twist, add a tablespoon of fresh orange zest to the cake batter and use orange juice instead of water for the syrup. It is an amazing way to make the recipe feel fresh and vibrant! For a chocolate version, use a devil’s food cake mix and fold in a half cup of mini chocolate chips. If you are looking for a slightly different size for your next party, you might enjoy making a small-cake that uses similar techniques. You can even try a chai spice version by adding cinnamon, ginger, and cardamom to the whipped cream frosting. This is where you make it yours, so do not be afraid to experiment with different extracts like almond or coconut to find your favorite flavor pop!
How to Serve

These cakes are best served chilled, which keeps the whipped cream frosting firm and refreshing. I love pairing a vanilla lunch box cake with a hot cup of Earl Grey tea or a cold brew coffee. The bitterness of the coffee beautifully balances the sweet vanilla soak. If you are aiming for a very specific aesthetic, these look wonderful when served as a cute-cake alongside some fresh mint leaves or edible flowers. For a fun party idea, set up a ‘decorating station’ where guests can add their own toppings to a pre-frosted cake. It is a fantastic way to get everyone involved in the creative process!
The Sweet Spot
Baking these tiny treasures is such a joyful experience, and I hope you feel encouraged to try your own flavor additions. Whether you stick with the classic vanilla or try a spicy chai twist, the results are guaranteed to be delicious. If you love the look of simple and elegant designs, you should definitely see our post on the minimalist-cake for more ideas. I would love to see your creations, so please share them with me! You can find us on Pinterest, Instagram, and Facebook. Keep baking, keep experimenting, and most importantly, keep sharing the flavor love with everyone around you!


