I remember a particularly busy Tuesday night when I just wanted something that looked as good as it felt to bake, without the five-tier stress and complicated equipment. This aesthetic cake is my go-to when I want that Pinterest-perfect look using just a single bowl and basic pantry staples that I always have on hand. It is the kind of bake that proves you do not need a professional bakery or years of training to create something truly beautiful and delicious for your family.

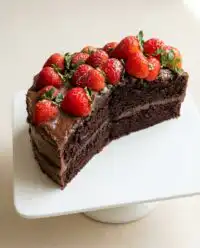
This recipe uses a incredibly moist yellow cake base that pairs perfectly with a silky, rich chocolate buttercream that melts in your mouth. It is the ultimate example of baking that fits into a busy afternoon but looks like a weekend masterpiece that took all day to create. We are going to keep things simple, honest, and completely approachable so you can feel confident in your kitchen from start to finish.
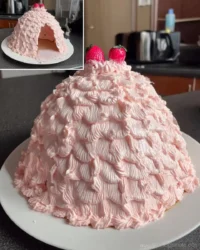
Simple Perfection for Every Occasion
You are going to absolutely love this aesthetic cake because it takes all the intimidation factor out of pretty baking and makes it accessible for everyone. It is the perfect project for when you want a beautiful result without the stress of complicated techniques or specialized tools you might only use once. This cake is light, moist, and has that classic buttery flavor that everyone in the family craves. Plus, the 6-inch size makes it feel extra special, modern, and perfectly suited for a small gathering or a cozy celebration. Whether you are baking for a small birthday, a special anniversary, or just because you saw a pretty picture on social media and felt inspired, this recipe delivers a reliable and wonderful result every time. It is baking that fits your life and your schedule, not the other way around. I love how the sour cream and oil work together to keep the crumb tender for days, meaning you can bake it ahead of time without any worry about it drying out. It is simple, practical, and honestly just a lot of fun to put together with minimal cleanup needed afterward. There is something so satisfying about making something this pretty with just one bowl and a whisk, proving that simple really can be spectacular.
Print
Aesthetic Cake
- Total Time: 55 mins
- Yield: 8 servings
- Diet: Vegetarian
Description
This elegant six-inch yellow cake combines the richness of butter with the moisture of oil and sour cream to create a perfectly tender crumb. It is a simple, approachable recipe designed to help home bakers achieve a professional, minimalist look with basic pantry staples and minimal cleanup.
Ingredients
- All-purpose flour
- Baking powder
- Baking soda
- Fine sea salt
- Salted butter, softened
- Granulated sugar
- Large eggs
- Pure vanilla extract
- Sour cream
- Whole milk
- Canola oil
Instructions
- Preheat your oven to 350 degrees F (175 degrees C). Line the bottoms of two 6-inch round cake pans with parchment paper and grease the sides with butter or non-stick spray.
- In a medium-sized bowl, whisk together the all-purpose flour, baking soda, baking powder, and fine sea salt until well combined to ensure an even rise.
- In a main mixing bowl, beat the softened salted butter and granulated sugar together for 1-2 minutes until the mixture is light and fluffy.
- Add the eggs one at a time, followed by the vanilla extract, and beat for 60 seconds until the batter is pale and thick.
- Gently stir in the sour cream, whole milk, and canola oil until the liquid base is mostly combined.
- Incorporate the flour mixture into the wet ingredients, stirring gently with a spatula or whisk until just combined to keep the texture soft.
- Divide the batter evenly between the two prepared 6-inch pans and bake for 30 to 35 minutes until a toothpick inserted in the center comes out clean.
- Let the cakes cool in their pans for 30 minutes before transferring them to a wire rack to cool completely before applying frosting.
Notes
For the most stable layers, consider baking your cakes a day in advance and wrapping them tightly in plastic wrap before storing them in the freezer; this makes the frosting process much easier and reduces crumb dispersion. Always ensure your eggs and milk are at room temperature before mixing to create a smooth, emulsified batter that rises evenly.
- Prep Time: 20 mins
- Cook Time: 35 mins
- Category: Dessert
- Method: Baking
- Cuisine: American
The Pantry Basics for a Perfect Bake

Making a stunning aesthetic cake does not require a trip to a specialty grocery store or expensive ingredients. Here is an overview of what you will need from your kitchen cupboards to get started:
- All-Purpose Flour: This is the sturdy foundation of our cake. It provides the structure we need while keeping things soft and approachable. You can also use cake flour if you want an even finer crumb, but standard flour works beautifully.
- Leavening Agents: Both baking powder and baking soda are used here to give our cake that perfect, fluffy lift that makes it feel light as air.
- Salted Butter: I use salted butter because it adds a nice depth to the sweetness and rounds out the flavor. If you only have unsalted, just add an extra pinch of fine sea salt to the mix.
- Granulated Sugar: This provides the sweetness and helps the butter get nice and fluffy during the mixing process, which is key for a good texture.
- Eggs: These bind everything together and provide essential structure and moisture to the batter.
- Sour Cream: This is my secret for a moist cake that stays fresh. It adds fat and a slight acidity which makes the texture incredible and the crumb very tender.
- Whole Milk: This adds moisture and a rich flavor to the batter. I recommend whole milk for the best fat content and mouthfeel.
- Canola Oil: While butter gives us that classic flavor, oil gives us lasting moisture. Using both is the best of both worlds for a perfect cake.
- Vanilla Extract: Always try to use a good quality pure vanilla extract for that classic, comforting aroma that fills your whole house while it bakes.
Everything on this list is a basic staple in most kitchens, making this the perfect recipe for a spontaneous baking session whenever the craving for something sweet and beautiful hits you.
The Simple Process
Step 1: Prep Your Space and Pans
Start by preheating your oven to 350 degrees F (175 degrees C). Take two 6-inch round cake pans and line the bottoms with parchment paper to make removal easy. Give the sides a good grease with butter or non-stick spray so your cakes pop right out later without any fuss.
Step 2: Whisk the Dry Ingredients
In a medium-sized bowl, whisk together your all-purpose flour, baking soda, baking powder, and fine sea salt. Making sure these are well-mixed now helps the cake rise evenly in the oven later on and prevents any clumps of leavening.
Step 3: Cream the Butter and Sugar
In your main mixing bowl, beat the softened salted butter and granulated sugar together. You want it to look light and fluffy, which usually takes about a minute or two of vigorous mixing. This step adds air into the batter for a better, lighter texture.
Step 4: Incorporate Eggs and Vanilla
Add your eggs one at a time, followed by the pure vanilla extract. Beat the mixture for another 60 seconds until it looks pale, thick, and well-incorporated. This builds the structure that will hold up those beautiful cake layers.
Step 5: Combine the Liquid Ingredients
Stir in the sour cream, whole milk, and canola oil. It might look a little bit separated at first because of the different fat contents, but just keep stirring gently until it is mostly combined into a smooth liquid base.
Step 6: Final Batter Mix
Add your flour mixture to the wet ingredients. Stir gently with a spatula or whisk until just combined. Be careful not to overmix at this stage; we want a tender and soft cake, not one that is tough or chewy.
Step 7: Bake to Golden Perfection
Divide the batter evenly between your two prepared 6-inch pans. Bake for 30 to 35 minutes in the center of the oven. You will know they are done when the tops are set and a toothpick inserted in the center comes out clean or with just a few moist crumbs.
Step 8: Cool and Prepare for Frosting
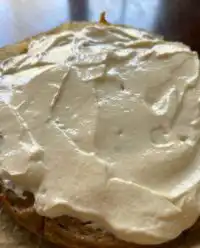
Let the cakes cool in the pans for about 30 minutes before moving them to a wire rack. Once they are completely cool to the touch, you can frost them with your favorite chocolate buttercream or a simple vanilla icing.
Meagan’s Easy Wins

One of my favorite tricks for a perfect aesthetic cake is to chill the layers in the fridge or freezer before you start frosting. This makes the cake much firmer and far less likely to crumble as you spread the icing around the sides. If you have the time, you can even bake these a day ahead and keep them wrapped tightly in the freezer. For more on how to achieve that trendy, clean look, check out our guide on the minimalist cake style. Also, always try to use room temperature eggs and milk. This helps the batter emulsify properly, giving you a much smoother texture in the finished bake. If you forgot to take your eggs out of the fridge, just pop them in a bowl of warm water for five minutes. It is a quick and helpful fix that makes a big difference in the final result. Don’t worry about making it look perfect on the first try; the natural and slightly rustic look is actually very popular and adds a lot of charm to your homemade creations!
Simple Swaps to Make it Yours
You can easily change the personality of this aesthetic cake with a few quick swaps based on what you have in your pantry. If you want a more floral or bright vibe, try adding a teaspoon of almond or orange extract instead of the vanilla. For those who love a bit of fun texture, you can fold in half a cup of colorful sprinkles for a fun ‘confetti’ look that kids and adults both love. If you are looking for a different design style to try, our vintage cake recipe offers some great inspiration for classic piping techniques. You can also swap the sour cream for full-fat plain Greek yogurt if that is what you have in the fridge. The goal is to make the recipe work for you and your busy life, using what you already have to create something special and unique.
Everyday Enjoyment

Serving an aesthetic cake is all about the simple joy of the moment. I love placing this cake on a plain wooden board or a vintage glass stand to let the design really shine. It looks beautiful next to a pot of fresh tea or a cup of your favorite coffee. For a more whimsical or detailed presentation, you can look into our lambeth cake ideas for piping inspiration that adds a touch of old-world charm. This cake is rich enough to stand on its own, but a scoop of simple vanilla bean ice cream or a handful of fresh berries never hurts anyone. It is the perfect size for a small gathering of friends or a special family treat on a weekend morning. You can also check out more design ideas over at this great post on aesthetic minimalist cakes for even more inspiration for your next baking project.
The Sweet Spot
I truly hope this recipe shows you that baking a beautiful aesthetic cake is something anyone can do right in their own kitchen. It is all about finding joy in the simple process and enjoying the delicious, honest results with the people you love most. If you enjoyed this project, you might also like to try our coquette cake for more feminine and delicate styling ideas. Please share your beautiful bakes with me on Instagram, Pinterest, or Facebook. I love seeing what you create! For even more visual inspiration, you can jump over to this guide on aesthetic minimalist cake designs. Happy baking, friends!

