My grandmother always said that some of the best treats don’t require an oven at all. She would keep a box of simple ice cream sandwiches in the freezer for those heavy summer afternoons when the kitchen was just too warm for baking. This cake reminds me of those quiet times when a few basic items from the store could be turned into something truly special.

This ice cream sandwich cake is the ultimate no-bake wonder that looks beautiful but stays completely humble. It is reliable, sturdy, and always a hit because it brings together the familiar flavors everyone already loves. You don’t need fancy tools or professional skills to make this work every single time.
Honest Comfort in Every Slice
You are going to love this recipe because it takes all the stress out of making a celebration cake. There is no worrying about a cake sinking in the middle or the frosting melting off a warm layer. It is a reliable classic that relies on the simple joy of cold cream and soft cookies. Because we use store-bought sandwiches as the “crust,” the hard work is already done for you.
Another reason this cake is a favorite in my house is that it actually tastes better the next day. As it sits in the freezer, the different flavors of ice cream have a chance to settle, and the cookie layers of the sandwiches soften just enough to make every bite tender. It is the kind of cake you can pull out of the freezer when friends stop by unexpectedly, and it always feels like a treat.
This recipe is also incredibly forgiving. If your sandwiches aren’t perfectly straight or your ice cream is a little too soft, it doesn’t matter. Once it all freezes together and you pour that chocolate topping over the top, it looks like a masterpiece. It is honest, simple comfort that proves you don’t need to spend all day in the kitchen to show someone you care.
Print
Ice Cream Sandwich Cake
- Total Time: 4 hours 25 mins
- Yield: 12 servings
- Diet: Vegetarian
Description
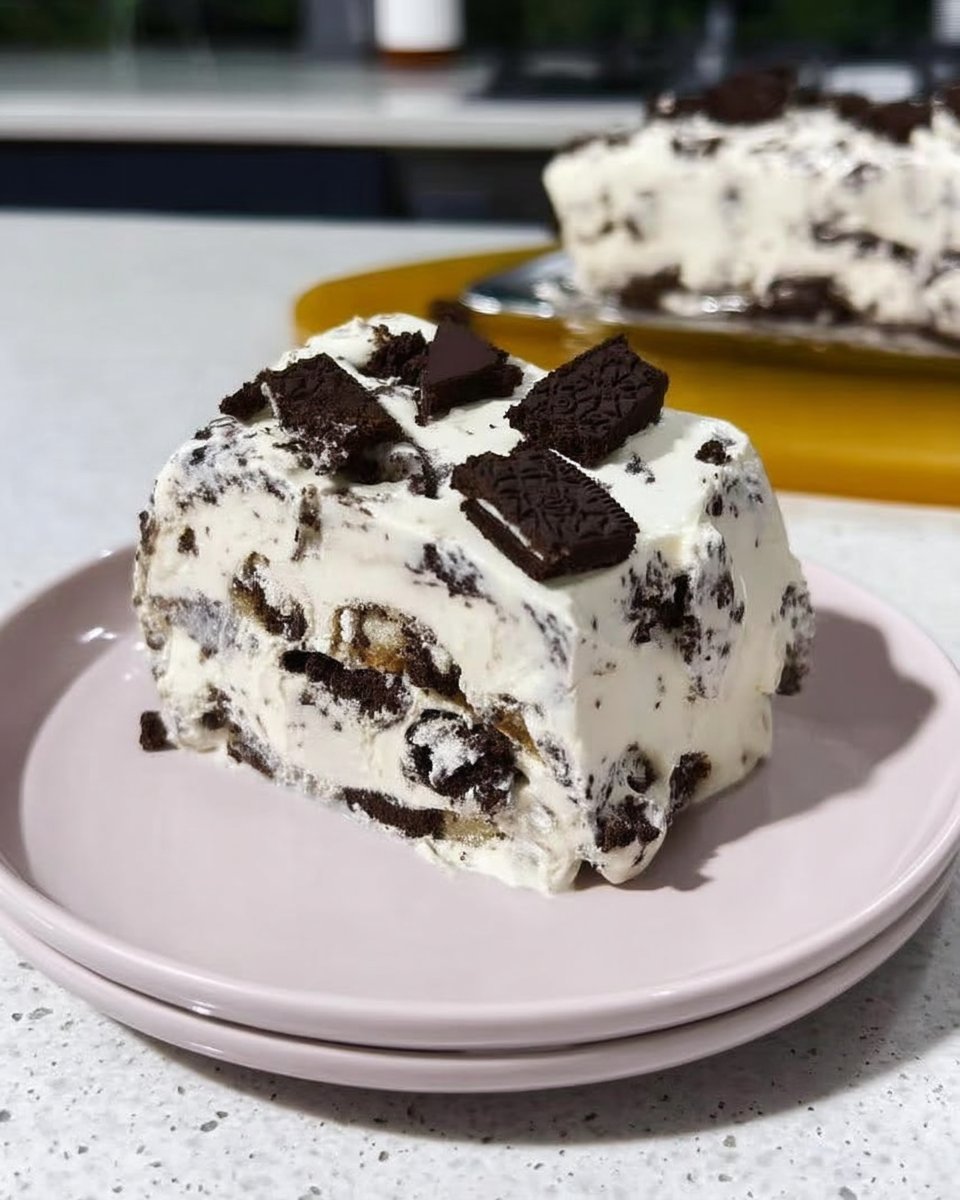
This easy, no-bake ice cream sandwich cake combines classic store-bought sandwiches with layers of rich ice cream for a stunning freezer dessert. Perfect for birthdays or summer gatherings, it features a whimsical sugar cone topping and a crisp chocolate shell coating.
Ingredients
- 12 count standard rectangular ice cream sandwiches
- 2 quarts ice cream (suggested: 1.5 quarts chocolate and 1 pint vanilla)
- 3 sugar cones
- Chocolate Magic Shell topping
- Candies and sprinkles (such as peanut butter M&Ms and confetti sprinkles)
Instructions
- Line an 8-inch or 9-inch round cake pan with plastic wrap, ensuring the plastic hangs over the edges for easy removal later.
- Softened the ice cream at room temperature for 10 to 15 minutes until it is pliable and easy to stir.
- Unwrap the ice cream sandwiches and cut them evenly in half.
- Place the sandwich halves cut-side-down around the inner edge of the cake pan to create a vertical border.
- Stir half of the ice cream in a bowl until thick and pourable, then pour it into the center of the pan surrounded by the sandwiches.
- Freeze the cake for at least 4 hours, or ideally overnight, until it is completely solid.
- Lift the cake from the pan using the plastic wrap overhang and place it on a cold serving plate.
- Top with scoops of the remaining ice cream, press sugar cones onto the scoops, and drizzle with Magic Shell and candies before serving.
Notes
For the best presentation, chill your serving plate in the freezer for 20 minutes before unmolding to prevent the bottom from melting. When slicing, use a sharp knife dipped in warm water and wiped dry between cuts to maintain clean, distinct layers of ice cream and cookie.
- Prep Time: 25 mins
- Cook Time: 4 hours
- Category: Dessert
- Method: No-Bake
- Cuisine: American
Simple Freezer Staples

To make this cake, you only need a handful of basic ingredients that you can find at any local grocery store. I like to keep these on hand during the summer months so I am always ready to whip up a dessert.
- Ice Cream Sandwiches (12 count): These form the outer wall and the base of your cake. Use the standard rectangular ones with the soft chocolate cookie and vanilla filling.
- Ice Cream (2 quarts): I find that using a mix of flavors adds a nice look. I usually go with 1.5 quarts of chocolate and 1 pint of vanilla, but you can use whatever your family likes best. Just make sure it is softened enough to stir.
- Sugar Cones (3): These add a bit of height and a nice crunch to the top of the cake. They make the cake look like a classic ice cream parlor treat.
- Chocolate Magic Shell: This is the secret to that quick, crisp chocolate coating. It hardens instantly on the cold ice cream, creating a wonderful texture.
- Candies and Sprinkles: This is where you can have some fun. I like using peanut butter M&Ms and confetti sprinkles for a pop of color and extra crunch.
Using these simple ingredients means you know exactly what you are getting. There are no complicated techniques involved, just honest flavors that work well together.
The Simple Way to Assemble
Step 1: Prep Your Pan
Start by lining an 8-inch or 9-inch standard round cake pan with plastic wrap. Make sure the plastic hangs over the edges quite a bit so you have something to grab onto later. Let your ice cream sit out on the counter for about 10 to 15 minutes until it is soft enough to stir but not completely melted.
Step 2: Build the Walls
Unwrap your ice cream sandwiches and cut them evenly in half. Place these sandwich pieces cut-side-down around the inside edge of your cake pan. They should stand up tall, creating a beautiful border for the rest of your ingredients.
Step 3: Fill the Center
Take half of your softened ice cream and put it in a bowl. Stir it until it is thick and pourable, almost like a very thick milkshake. If you want to add crushed cookies or extra chocolate chips, now is the time to stir them in. Pour this mixture into the center of the cake pan, surrounded by the sandwiches.
Step 4: The First Freeze
Immediately put the pan in the freezer. Also, put the rest of your ice cream back in the freezer so it stays firm. Let the cake chill until it is solid, which usually takes about 4 hours, though letting it sit overnight is even better for a sturdy result.
Step 5: Unmold and Decorate
When you are ready to serve, pull the ends of the plastic wrap upward to lift the cake out of the pan. Place it on a cold serving plate. Use an ice cream scoop to put mounds of the remaining ice cream on top of the cake. Press your three sugar cones onto three of the scoops.
Step 6: Finishing Touches
Pour the chocolate Magic Shell over the ice cream mounds and the cones. It will harden quickly, so immediately toss on your sprinkles and candies. Put the cake back in the freezer for a few minutes to set everything before you slice into it.
Jesse’s Simple Tips for Success

Working with frozen treats can be a bit of a race against the clock, but don’t let that worry you. My best advice is to chill your serving plate in the freezer for 20 minutes before you unmold the cake. This keeps the bottom from melting while you are adding the decorations. For more easy frozen ideas, you might enjoy my chocolate eclair cake which uses similar simple layers.
When it comes to slicing, use a sharp knife that has been dipped in warm water. Wipe the knife dry between every single cut. This ensures that the layers stay distinct and the ice cream sandwiches don’t get squashed. This recipe is very forgiving, so even if a sandwich piece tips over while you are pouring the center, just nudge it back into place with a spoon. You can also find great inspiration for these types of assembly desserts over at Sprinkle Bakes.
Keep It Simple Swaps
You can easily change the flavors of this cake based on what you have in the freezer. Instead of chocolate ice cream, try using mint chocolate chip or even a bright strawberry flavor for a summer birthday. If you love a bit of extra texture, our Oreo icebox cake is another great way to use basic cookies and cream.
Another simple change is to use different candies for the topping. Chopped peanut butter cups or crushed peppermint candies work wonders during the holidays. You can even swap the sugar cones for waffle bowls if you want a different look on top. The goal is to keep it fun and use what your family enjoys most without making it complicated.
Simple Enjoyment and Serving

I like to serve this cake straight from the freezer on a warm afternoon. Because it is so cold and creamy, it pairs perfectly with a hot cup of coffee after a big family dinner. If you are looking for a fruitier option for your next gathering, consider serving this alongside a strawberry icebox cake for a variety of textures.
When you slice this cake, try to cut between the ice cream sandwiches. I find that a slice containing two sandwich halves is the perfect portion size for an adult. For the kids, a single sandwich width is usually plenty. It is meant to be eaten casually, even standing at the kitchen counter with a spoon.
Simple Truth and Comfort Baking
This ice cream sandwich cake is proof that you don’t need a hot oven to make something memorable. It is a reliable, honest dessert that honors the simple ingredients we all grew up with. If you enjoyed this no-fuss recipe, you should also try my strawberry chocolate icebox cake for another easy treat that improves with time.
I hope this cake brings a bit of cool comfort to your home. If you make it, please share a photo with us! You can find more simple recipes and family favorites on our Pinterest, Instagram, and Facebook pages. Happy baking—or in this case, happy freezing!
