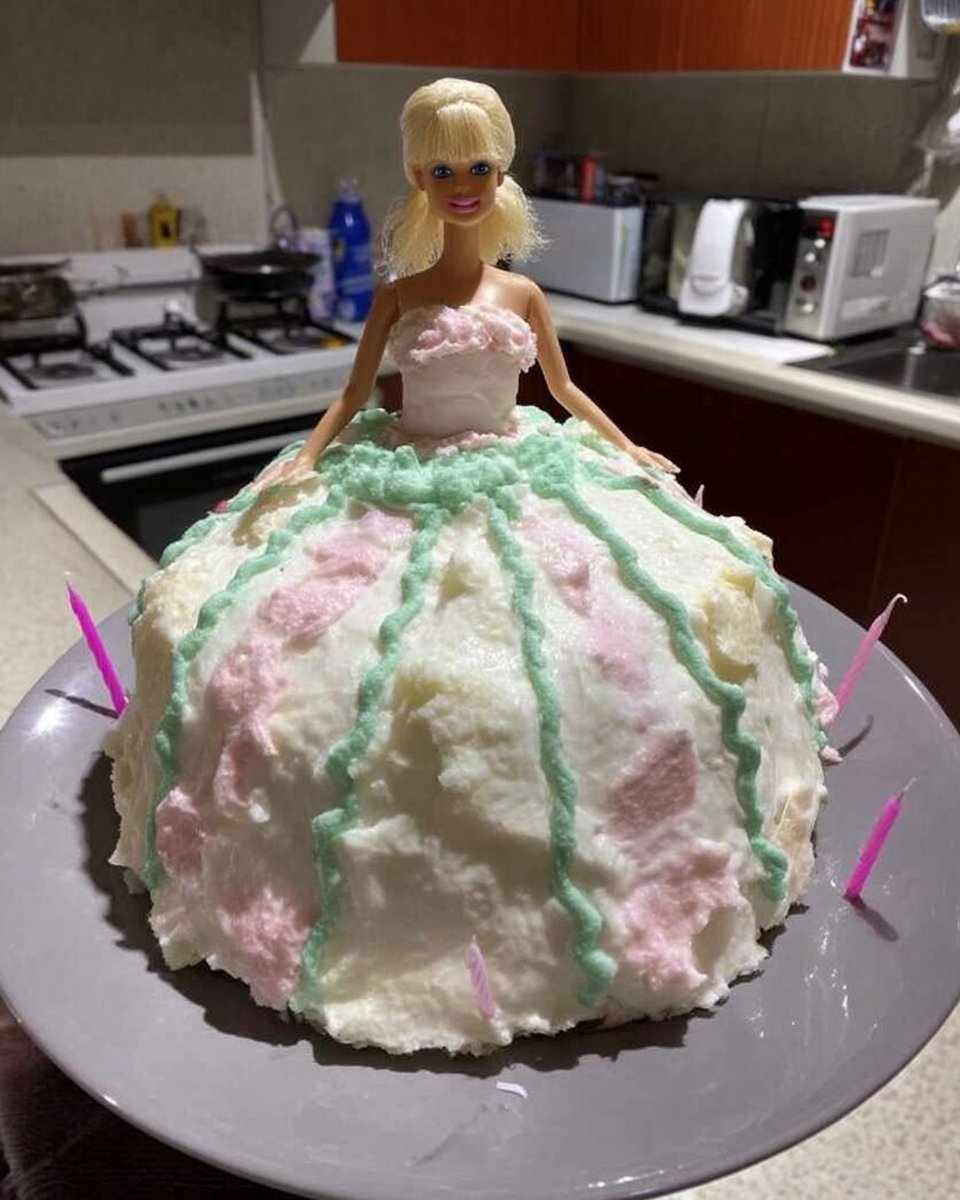
I used to watch those mesmerizing cake videos online and think, “There is no way I’m trying that in my kitchen.” But when a special birthday request came in for a princess cake, I realized that the dramatic “tsunami” effect is actually a brilliant shortcut. Instead of spending hours piping a perfect dress, you let gravity and ganache do the heavy lifting for you.

This Princess Tsunami Cake features tender cake layers carved into a skirt, topped with a doll and a collar of colorful ganache. When you lift the acetate, the frosting flows down like a magical waterfall, creating a dress right before your eyes. It is messy, interactive, and incredibly fun—exactly what baking should be.
Why This Recipe is a Keeper
This cake is the ultimate party trick that requires surprisingly little technical skill. Unlike fondant-heavy designs that take days to dry, this beauty comes together with standard buttercream and a simple ganache pour. The “pull-me-up” moment is pure joy for kids and adults alike, making it the centerpiece of any celebration. Plus, you can customize the colors to match any princess theme, from a blue Cinderella ballgown to a yellow Belle-inspired dress.
Print
Princess Tsunami Cake
- Total Time: 55 mins
- Yield: 12 servings
- Diet: Vegetarian
Description
This Princess Tsunami Cake is a show-stopping dessert that uses a gravity-defying ganache “waterfall” to create a beautiful dress for a central doll. It is the perfect interactive centerpiece for birthday parties, offering a high-impact reveal with minimal technical piping skills required.
Ingredients
- 3 6-inch round cake layers
- Crusting buttercream frosting (tinted to match)
- 12 oz blue candy melts or white chocolate with oil-based food coloring
- 1/2 cup heavy cream
- 1 standard fashion doll
- Plastic wrap
- Assorted sprinkles
- Acetate sheet
- Tape
Instructions
- Wrap the bottom half of the fashion doll in plastic wrap to keep it clean for assembly.
- Core the centers of the three 6-inch cake layers using a round cutter, then stack them on a cake drum with buttercream between each layer.
- Freeze the stacked cake for 20 minutes to firm up, then use a serrated knife to carve the stack into a tapered cone or skirt shape.
- Apply a crumb coat of buttercream over the entire skirt, smooth it with a spatula, and freeze for another 10 minutes to set.
- Make the ganache by heating heavy cream until warm and stirring it into the candy melts until smooth and pourable.
- Wrap an acetate sheet tightly around the top of the cake to create a tall collar, secure it with tape, then place the doll in the center hole.
- Pour the cooled ganache into the acetate collar around the doll’s waist, top with sprinkles, and lift the sheet straight up when ready to serve for the tsunami effect.
Notes
For the smoothest flow, ensure your ganache is barely warm to the touch before pouring; if it is too hot, it will melt your base buttercream, but if it is too cold, it will clump instead of cascading. Always place the cake on a rimmed baking sheet before the reveal to catch any excess ganache and prevent a mess on your table.
- Prep Time: 45 mins
- Cook Time: 10 mins
- Category: Dessert
- Method: Assembly
- Cuisine: American
Simple Ingredients

- Cake Layers: You will need three 6-inch round cakes. Feel free to use your favorite sturdy box mix or a homemade recipe.
- Buttercream Frosting: A standard crusting buttercream works best here. You’ll want to tint it to match your ganache for a cohesive look under the flow.
- Candy Melts: Blue candy melts (or white chocolate with oil-based food coloring) create the base for the pourable ganache.
- Heavy Cream: This thins the candy melts into a pourable consistency that flows easily without being too watery.
- The Doll: A standard fashion doll (like a Barbie) is the star of the show. Just make sure to wrap the bottom in plastic wrap.
- Sprinkles: A generous amount of sprinkles adds texture and sparkle to the flowing skirt.
- Acetate Sheet: This clear plastic sheet is essential for holding the ganache in place before the big reveal.
How to Make It
Step 1: Prep and Stack
Start by wrapping the bottom half of your doll in plastic wrap to keep her clean. Using a round cutter, core the center of your three 6-inch cake layers. Stack them on a cake drum with buttercream in between, ensuring the holes align. Pop the stack in the freezer for 20 minutes to firm up.
Step 2: Carve the Skirt
Once chilled, use a serrated knife to carve the stacked cake into a cone or skirt shape. Start at the top edge and cut downward at an angle. Don’t worry if it’s not perfectly symmetrical; the frosting will cover it. Freeze again for 10 minutes.
Step 3: Crumb Coat
Cover the carved cake with a generous layer of buttercream. Smooth it out as best as you can, moving your spatula in an upward spiral. This base coat prevents crumbs from mixing with your ganache. Freeze for another 10 minutes to set.
Step 4: Make the Ganache
Heat the heavy cream in the microwave until warm (about 30 seconds). Pour it over your candy melts and let it sit for a minute before stirring until smooth. If it’s too thick, add a splash more cream; it needs to be thinner than a standard drip so it flows quickly.
Step 5: The Setup
Wrap the acetate sheet tightly around the top of the cake, securing it with tape. It should create a tall collar standing up from the top edge. Place the doll in the center hole and secure her with a little buttercream. Pour the cooled ganache into the collar around the doll’s waist and top immediately with sprinkles.
Step 6: The Tsunami Pull
When you are ready to serve, quickly lift the acetate sheet straight up. The ganache and sprinkles will cascade down the sides, coating the cake in a beautiful, sweet skirt. Wipe up any pooling excess at the base and pipe a quick border if desired.
Meagan’s Tips

- Temperature Matters: Let your ganache cool until it is barely warm to the touch. If it’s too hot, it will melt your buttercream base; if it’s too cold, it won’t flow down the skirt.
- Contain the Mess: This is a “tsunami” for a reason! Always place your cake stand on a rimmed baking sheet before doing the pull to catch any dripping ganache.
- Sturdy Foundation: Since you are carving the cake, you need a sponge that isn’t too crumbly. My vanilla cake recipe is dense enough to hold its shape while still being soft and delicious.
Make It Yours
- Chocolate Lover’s Dream: Swap the vanilla layers for chocolate fudge cake and use dark chocolate ganache for a dramatic, rich look.
- Different Themes: Change the food coloring to green for a fairy theme or white for a winter wonderland bride. You can even use edible glitter for extra sparkle.
- Dairy Inspiration: If you are looking for more fun ways to use cream and dairy in your baking, check out this cute Valentine’s Day tsunami cake for more ideas.
Simple Serving

This cake is all about the moment of the reveal, so gather everyone around before you lift the plastic. Once the ganache has settled, slice the cake just like a regular round cake. It pairs beautifully with a cold glass of milk to balance the sweetness of the candy melts. It is the perfect interactive dessert for party cakes and events where you want to impress without stress.
The Sweet Spot
Baking should be fun, and this Princess Tsunami Cake brings a sense of playfulness back into the kitchen. Don’t stress about a little mess—that is part of the charm. If you prefer a more traditional finish without the flow, you can always stick to a classic yellow cake with chocolate frosting. But for a birthday to remember, give this waterfall skirt a try!
Connect with me on social media!
