I still remember the first time I saw a cake that looked like a blooming spring garden; I was absolutely convinced it was some kind of wizardry. It wasn’t until I picked up a petal tip myself that I realized the secret wasn’t magic, but a simple technique that anyone can master. Transforming a plain cake into a floral masterpiece is one of those joyful moments where you feel like a total pro without the stress.

This Tulip Cake is the ultimate way to bring a little sunshine to your kitchen using bright colors and a few smart tools. We are taking a simple vanilla or chocolate base and giving it a massive flavor pop with creamy, colorful icing that looks as good as it tastes. You won’t believe how easy it is to create these stunning petals once you get into the rhythm of the squeeze-and-turn!
A Garden on a Cake
You are going to fall in love with this recipe because it makes the difficult look incredibly easy. The secret is all in the petal tip, which does most of the heavy lifting for you! By using a palette of burgundy, ivory, and moss green, you create a sophisticated look that is perfect for birthdays, showers, or just a Tuesday treat. It is a fantastic way to practice your piping skills while creating something that will make your friends and family go “wow.”
Plus, the addition of pearlized jimmies and sugar pearls adds a lovely crunch and a bit of sparkle that catches the light beautifully. It is about taking basic ingredients and using one smart technique to change everything. You get to be the artist and the baker all at once, and the result is a vibrant, happy dessert that tastes like a dream.
Print
Tulip Cake
- Total Time: 1 hour 20 mins
- Yield: 1 cake (8-10 servings)
- Diet: Vegetarian
Description
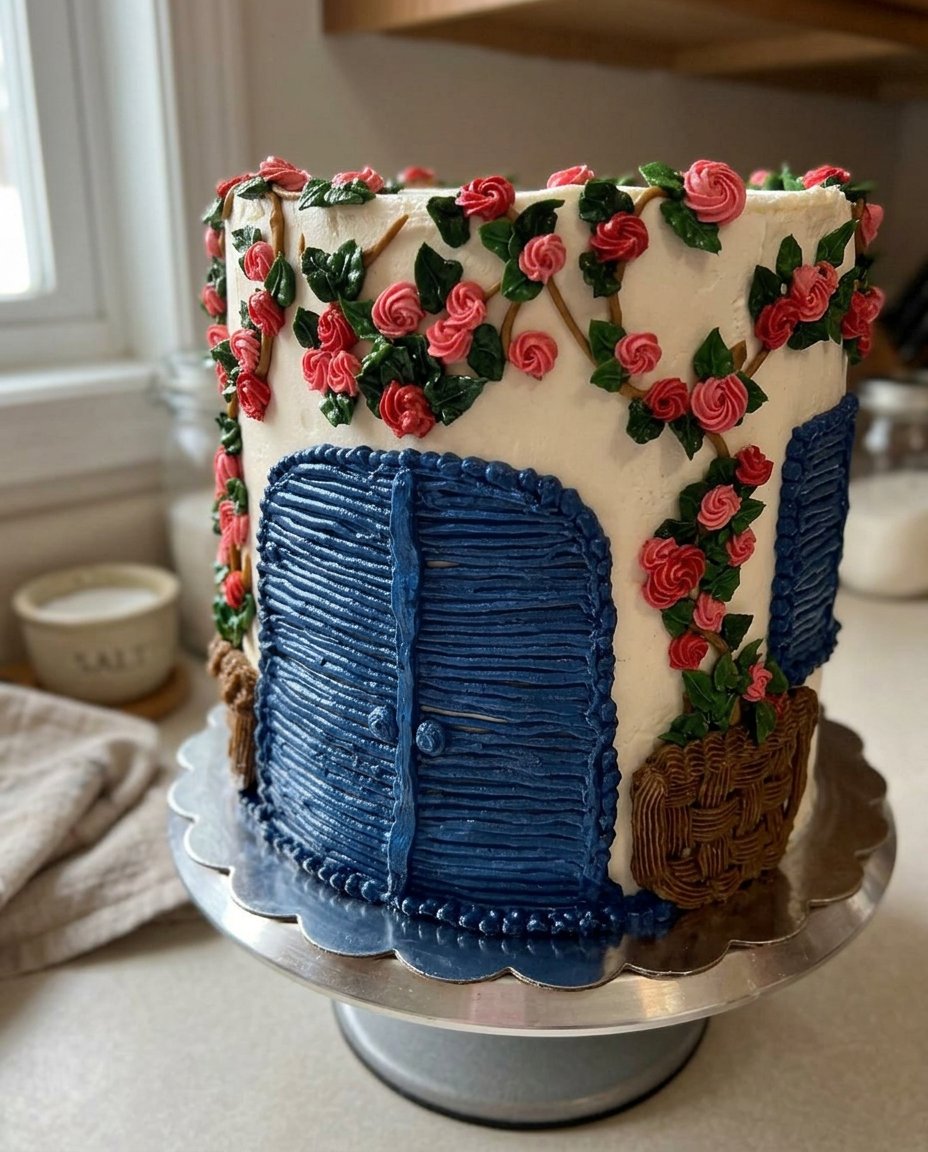
Create a breathtaking floral display with this elegant Tulip Cake, featuring realistic piped petals and a sophisticated color palette. This tutorial guides you through the process of using specialty tips to turn a simple cake into a stunning spring centerpiece.
Ingredients
- 1 favorite 6-inch cake base
- 4.5 lb. tub White Decorator Icing
- Ivory icing color
- Black icing color
- Burgundy icing color
- Moss Green icing color
- Purple petal mix (light and dark shades)
- Pearlized jimmies and sugar pearls
- Almond extract (optional)
Instructions
- Portion the white decorator icing into five mixing bowls and tint using the icing colors to create moss green, light burgundy, dark purple, light purple, and ivory shades.
- Fit 12-inch disposable bags with couplers and tip 123, then fill them with the colored icings, including one bag with a swirl of burgundy and purple for flower centers.
- Using a flower nail and icing squares, pipe a small mound with tip 12 and dots with tip 3, then use tip 123 at a 45-degree angle to create two rows of overlapping petals.
- Transfer the piped flowers on their squares to the freezer and chill until completely firm.
- Ice the cooled 6-inch cake in pale ivory with textured diagonal marks, then arrange the frozen tulips on top using small mounds of icing for height.
- Finish the design by piping moss green leaves with tip 352 and adding sugar pearls for a decorative sparkle.
Notes
To achieve the most realistic look, try using a multi-colored striped bag of icing for the centers of your flowers. If the icing becomes too soft while piping, place the decorating bag in the refrigerator for 5-10 minutes to firm up. Always use a flower nail with parchment squares to make transferring the frozen blooms to your cake much easier and cleaner.
- Prep Time: 45 mins
- Cook Time: 35 mins
- Category: Dessert
- Method: Piping
- Cuisine: American
The Flavor Stars

To get this tulip look just right, you need a few specific items that work together to create those realistic petals and rich colors. While the cake base can be any flavor you adore, the icing is where the real transformation happens.
- White Decorator Icing: We start with a large 4.5 lb. tub to ensure we have plenty for all those layered petals.
- Icing Colors: Ivory, Black, Burgundy, and Moss Green are the keys to our natural, earthy floral palette.
- Pearl Dust and Sugar Pearls: These add that extra “pop” of texture and shine that takes the cake from simple to special.
- The Petal Tip (123): This is our MVP! This specific tip is what gives the tulips their characteristic curved, delicate shape.
- Petal Mix: A combination of light and dark purple shades creates depth in every bloom.
The Simple Process
Step 1: Tint Your Icing
Portion your white decorator icing into five small mixing bowls. Put 1/4 cup in one bowl and tint it green using a mix of Ivory and Moss Green icing colors. In the other four bowls (1/2 cup each), create your floral shades: light burgundy, dark purple, light purple, and ivory. To get those deeper, moody purples, mix a tiny bit of Black icing color into your Burgundy icing until you reach that perfect shade.
Step 2: Prep Your Decorating Bags
Get your 12-inch disposable bags ready! Fit one with a coupler and one with tip 123, then fill both with ivory icing. Prepare another bag with a coupler and a swirl of burgundy, dark purple, and light purple—this multi-colored mix will be our secret for realistic flower centers. Finally, prepare three more bags with tip 123 using your remaining color combinations.
Step 3: Pipe the Tulips
Place a flower template on your nail and attach an icing square. Using tip 12, pipe a small mound in the center, then switch to tip 3 to pipe one tall pull-out dot with six shorter dots around it. Now, grab your tip 123 bag at a 45-degree angle. Squeeze while turning the nail to form three overlapping petals. Repeat for a second row of petals to give the tulip its full, lush look. Slide the square off and pop it in the freezer to chill until firm!
Step 4: Ice and Decorate
Bake your favorite 6-inch cake and let it cool completely. Ice the whole thing in a pale ivory shade, using a spatula to create pretty diagonal marks on the sides for texture. Arrange your chilled tulips on top, using small mounds of icing to give some flowers extra height. Finish by sprinkling your dusted sugar pearls and piping little moss green leaves with tip 352 to bring the whole garden together.
Jasmine’s Flavor Tips

One of my favorite tricks for a professional finish is the cornstarch tap! If your icing petals have any jagged or unfinished edges, simply dip your finger in a little cornstarch and gently press the icing into place. It smooths everything out without sticking to your skin. Also, for a real flavor pop, try adding a drop of almond extract to your icing to give it a cherry-like aroma that pairs perfectly with the floral design.
If you are looking for more ways to celebrate the season with sweets, check out our favorite spring-cake ideas for more inspiration! Remember that temperature is your friend; if your hands are warm and the icing gets soft, just set the bag down for five minutes in the fridge to keep those petal edges crisp and sharp.
Other Pops of Flavor
You can easily make this recipe your own by playing with different color palettes. Instead of moody purples, try a sunset theme with oranges and yellows, or a classic rose-cake style using shades of pink and red. If you want to change the flavor profile, swap out the vanilla icing for a light lemon buttercream or even a hint of orange blossom water for a truly botanical experience.
You can also experiment with the flower centers! Instead of icing dots, try using a single large sugar pearl or a cluster of yellow nonpareils to mimic pollen. For a more detailed guide on creating various blooms, you can see the supply list and original inspiration on the Wilton website to see how they play with different petal shapes.
Simple Serving Ideas

This cake is a true centerpiece, so I love to keep the presentation simple and elegant. Place your masterpiece on a clean white cake stand to let the colors of the tulips really pop. When you are ready to serve, use a sharp, thin knife dipped in warm water to get clean slices through those frozen icing flowers.
I highly recommend serving this with a hot cup of Earl Grey tea or a light sparkling hibiscus lemonade to complement the floral notes. If you’re hosting a larger party, you can even make matching floral-cake cupcakes to sit around the base of the main cake for a full garden effect. It’s a wonderful way to make your guests feel special with very little extra effort!
The Sweet Spot
Creating a tulip cake is such a rewarding way to spend an afternoon in the kitchen. It proves that you don’t need a million different ingredients to make something truly extraordinary—just one smart tool and a little bit of color can change a simple bake into a work of art. I can’t wait to see the beautiful gardens you create on your own cakes!
For more tips on working with botanical designs, don’t miss our guide on cake-flowers. If you loved this recipe, please share your creations with me on Pinterest, Instagram, or Facebook. Happy baking and keep popping those flavors!
Find the original project inspiration here.
