A child’s first celebration deserves a cake that tastes of home and honest ingredients, rather than something plucked from a cold grocery store shelf on a whim.

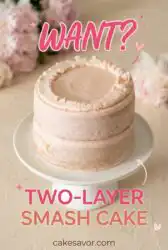
When the first birthday rolls around, every parent wants a centerpiece that looks beautiful in photos but remains soft enough for tiny hands to explore. This Two-Layer Smash Cake is designed with that exact balance in mind, offering a tender crumb that yields easily to a curious toddler. We use real butter and a touch of sour cream to make sure the layers stay moist even if you bake them a day ahead of the big party. It is a humble recipe that honors the tradition of home baking while providing a sturdy canvas for whatever simple decorations you choose to add.
What Makes This Two-Layer Smash Cake a Family Favorite
Prep: 40 min · Serves: 12 · Difficulty: Easy
- Tender crumb melts in your mouth.
- Pantry staples you already own today.
- Sturdy structure stands up to hands.
- Mild vanilla flavor every child loves.
- Forgiving batter works every single time.
This is the recipe my family requests every single time a new little one joins the table. For a larger gathering of adults, you might also enjoy our classic vanilla butter cake which follows many of these same traditional baking principles.
Get The Full Cake Recipe
Print
Two-Layer Smash Cake
- Total Time: 1 hour 15 mins
- Yield: 12 servings
- Diet: Vegetarian
Description
Create a tender, vanilla-infused two-layer smash cake perfect for a baby’s first birthday. This reliable, simple recipe uses real butter and sour cream to ensure a soft, moist crumb that is easy for little hands to explore.
Ingredients
- All-purpose flour
- Granulated sugar
- Baking powder
- Baking soda
- Salt
- Unsalted butter, softened
- Sour cream
- Vanilla bean paste
- Egg whites
- Whole milk
- Strawberry preserves
- Confectioners’ sugar
Instructions
- Prep the pans. Preheat your oven to 350 degrees and grease 6-inch pans, coating them with a dusting of flour to prevent sticking.
- Sift dry ingredients. Combine flour, sugar, baking powder, baking soda, and salt in a bowl, sifting them together to remove lumps and aerate the mixture.
- Whisk wet ingredients. In a separate bowl, stir together the softened butter, warm milk, sour cream, vanilla bean paste, and egg whites until smooth.
- Combine the batter. Gradually stir the wet mixture into the dry ingredients until just combined, being careful not to over-mix the batter.
- Bake the layers. Distribute the batter evenly into the prepared pans and bake for approximately 35 minutes until a wooden pick comes out clean.
- Cool the cakes. Allow the cakes to cool in their pans for ten minutes before transferring them to a wire rack to cool completely to room temperature.
- Make the frosting. Cream the butter until fluffy, then gradually incorporate confectioners’ sugar, strained strawberry preserves, and a pinch of salt.
- Assemble the cake. Spread buttercream between the two layers and frost the exterior, creating a thin crumb coat before applying the final layer of icing.
Notes
- Use room temperature ingredients to ensure the batter emulsifies properly for an even crumb.
- Avoid opening the oven door during the first 30 minutes to prevent the center from sinking.
- Chill baked layers in the refrigerator for at least an hour before frosting to make them easier to handle.
- If a piece breaks off during assembly, use a dab of frosting as glue to repair the structure.
- Strain the strawberry preserves through a fine-mesh sieve to achieve a smooth, spreadable frosting consistency.
- Prep Time: 40 mins
- Cook Time: 35 mins
- Category: Dessert
- Method: Baking
- Cuisine: Southern
Simple Ingredients

Baking for a little one means choosing ingredients that are clean, simple, and reliable for the best results. This recipe relies on the basics that have sat in Southern pantries for generations, making sure the flavor is honest and the texture is exactly what you expect from a home kitchen. We avoid anything too complex because the best memories are often made with the simplest things found right in your cupboard.
- All-Purpose Flour: This provides the essential structure for our layers, making sure they do not crumble too easily when the baby starts digging in during the photo session.
- Granulated Sugar: We use enough sweetness to make it a treat without being overwhelming for a child experiencing their very first taste of dessert.
- Unsalted Butter: Using room temperature butter allows for a smooth batter and that unmistakable rich flavor only real butter provides to a traditional cake.
- Sour Cream: This is our secret to a moist cake that stays fresh, adding a subtle tang and a lot of tenderness to the overall crumb.
- Vanilla Bean Paste: It gives the cake those beautiful little black specks and a deep, authentic vanilla aroma that fills the whole house while it bakes.
- Egg Whites: By using only the whites, we keep the cake color pale and the texture light and airy, which is ideal for a toddler.
- Whole Milk: A splash of warm milk helps the ingredients come together smoothly without overworking the delicate flour during the mixing process.
- Strawberry Preserves: We strain these into the buttercream for a natural pink color and a hint of summer fruit flavor that tastes much better than dyes.
| Ingredient | Why It Matters |
|---|---|
| Sour Cream | Adds moisture and a tender crumb structure |
| Egg Whites | Keeps the cake light and bright white |
| Vanilla Bean Paste | Provides deep flavor and beautiful visual specks |
| Butter | Ensures a rich, traditional Southern cake taste |
| Whole Milk | Creates a smooth batter that bakes evenly |
How to Bake It

Step 1: Prep Your Oven and Pans
Start by preheating your oven to 350 degrees and preparing your 6-inch pans with a coating of butter and a dusting of flour to prevent sticking. I always suggest using cake strips soaked in water to make sure the layers rise flat and stay moist right to the very edges of the pan. If you do not have store-bought strips, a wet kitchen towel wrapped in foil works well to keep the heat even around the pan during the bake.
Step 2: Sift the Dry Ingredients
Place your flour, sugar, baking powder, baking soda, and salt into a large bowl and sift them together to remove any lumps from the mixture. This step is vital because it aerates the flour, which leads to a much lighter cake that isn’t dense or heavy for small children to eat. Give it a quick whisk after sifting to make sure the leavening agents are distributed evenly throughout the sugar and flour for a consistent rise.
Step 3: Combine the Wet Ingredients
In a separate bowl, whisk together your softened butter, warm milk, sour cream, vanilla, and egg whites until the mixture is mostly smooth and looks combined. Do not worry if you see tiny clumps of butter remaining in the liquid; they will disappear once they meet the dry ingredients and hit the heat of the oven. The goal here is to get the liquids well-incorporated so they can hydrate the flour quickly and efficiently without making a mess.
Step 4: Mix Your Two-Layer Smash Cake Batter
Slowly pour the wet mixture into the dry bowl and use a wooden spoon or a whisk to bring everything together until the batter is just combined. You want to stop mixing as soon as you no longer see streaks of dry flour, as over-mixing can make the cake tough instead of tender for the baby. A few small lumps in the batter are fine and will bake out, leaving you with a beautiful, even crumb that looks professional.
Step 5: Fill the Pans and Bake
Distribute the batter evenly among your prepared pans, using a kitchen scale if you want them to be perfectly identical for easier stacking after they cool. Slide them into the center of the oven and bake for about 35 minutes, or until the tops feel springy to a light touch and a wooden pick comes out clean. The smell of vanilla will begin to fill your kitchen as the cakes reach their peak, signaling that the celebration is almost ready to begin.
Step 6: Cool the Layers Completely
Let the cakes sit in their pans for about ten minutes before carefully turning them out onto a wire rack to finish cooling to room temperature. It is tempting to frost a warm cake, but the butter in the frosting will melt and slide right off if the layers are not completely cold. I often find these cakes are easiest to handle if you wrap them and let them rest on the counter overnight before you begin the assembly.
Step 7: Prepare the Buttercream
Cream your softened butter in a large bowl until it looks pale and fluffy, then slowly add in your confectioners’ sugar one cup at a time. Once the base is smooth, you can stir in your strained strawberry preserves and a pinch of salt to balance the sweetness of the sugar for a pleasant taste. This frosting should be thick enough to hold its shape but soft enough that a baby can easily swipe a finger through it without effort.
Step 8: Assemble and Decorate
Place your first layer on a plate, spread a generous amount of strawberry buttercream on top, and then set the second layer firmly in place over the filling. Spread a thin layer of frosting over the entire cake to trap any crumbs, let it set in the fridge, and then finish with a final smooth coat. The beauty of this cake is in its simplicity, so do not feel pressured to make it look like it came from a fancy bakery catalog.
Grandmother’s Tips

One of the most important things to remember when baking for a toddler is the temperature of the ingredients before you even begin to mix. Make sure your butter, eggs, and sour cream are all at room temperature to help the batter emulsify into a smooth, even texture that bakes up beautifully every time. If you use cold ingredients, the butter will clump up and the cake might end up with an uneven crumb that is difficult for a child to eat.
To get those perfectly flat layers that stack so well, try to avoid the temptation of peaking in the oven before the timer goes off. Every time you open the door, the temperature drops and can cause the center of your cake to sink, leaving you with a dip that requires extra frosting to fill. Trust your timer and the smell of the vanilla to tell you when it is time to check the cakes with a wooden pick for doneness.
If your cake is too crumbly to frost without tearing the surface, it might be too fresh or still holding onto some internal heat from the oven. Try chilling the layers in the refrigerator for at least one hour to firm up the butter and make them much easier to handle with your spatula. This little bit of patience makes the crumb-coating process much faster and results in a cleaner look for the final presentation on the birthday table.
For those who are new to stacking cakes, you might want to read this classic two layer yellow cake chocolate frosting story to see how simple the process can be. It reminds us that even the most basic cakes hold a special place in the family history when they are made with care and shared with those we love most in the world.
When you are making the frosting for a little one, it is helpful to follow a guide on how to prepare a cake for a baby’s first birthday to ensure the texture is just right. You want something that is creamy and soft so it creates those wonderful messy photos that families cherish for decades after the party is over.
Always use a gentle hand when turning the cakes out of their pans to prevent any breakage on the delicate edges. I like to run a thin knife around the perimeter of the pan to make sure the cake is completely free before I flip it onto the cooling rack. If a small piece does break off, you can use a little bit of frosting as glue to stick it back in place before you start the final decorating.
Frequently Asked Questions
Can I make this cake a day ahead of the party?
Yes, you can certainly bake the layers a day in advance to save time on the morning of the celebration. Simply wrap the cooled layers tightly in plastic wrap and keep them at room temperature or in the refrigerator. This often makes the cake easier to frost because the crumb has had time to settle and firm up slightly.
What if I do not have 6-inch cake pans at home?
If you only have larger pans, you can double the recipe for two 8-inch layers or triple it for 9-inch pans. However, for a true smash cake that is easy for a baby to handle, the 6-inch size is really the most traditional and practical choice. You can also use the extra batter to make a few matching cupcakes for the guests to enjoy.
How do I make sure the cake does not stick to the pan?
The best way to prevent sticking is to grease the pans thoroughly with butter and then add a light dusting of flour, tapping out any excess. For extra insurance, you can cut a small circle of parchment paper to fit in the bottom of each pan. This makes sure the cake releases perfectly every time without any tearing on the bottom or sides.
Is this cake recipe safe for a one-year-old child?
This cake uses simple, honest ingredients like butter, flour, and milk that are generally fine for a first birthday treat. However, always check with your pediatrician if you have concerns about introducing new foods like eggs or dairy. We keep the sugar levels moderate so it is a gentle introduction to the world of desserts for a little one.
Can I freeze the cake layers for a later date?
You can freeze these cake layers for up to three months if they are wrapped well in plastic wrap and then placed in a freezer-safe bag. When you are ready to use them, let them thaw in the refrigerator overnight while still wrapped to keep the moisture inside. This is a great way to prep for a busy party season well in advance of the actual event.
Why did my cake turn out dense instead of fluffy?
A dense cake is usually the result of over-mixing the batter once the flour has been added to the wet ingredients. When you mix too much, you develop the gluten in the flour, which creates a tough and heavy texture. To avoid this, use a gentle hand and stop mixing as soon as the last streaks of flour disappear into the batter.
Simple Switch-Ups
You can easily change the flavor of this cake to suit your family’s preferences by swapping out the vanilla bean paste for another simple extract. Lemon zest stirred into the batter provides a bright, fresh flavor that pairs beautifully with a blueberry or raspberry preserve in the buttercream frosting. These small changes allow you to use the same reliable base recipe for many different celebrations throughout the year without needing a whole new set of instructions.
If your family prefers a richer flavor for the big day, you might consider making a chocolate layer cake for the adults while keeping the smash cake simple for the baby. This way, everyone at the party gets a treat they enjoy while the birthday child has something mild and easy on their stomach. It is a common tradition in Southern kitchens to have multiple cakes on the counter to make sure every guest feels welcomed and well-fed.
Another easy variation is to change the color of the frosting using natural juices instead of artificial dyes from a bottle. A few drops of beet juice or a spoonful of mashed blackberries can create beautiful shades of pink and purple without changing the flavor too much. This keeps the cake honest and free from unnecessary chemicals, which is something many parents appreciate when they are introducing their children to sweets for the first time.
At the Kitchen Table
When it is time to serve the cake, place it on a sturdy stand or a simple wooden board that can handle a little bit of a mess. I like to clear a space on the table or even use a high chair tray to give the baby plenty of room to explore the textures and flavors. Having a damp kitchen towel nearby is always a good idea to help with the cleanup once the photo session has come to an end.
To make the occasion feel even more special, you can coordinate the colors of the frosting with simple streamers or a handful of fresh flowers from the garden. If you are looking for more ideas on how to style the event, our guide on the smash cake tradition offers plenty of inspiration for making the day memorable. It is less about the perfection of the decorations and more about the joy of watching a child experience something new and sweet for the first time.
I often suggest serving small slices to the adults alongside some fresh coffee or a glass of cold milk while the baby enjoys their portion. This cake is light enough to be enjoyed in the middle of a sunny afternoon without feeling too heavy or overwhelming for the guests. It is the kind of cake that brings people together around the table to share stories and celebrate the growth of the family’s newest member.

Keep This One Close
This recipe for a Two-Layer Smash Cake is more than just a set of instructions; it is a way to mark a significant milestone in your family’s life. We hope that the simple flavors and honest ingredients bring as much joy to your kitchen as they have to ours over the years. Remember that the best cakes are not always the ones that look the most complicated, but the ones that are made with love and shared with a happy heart.
As you continue to celebrate birthdays and special moments, you might find yourself reaching for this birthday cake recipe for the older children in the house. There is something wonderful about having a collection of reliable recipes that grow with your family from year to year. We would love to see how your celebration turns out, so please feel free to share your stories and photos with us on our social channels.
