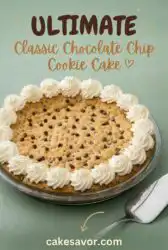
A fresh wedge of this golden, chewy cake sits on the kitchen counter, still warm from the oven, and it is already disappearing slice by slice before the afternoon coffee is even poured.

If you are looking for a stress-free dessert that brings pure joy, this Classic Chocolate Chip Cookie Cake is the ideal answer for your busy week. We are skipping the fussy cookie scoop and the multiple baking sheets in favor of one simple springform pan that does all the heavy lifting. You get all the buttery, brown-sugar-rich goodness of a classic cookie, but baked into a thick, shareable cake that feels wonderfully special without any of the extra effort. It is the type of recipe that makes you feel like an accomplished baker even on a chaotic weekday evening when time is short.
What Makes This Classic Chocolate Chip Cookie Cake Shine
Prep: 15 min · Serves: 12 · Difficulty: Easy
This classic cookie cake is the simple, stress-free bake your family will love.
- Baked in one single pan for quick cleanup.
- Soft, chewy centers with crisp outer edges.
- Uses basic pantry ingredients you already have.
- Ready to enjoy in under forty minutes.
- Easy to decorate with simple buttercream swirls.
Get The Full Cake Recipe
Print
Classic Chocolate Chip Cookie Cake
- Total Time: 45 mins
- Yield: 12 servings
Description
This decadent cookie cake features a chewy, buttery center with crispy edges, all baked in a single pan for minimal cleanup. It is the perfect stress-free dessert for any occasion, offering the classic flavors of a homemade chocolate chip cookie in a thick, shareable format.
Ingredients
- Unsalted butter, softened
- Brown sugar, packed
- Granulated sugar
- Egg
- Egg yolk
- Vanilla extract
- All-purpose flour
- Cornstarch
- Salt
- Baking soda
- Mini chocolate chips
Instructions
- Cream the sugars. In a large bowl, cream the softened butter, brown sugar, and granulated sugar together for three minutes until fluffy.
- Mix wet ingredients. Add the vanilla, egg, and extra yolk to the butter mixture and beat until glossy and unified.
- Whisk dry ingredients. In a separate bowl, whisk together the flour, cornstarch, salt, and baking soda.
- Combine the mixtures. Gradually stir the dry ingredients into the butter mixture on low speed until just combined.
- Fold in chips. Gently fold the mini chocolate chips into the dough using a silicone spatula.
- Prepare the pan. Line a ten-inch springform pan with parchment paper and press the dough firmly into an even layer.
- Chill the dough. Place the pan in the freezer for fifteen minutes while preheating the oven to 350°F.
- Bake the cake. Bake for approximately thirty minutes, shielding the top with foil if it browns too quickly.
- Cool and serve. Allow the cake to cool completely in the pan before releasing the ring and decorating as desired.
Notes
- Use room temperature butter to ensure the dough maintains the correct emulsion for a chewy texture.
- Measure flour using the spoon-and-level technique to prevent a dry or crumbly cake.
- Do not skip the freezer chilling step as it prevents the cake from spreading too thin during baking.
- Always use a hot knife when slicing the finished cake to achieve clean, professional-looking wedges.
- Test for doneness by checking that a toothpick inserted into the center comes out with a few moist crumbs.
- Prep Time: 15 mins
- Cook Time: 30 mins
- Category: Dessert
- Method: Baking
- Cuisine: American
Grab These From the Kitchen

You do not need any fancy baking items or hard-to-find ingredients to make this dessert. A quick scan of your cupboards is likely all it takes to gather the simple pantry items needed to bring this sweet cake to life on your counter. Keeping things simple is the secret to stress-free baking, and this recipe relies entirely on familiar, honest components that combine into something truly spectacular.
- Unsalted Butter: We want this very soft, almost melting, to create a chewy cookie texture rather than a light, crumbly crumb.
- Brown Sugar: Packing this sugar into the dough adds moisture and a deep caramel flavor that defines a good cookie.
- Granulated Sugar: Granulated sugar balances the moisture from the brown sugar and helps create those wonderfully crisp outer edges.
- Egg and Egg Yolk: The extra yolk adds richness and helps keep the center of the cake dense, chewy, and soft-baked.
- All-Purpose Flour: This provides the structure for our cake, keeping it sturdy enough to slice but tender to bite.
- Adding a little of this Cornstarch: Using this little pantry secret keeps the flour from developing too much gluten, ensuring the crumb stays soft.
- Mini Chocolate Chips: Mini chips mean you get chocolate in every single bite, which is essential for a great cake.
- Vanilla Extract: A generous splash of quality vanilla rounds out all the sweet, buttery flavors in the dough.
| Ingredient | Why It Matters |
|---|---|
| Butter | Melted slightly for maximum chewiness |
| Egg Yolk | Adds rich moisture for a dense center |
| Cornstarch | Keeps the texture beautifully soft |
| Mini Chips | Guarantees even chocolate distribution |
| Brown Sugar | Deepens the flavor with caramel notes |
| Granulated Sugar | Balances moisture and crisps edges |
From Bowl to Oven

Step 1: Cream the Softened Butter and Sugars
Start by placing your very soft butter, brown sugar, and granulated sugar into a large mixing bowl. Using a sturdy wooden spoon or a hand mixer, cream them together for about three minutes. The mixture should look pale, smooth, and slightly fluffy before you move to the next stage of the process.
Step 2: Mix in the Wet Ingredients
Pour the vanilla extract, whole egg, and extra egg yolk directly into the sweet butter mixture. Beat these together for another two minutes until the batter is glossy and fully unified. You will notice the rich aroma of vanilla filling your kitchen as the liquids combine into a smooth batter.
Step 3: Whisk the Dry Ingredients Together
Grab a separate bowl to whisk your flour, cornstarch, salt, and baking soda together until they are evenly blended. Making sure these dry ingredients are evenly distributed prevents any salty or metallic spots in your finished dessert. The mixture should look light, uniform, and powdery after a thorough whisking with a wire whisk.
Step 4: Combine the Wet and Dry Mixtures
Slowly add your dry ingredients to the creamed butter mixture while stirring on a low speed. Stop mixing the very moment the flour disappears into the dough to avoid making the cake tough and bread-like. You should have a thick, cohesive dough that easily pulls away from the sides of the bowl.
Step 5: Fold in the Mini Chocolate Chips
Pour the mini chocolate chips over the dough and gently fold them in with a silicone spatula. You want to stir only enough to distribute the chocolate evenly without overworking the flour mixture. The finished dough should look heavily studded with chocolate chips throughout every single inch of the mixture.
Step 6: Prepare the Springform Pan and Smooth the Top
Prepare your ten-inch springform pan by lining the bottom with a round of parchment paper to prevent sticking. Press the thick cookie dough firmly into the bottom of the pan, using your clean hands or the back of a measuring cup to create an even, flat surface. This flat surface helps the cake bake evenly from the edges to the center.
Step 7: Chill the Prepared Dough in the Freezer
Place the springform pan directly into your freezer for fifteen minutes while your oven preheats to 350°F. Chilling the dough keeps the fat solid in the butter, which keeps the cake from spreading too flat or losing its thick shape during the bake. This quick step is crucial for achieving that dense, bakery-style texture we want.
Step 8: Bake Your Classic Chocolate Chip Cookie Cake to Perfection
Slide the chilled pan onto the middle rack of your preheated oven and bake for approximately thirty minutes. Keep an eye on the oven around the twenty-five-minute mark to see if the top is browning too quickly. If the surface looks dark, shield it with foil so the interior can finish baking without burning.
Step 9: Cool Completely and Release from the Pan
Let the baked cake cool completely in the pan on a wire rack before releasing the springform ring. Once cooled, you can pipe rich buttercream stars around the border and add a handful of colorful sprinkles. The cooled cake will feel solid on the outside but remain delightfully soft and dense in the center.
Make-It-Easier Tips

First, make sure your butter is truly soft but not completely liquid before you begin creaming. If your butter is too hot, the dough will become greasy, and your cake will turn out flat and greasy; to fix this, let the butter sit at room temperature for an hour instead of using the microwave. This handles the correct emulsion when combined with the sugars.
Second, measure your flour using the spoon-and-level method rather than scooping directly from the bag. Scooping packs too much flour into the cup, leading to a dry and crumbly texture. If you want a quick baking alternative, you can always try my easy cake mix cookies for a faster sweet fix that requires almost no effort.
Third, do not skip the brief chilling time in the freezer before baking. Chilling solidifies the fat in the butter, which prevents the cake from over-expanding and losing its thick, chewy texture. For more detailed instructions on temperature control, check out this helpful chewy cookie cake baking guide to make sure your bakes are always flawless.
Fourth, use mini chocolate chips instead of standard chocolate chips for this recipe. Mini chips disperse much better throughout the dense dough, giving you a balanced amount of chocolate in every bite. Large chips can sink or create pockets of melted chocolate that cause the cake to break apart when sliced into wedges.
Fifth, check the center with a toothpick to avoid overbaking the cake. You want the toothpick to come out with a few moist crumbs attached, rather than completely clean. If the cake bakes for too long, it will lose its signature chewy center and become dry and crumbly like standard yellow cake.
Sixth, let the cake cool fully before you attempt to remove it from the springform pan. Trying to release a warm cookie cake often leads to cracking and structural failure. The structure settles and firms up as it cools, making it much easier to slice into clean wedges for serving.
Seventh, use a hot knife to cut clean slices of your finished cake. Run a long chef’s knife under hot tap water, wipe it dry with a towel, and then slice straight down through the cake. Wipe the blade clean between each cut to prevent chocolate smears from messing up your beautiful slices.
Frequently Asked Questions
What is the difference between cookie and cookie cake?
A traditional cookie is portioned into small balls and baked individually, resulting in crispier edges and a lighter bite. A cookie cake is pressed into a single pan and baked as one giant treat, which keeps the center much denser, softer, and chewier. The baking time and pan shape allow the interior to remain soft-baked while the edges turn golden brown. It provides the best of both worlds with crispy corners and gooey centers.
Can I make a cookie cake with a normal cookie recipe?
Yes, you can use a standard cookie recipe, but you may need to adjust the flour and moisture levels to prevent it from spreading too thin. Normal cookie dough often lacks the structure needed to bake evenly in a deep pan. Adding a bit of cornstarch and an extra egg yolk helps create that signature thick, dense texture we love. It keeps the center soft without collapsing under its own weight.
What makes cookies cakey vs chewy?
The ratio of fat, sugar, and flour determines whether your bake turns out chewy or cakey. Recipes with more brown sugar, melted butter, and extra egg yolks produce a denser, chewier crumb that stays soft for days. If you use more white sugar, whole eggs, and leavening agents, the dough will rise more and create a lighter, cakey texture. Our recipe uses cornstarch and an extra egg yolk to guarantee a chewy finish.
How do I store a leftovers cookie cake?
You should store any leftover slices in an airtight container at room temperature for up to three days. To keep the cake from drying out, you can place a piece of white bread in the container to help retain moisture naturally. If you want to keep it longer, wrap individual slices tightly in plastic wrap and freeze them for up to three months. Simply let them thaw on the counter for an hour before enjoying.
Can I make this recipe dairy-free or vegan?
To make a vegan version, you can substitute the butter with a high-quality plant-based butter block and use a commercial egg replacer. Be sure to select dairy-free mini chocolate chips to fold into the sweet dough. The bake time remains the same, though the texture may be slightly lighter than the original version. It still tastes wonderful and satisfies any sweet tooth without any dairy products.
How can I prevent the cake from sticking to the springform pan?
The best way to prevent sticking is to line the bottom of your pan with a round of parchment paper before pressing the dough inside. You should also lightly grease the sides of the pan with butter or non-stick cooking spray for extra insurance. Letting the cake cool fully before releasing the springform ring will also guarantee a clean release without any tearing. This makes sure your cake looks beautiful and intact.
Can I use a regular cake pan instead of a springform pan?
Yes, you can use a regular nine-inch or ten-inch round cake pan if you do not have a springform pan. However, you must line the pan with parchment paper that has overhang flaps to help you lift the cake out safely. Trying to flip a cookie cake upside down will cause it to break and crack across the top. The springform pan is highly recommended for the easiest and cleanest removal.
Why did my cookie cake sink in the middle after baking?
A cookie cake can sink in the center if it is underbaked or if the oven temperature was too low. Because this cake is very dense, the center takes the longest to bake through fully. If you remove it too early, the unset dough will collapse as it cools. Be sure to test the center with a toothpick to make sure it is mostly done before pulling it out.
Simple Swaps
If you want to satisfy a serious cocoa craving, you can swap the mini chocolate chips for chopped white chocolate and peanut butter cups. This combination creates a rich, sweet variation that feels wonderfully indulgent for chocolate lovers. For those who love deep cocoa flavors, pairing this with my favorite rich chocolate treats can create a beautiful dessert table for any gathering. You can also press half a cup of chopped walnuts into the top before baking for a pleasant nutty crunch.
For a fun holiday twist, try replacing the standard mini chips with seasonal M&Ms and colorful sprinkles folded directly into the dough. This adds a delightful crunch and makes the dessert look wonderfully festive for school events or family gatherings. You can even dye your buttercream border with bright gel colors to match the theme of your party. It is an unbelievably easy way to customize the cake for Halloween, Christmas, or Valentine’s Day.
To make a double chocolate version, replace half a cup of the all-purpose flour with unsweetened cocoa powder. This yields a deeply rich chocolate dough that tastes delicious when loaded with white chocolate chips and semi-sweet chunks. It is a fantastic option for those who prefer a more intense chocolate flavor in their baked goods. Be sure to serve this version with a scoop of raspberry sorbet to balance the deep chocolate notes.
Bring It to the Table
When it is time to serve this delicious dessert, cutting it into thin wedges like a traditional cake is always the best approach. A warm slice pairs beautifully with a cold glass of milk or a hot cup of coffee in the afternoon. For a fun twist, you can even slice it into small squares and use them as the base for a loaded dessert bar at your next party. This allows guests to sample different toppings and enjoy smaller portions.
If you want to take things a step further, try serving warm wedges with a generous scoop of vanilla bean ice cream and a drizzle of warm fudge. The ice cream melts slightly into the warm cookie, creating a dessert that feels like a classic diner favorite. If you are hosting a larger gathering, you can also offer a variety of options by serving this alongside a classic chocolate cake recipe to satisfy every guest at the table. This combination makes sure there is something for both cookie lovers and cake enthusiasts alike.
For casual get-togethers, this cake looks beautiful presented right on a wooden cutting board in the middle of the table. Guests can easily grab a slice and enjoy it while chatting, with no fancy plates or forks required. It is a wonderful low-stress party dessert that looks stunning without trying too hard. You can surround the board with fresh berries to add a touch of color and a fresh contrast to the sweet chocolate.

The Wrap-Up
There is nothing quite like a homemade treat to make an ordinary day feel special for the people you love. This recipe takes all the stress out of baking, letting you create something beautiful in under an hour without losing your entire Saturday. I hope you give this simple method a try the next time you need a sweet treat for your family or friends. It is a foolproof bake that always brings smiles to the table.
If you are looking for more inspiration for your kitchen, be sure to check out my other cute quick bakes to find your next favorite recipe. There is a whole world of uncomplicated baking waiting for you, designed to fit right into your busy schedule. You do not need hours of prep or professional skills to create memories around delicious, home-cooked food.
Do not forget to share your baking creations with me online. You can connect with our community and see what everyone else is whipping up by following us on Pinterest, Facebook, TikTok, and Telegram. Happy baking, and I cannot wait to see your beautiful cookie cakes!


