What is that beautiful secret making this glaze shine like a polished dark stone? You are about to discover the simple method to getting this deep, glossy finish right in your home kitchen.

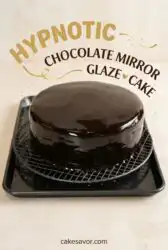
Creating a flawless Chocolate Mirror Glaze Cake is much easier than it looks, especially when you skip the sticky canned milk and use pure cocoa powder. This method relies on Dutch-processed cocoa to deliver a deep, toasty flavor that matches its stunning reflective surface. With only a few basic tools and some patience, you can turn a simple weekend bake into a masterpiece that looks like it belongs in a high-end pastry shop. Let us build this deep chocolate flavor together.
What Makes This Chocolate Mirror Glaze Cake Special
Prep: 60 min · Serves: 12 · Difficulty: Medium
- Deep cocoa flavor blooms beautifully in every single bite.
- Liquid gloss finish needs no condensed milk at all.
- Stunning presentation turns a standard chocolate layer cake into art.
- Simple pantry staples do all the heavy lifting here.
- Silky ganache layers provide a wonderfully stable base coat.
This is the recipe that will have your guests staring in disbelief before they take their first bite.
Get The Full Cake Recipe
Print
Chocolate Mirror Glaze Cake
- Total Time: 3 hours
- Yield: 12 servings
Description
Create a stunning, professional-grade dessert with this easy chocolate mirror glaze recipe. This method yields a deep, reflective, and silky finish that transforms any cake into a masterpiece.
Ingredients
- Dutch-processed cocoa powder
- Gelatine powder
- Cold water
- Pure whipping cream
- Caster sugar
- Dark chocolate ganache (for base)
Instructions
- Prep and chill. Bake and cool your sponge layers, refrigerating for at least one hour until firm before leveling with a serrated knife.
- Smooth with ganache. Frost the cake with a double batch of dark chocolate ganache, using a bench scraper for a glass-smooth surface before chilling for one hour.
- Bloom the gelatine. Sprinkle gelatine powder over cold water in a shallow bowl and let sit for five minutes until it forms a firm, rubbery paste.
- Cook the base. Sift cocoa into a saucepan, whisk in water to create a paste, then stir in cream and sugar over medium-high heat.
- Dissolve the gelatine. Once the glaze reaches a boil, remove from heat, add the bloomed gelatine, and stir until completely smooth and incorporated.
- Strain the glaze. Pour the mixture through a fine-mesh strainer into a clean bowl, covering the surface with plastic wrap to prevent a skin.
- Cool to temperature. Allow the glaze to rest until it reaches exactly 30°C (86°F), monitoring closely with a digital thermometer.
- Execute the pour. Set the cake on a wire rack and pour the glaze in a steady, slow spiral to cover the entire surface evenly.
Notes
- Use a digital thermometer for precision, as the glaze will slide off if too warm or clump if too cold.
- Press plastic wrap directly onto the surface of the warm glaze to prevent a skin from forming while it cools.
- Always strain the glaze through a fine-mesh sieve immediately before pouring to remove any accidental air bubbles or lumps.
- Maintain a very steady, thick stream when pouring to ensure an even, uniform coating over the sides of the cake.
- Prep Time: 60 mins
- Cook Time: 15 mins
- Category: Dessert
- Method: Glazing
- Cuisine: Modern French
Simple Ingredients + One Smart Add

Building a spectacular dessert starts with selecting ingredients that work together in perfect harmony. While the gloss might look complex, the pantry lineup is surprisingly straightforward and relies on clean, accessible elements. Our one smart addition, all the wow, is premium Dutch-processed cocoa powder, which provides a rich, dark color and a wonderfully smooth taste.
- Dutch-Processed Cocoa Powder: This cocoa is treated to reduce acidity, yielding a dark, almost black hue and a mellow, toasty flavor profile that regular cocoa cannot match.
- Gelatine Powder: The key setting agent that allows the warm mixture to transform into a delicate, reflective, jelly-like skin without becoming rubbery.
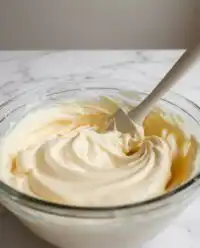
- Pure Whipping Cream: Standard cream provides the fat needed to keep the glaze supple, rich, and highly reflective as it cools on the surface.
- Caster Sugar: Superfine sugar crystals dissolve rapidly into the warm cream, making sure that your glaze remains completely free of gritty particles.
- Dark Chocolate Ganache: A double batch of rich ganache creates a smooth, level foundation that hides any minor cake crumbs and anchors the final pour.
- Gold Leaf and Dust: These edible accents catch the light beautifully against the dark surface, adding a touch of classic elegance.
Now let us look at how these key elements build the structure of our dessert.
| Ingredient | Why It Matters |
|---|---|
| Dutch Cocoa | Delivers the signature dark shade and smooth, non-acidic flavor. |
| Gelatine Powder | Sets the glaze into a thin, glossy, and beautifully reflective layer. |
| Pure Cream | Adds necessary fat for a supple texture and natural liquid sheen. |
| Caster Sugar | Dissolves easily to prevent graininess and keep the finish smooth. |
| Chocolate Ganache | Creates the essential flat, crumb-free barrier on the cake base. |
Building the Flavor

Step 1: Prep and Chill the Cake Layers
Bake your sponge ahead of time and cool the layers completely before wrapping them in plastic. Refrigerate these chocolate layers for at least one hour until they are firm to the touch. Cold cake is far sturdier, which makes leveling and handling much easier during assembly. Trim the tops with a sharp serrated knife so they are flat and level.
Step 2: Smooth and Frost with Ganache
Cover the leveled cake layers with a generous double batch of dark chocolate ganache. Use a metal bench scraper to make the sides and top as smooth as a sheet of glass. Any tiny bump, dip, or crumb on the surface will show through your final glaze. Place the frosted cake back into the refrigerator for at least one hour so the ganache sets firm.
Step 3: Bloom the Gelatine Powder
Pour the cold tap water into a small, shallow bowl. Sprinkle the gelatine powder evenly across the water surface, letting it absorb the liquid naturally. Leave this mixture undisturbed for five minutes until it thickens into a firm, rubbery paste. This process hydrates the gelatine, guaranteeing a smooth dissolve later without leaving rubbery lumps.
Step 4: Whisk and Cook the Glaze Base
Sift your Dutch-processed cocoa powder into a medium saucepan, then slowly pour in the water. Whisk these two together gently until they form a thick, lump-free chocolate paste. Stir in a small splash of the cream to loosen the paste before adding the remaining cream and caster sugar. Gently mix with a silicone spatula, making sure to avoid vigorous stirring that introduces trapped air bubbles.
Step 5: Bring the Glaze to a Boil
Set the saucepan over medium-high heat and watch it closely as it begins to warm. As soon as the dark liquid reaches a gentle boil, remove the pan from the heat immediately. Drop the firm block of bloomed gelatine into the hot liquid. Stir slowly and gently with your spatula until the gelatine dissolves completely into a sleek, dark liquid.
Step 6: Pour and Strain the Chocolate Mirror Glaze Cake Coating
Set a small, fine-mesh strainer over a shallow bowl. Pour the warm glaze through the strainer slowly, keeping the spout of your saucepan close to the strainer. This low height prevents air from being trapped as the liquid drops. Cover the surface of the glaze with plastic wrap, pressing it directly onto the liquid to prevent a skin from forming.
Step 7: Cool the Glaze to the Target Temperature
Allow the covered glaze to rest on your kitchen counter for about two hours until it cools. Use a digital thermometer to track the temperature until it reads exactly 30°C or 86°F. If the glaze is too hot, it will run off the cake too quickly; if it is too cold, it will clump up. Right before pouring, strain the glaze one final time into a clean pouring jug.
Step 8: Execute the Grand Pour
Take your chilled, ganached cake out of the refrigerator and place it on a wire rack over a clean baking sheet. Start pouring the glaze directly over the center of the cake, moving outward in a slow, steady spiral. Pour with confidence in a thick stream so the chocolate drapes like a curtain over the sides. Let the excess liquid drip down for ten minutes before transferring the cake to your serving platter.
Small Tweaks, Big Wow

Temperature is the single most important factor when working with this style of coating. If the glaze is too warm, it will slide right off the sides, leaving a sheer, transparent coating that exposes the under-layer. If it cools past the target temperature, it will become thick and gelatinous, resulting in unsightly lumps and a heavy, rubbery finish.
Getting a spotless surface requires eliminating trapped air. If bubbles form in your glaze after stirring or reheating, twist the bowl rapidly back and forth between your hands on the counter. This action forces the tiny pockets to rise to the center where you can pop them with a toothpick or a very quick pass of a kitchen blowtorch.
Always make sure your cake base is incredibly smooth before you start glazing. We recommend using a sturdy chocolate ganache cake as your base because ganache sets firmer and flatter than standard buttercream. For detailed steps on this pouring method, you can study the technique of chocolate mirror glaze coating to build your confidence before pouring.
If your glaze slides off the cake completely, here is why and how to fix it. This slide happens because the glaze was too warm when poured, or the cake was not cold enough to set the gelatine on contact. To fix this, scrape the run-off glaze back into a bowl, let it cool down to the proper temperature, chill your cake again, and perform a second pour.
Never wipe the excess glaze off the bottom edge of the cake with a dry spatula. Instead, let the drips slow down naturally, then use a warmed palette knife to clean the bottom edge with clean, sweeping motions. This method leaves a crisp, professional border without pulling or tearing the delicate glaze.
Avoid using standard granulated sugar if superfine sugar is available. Superfine sugar dissolves much faster in the warm cream, preventing microscopically small crystals from remaining in the liquid. These tiny crystals can act as seeds for lumping, which dulls the final reflective shine.
Frequently Asked Questions
What is mirror glaze made of?
This style of glaze is made from a combination of gelatine, water, sugar, cream, and unsweetened cocoa powder. Unlike many modern recipes, this particular version does not use sweet condensed milk or glucose syrup. This traditional approach yields a far more natural, deep chocolate flavor and a clean, mirror-like shine that remains sparkling for several days.
Does mirror glaze have to set in the freezer?
No, this glaze does not require a frozen cake base to set properly. A well-chilled cake from a standard refrigerator is perfect because the cool temperature of the ganache will naturally firm up the thin gelatine layer on contact. Freezing the cake can sometimes cause condensation to form under the glaze, which might make the coating slide off later.
How long does it take for a mirror glaze to set?
The glaze begins to set within ten minutes of being poured over the cold cake. It is important to transfer the cake to your serving platter during this window before the gelatine sets completely. Once the cake is fully assembled, it will take about thirty minutes in the refrigerator to become completely firm to the touch.
Why is my mirror glaze not shiny?
A dull finish is usually caused by tiny air bubbles, undissolved sugar crystals, or pouring the glaze at the wrong temperature. If the glaze is poured when it is too cold, it will set too quickly and lose its natural gloss. Using high-quality Dutch-processed cocoa and straining the liquid twice will help guarantee a deep, glass-like shine.
What is the ideal temperature for pouring mirror glaze?
The ideal pouring temperature is exactly 30°C or 86°F. At this temperature, the glaze has the perfect viscosity to flow smoothly over the sides of the cake without running off too thin. We highly recommend using a digital candy thermometer to track this temperature accurately before you begin the pour.
Can I use any cake for a mirror glaze?
While you can use many sponge recipes, a sturdy, dense cake is much easier to work with than a fragile one. The cake must be coated in a firm, perfectly smooth layer of ganache or buttercream before glazing. Any cake with crumbs or uneven surfaces will cause the glaze to ripple and lose its reflective quality.
How do you store a mirror glaze cake?
You can store the cake on your kitchen counter if your room temperature is cool, ideally below 22°C or 72°F. If your kitchen is warm, store the cake in the refrigerator without any plastic wrap touching the glossy surface. An uncut cake does not need to be covered because the set glaze seals the moisture inside.
Swap Your Spice
One beautiful way to make this recipe your own is to bloom your cocoa with warm baking spices. You can add half a teaspoon of ground cardamom or freshly ground cinnamon directly into your cocoa paste. This minor addition blooms beautifully in the hot glaze, giving the cake a subtle, spicy warmth that smells like a cozy winter kitchen.
If you prefer a bright contrast, try adding a splash of orange blossom water or rose water. These floral extracts must be used with a light hand—only a quarter of a teaspoon is needed. This floral note cuts through the heavy richness of a deep chocolate truffle cake and makes the flavor feel incredibly elegant.
You can also introduce a nutty depth by adding a tiny drop of pure almond extract to the glaze mixture. This extract creates a subtle, cherry-like aroma that makes guests stop and wonder about the mysterious, delicious flavor. This is where you make it yours, turning a simple chocolate dessert into something truly memorable with almost zero extra effort.
Bringing the Wow to the Table
Presenting this dessert is all about showing off that flawless, reflective surface. Place the cake on a simple, elegant pedestal stand so the gloss can catch the light from all angles. To enhance the modern aesthetic, keep your chocolate cake decoration minimal by adding a light dusting of gold leaf on one side.
When it comes to slicing, clean cuts are essential to showcase the neat, beautiful layers inside. Fill a tall container with hot water, dip your sharp knife into the water, and wipe it dry before making each cut. Clean the blade and repeat this process for every single slice to prevent dragging crumbs through the glossy coating.
This dessert pairs beautifully with a cup of hot espresso or a light, floral herbal tea. The bitter notes of coffee balance the rich sweetness of the glaze, making each bite feel light and clean. Serve each slice with a small dollop of unsweetened whipped cream on the side for a gorgeous contrast.

Your Turn to Riff
Making a beautiful dessert is all about finding play in the process rather than seeking absolute perfection. This recipe proves that you do not need complex bakery tools to achieve a breathtaking, professional finish. With a simple package of gelatine and a box of good cocoa, you have everything required to create a stunning centerpiece.
If you are ready to begin, grab your favorite chocolate cake recipe and start prepping your kitchen space. Take your time with the steps, watch your temperatures closely, and enjoy the magical moment when the glossy glaze drapes over your cake. You will love how easy it is to bring this classic French finish into your own home baking.
For more sweet inspiration and beautiful design ideas, connect with our baking community online. Follow us on Pinterest, join the discussion on Facebook, check out our quick baking tips on TikTok, or get real-time updates through our Telegram channel. Happy baking, and enjoy every single slice.

