There is a quiet magic that happens when a sweet cake sits on the kitchen counter overnight, waiting for the morning coffee.

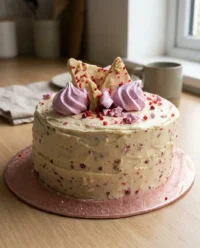
This classic White Chocolate Raspberry Anniversary Cake is exactly that kind of old-fashioned treat. It combines a tender crumb with a tart, homemade berry filling that settles beautifully into the layers. You do not need any fancy tools to make this centerpiece feel like a true celebration.
Why This White Chocolate Raspberry Anniversary Cake Stayed in the Family
Prep: 25 min · Serves: 10 · Difficulty: Medium
- Rich frosting pairs with tangy fruit filling.
- Humble ingredients create an unforgettable celebration dessert.
- Warm vanilla scent fills the entire house.
- Tender cake layers stay wonderfully soft overnight.
- Simple kitchen bowls are all you need.
This sweet bake will become a family tradition for every major milestone. When you slice into this beauty, you will understand why we love the classic raspberry white chocolate cake style so much. It is the kind of recipe that survives moves, decades, and dozens of family bakers without ever losing its charm.
Get The Full Cake Recipe
Print
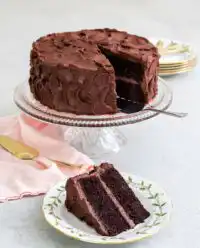
White Chocolate Raspberry Anniversary Cake
- Total Time: 3 hours 15 mins
- Yield: 10 servings
- Diet: Vegetarian
Description
This elegant anniversary cake features soft vanilla sponge layers filled with a tart, homemade raspberry reduction and finished with a silky white chocolate ganache frosting. It is a timeless, reliable dessert that brings a touch of homemade luxury to any milestone celebration.
Ingredients
- 2 cups all-purpose flour
- 1 1/2 cups granulated sugar
- 1/2 cup unsalted butter, softened
- 1/4 cup sunflower oil
- 3 large eggs
- 1 cup sour cream
- 1/2 cup whole milk
- 1 tsp vanilla extract
- 1 tbsp baking powder
- 1/2 tsp baking soda
- 1/2 tsp salt
- 2 cups fresh raspberries
- 8 oz white chocolate, chopped
- 1 cup heavy cream
Instructions
- Prep raspberry filling. Cook fresh berries with a spoonful of sugar in a saucepan until thick, then chill in the refrigerator for at least 30 minutes.
- Prepare oven and pans. Preheat oven to 350°F and line the bottoms of two 8-inch round cake pans with parchment paper.
- Mix dry ingredients. Whisk flour, baking powder, baking soda, and salt together in a medium bowl until thoroughly combined.
- Cream wet ingredients. Beat softened butter, oil, sugar, and vanilla until fluffy, then incorporate eggs, sour cream, and the flour mixture alternately with milk.
- Fold in raspberries. Gently fold the fresh raspberries into the prepared cake batter using a wooden spoon.
- Bake the layers. Divide batter between pans and bake for 25-30 minutes until a toothpick comes out clean; cool on a wire rack.
- Melt white chocolate. Pour simmering heavy cream over chopped white chocolate, let sit for two minutes, and whisk until completely smooth.
- Chill the ganache. Place the chocolate mixture in the refrigerator for at least two hours until it is completely firm.
- Whip the frosting. Beat the chilled ganache with a hand mixer on medium speed for two minutes until it reaches a thick, fluffy consistency.
- Assemble the cake. Pipe a ring of frosting on the bottom layer to contain the raspberry filling, stack the second layer, and frost the entire exterior.
Notes
- Bring all refrigerated ingredients to room temperature before mixing to ensure a smooth, stable batter emulsion.
- Toss your fresh raspberries in a light dusting of flour before folding to prevent them from sinking to the bottom during baking.
- Ensure the ganache is chilled thoroughly before whipping, otherwise it will remain liquid and fail to hold its shape.
- Keep the cake under a glass dome or in an airtight container to maintain moisture levels for up to three days.
- Prep Time: 25 mins
- Cook Time: 30 mins
- Category: Dessert
- Method: Baking
- Cuisine: American
Pantry Basics

Baking a cake from scratch should never feel like a chore or require a special trip to a specialty grocery store. This recipe relies on everyday staples that you likely already keep in your kitchen cabinet. Each ingredient has a clear job to do, making sure your layers turn out soft, sturdy, and full of natural flavor.
- All-Purpose Flour: This is the honest foundation of our cake, providing the structure needed to hold the heavy fresh berries. We do not use fancy cake flour here because standard flour provides a sturdier structure for the thick fruit layers.
- Unsalted Butter: Softened to room temperature, this ingredient delivers that unmistakable buttery edge and a melt-in-your-mouth crumb. It acts as the backbone of the flavor, giving the sponge that rich, traditional taste of a grandmother’s kitchen.
- Sunflower Oil: A small splash of neutral oil keeps the cake crumb incredibly soft and moist for days. While butter provides the flavor, the oil makes sure that the cake does not dry out in the refrigerator.
- Granulated Sugar: This sweetens the batter while helping to lock in moisture so the layers do not dry out during baking. It also helps to create those slightly caramelized, buttery edges that everyone loves.
- Fresh Raspberries: These tart little gems provide a beautiful contrast to the sweet cake and the rich chocolate. They burst slightly during baking, creating pockets of bright, jammy flavor throughout the layers.
- Whole Milk and Sour Cream: This combination brings rich fat and acidity, which tenderizes the gluten for a soft bite. The acidity in the sour cream activates the baking soda, guaranteeing a beautiful rise.
- White Chocolate: Heavy cream melts this into a smooth, silky base that whips up into the most luxurious frosting imaginable. It offers a mellow, sweet vanilla flavor that complements the tart berries beautifully.
| Ingredient | Why It Matters |
|---|---|
| All-Purpose Flour | Provides the structure to hold up fresh berries |
| Unsalted Butter | Creates a classic buttery flavor and tender crumb |
| Sunflower Oil | Keeps the cake moist and soft on day two |
| Fresh Raspberries | Adds a sharp, tart contrast to sweet frosting |
| Sour Cream | Tenderizes the crumb for a melt-in-your-mouth feel |
From Bowl to Pan

Step 1: Prep the Raspberry Filling
Cook the fresh berries down with a spoonful of sugar in a heavy saucepan until they break down into a thick, jam-like sauce. This mixture needs to cool completely in the refrigerator for at least thirty minutes before it touches the cake layers. Cold filling is sturdy and will not seep into your delicate sponge layers, keeping the presentation neat and clean.
Step 2: Prepare Your Oven and Pans
Turn your oven on to 350°F so it has plenty of time to reach the right temperature before you begin mixing. Line the bottom of two eight-inch round cake pans with simple parchment paper circles to keep the layers from sticking. Do not grease the sides of the pans because the batter needs to climb the walls to reach its full height during baking.
Step 3: Mix the Dry Ingredients
Whisk the flour, baking powder, baking soda, and salt together in a medium mixing bowl. Taking a moment to blend these dry basics guarantees your leavening agents are distributed evenly throughout the flour. This simple step prevents any large, unwanted air pockets from forming in your layers, giving you a beautiful, consistent crumb.
Step 4: Fold the Raspberries into the White Chocolate Raspberry Anniversary Cake Batter
Beat the softened butter, sunflower oil, sugar, and vanilla together in a large bowl with a hand mixer until the mixture looks pale and fluffy. Add the eggs one at a time, followed by the sour cream, then slowly alternate adding the flour mixture and whole milk. Once the batter is smooth and emulsified, gently fold in the fresh raspberries with a wooden spoon so they do not break apart.
Step 5: Bake the Layers Beautifully
Divide the thick batter evenly between your two prepared pans and slide them onto the center rack of your preheated oven. Bake for twenty-five to thirty minutes, watching for a light golden top and a clean toothpick inserted in the center. Let the pans cool on a wire rack for twenty minutes before turning the cakes out to cool completely.
Step 6: Make the White Chocolate Ganache Frosting Base
Place your chopped white chocolate into a heatproof bowl and heat your heavy cream in a saucepan until it just begins to simmer. Pour the hot cream over the chocolate, cover the bowl, and let it sit undisturbed for two minutes to melt the chocolate. Whisk the mixture until it is smooth, shiny, and completely emulsified, then chill it in the refrigerator for at least two hours.
Step 7: Whip the Chilled Ganache Frosting
Remove the cold chocolate mixture from the refrigerator once it is completely chilled through and firm. Beat it with your hand mixer on medium speed for about two minutes until it transforms into a thick, fluffy frosting. Watch the texture closely because it can go from soft, beautiful swirls to over-whipped and grainy quite quickly.
Step 8: Assemble the Celebration Cake
Place your first cake layer on a pretty serving plate and spread a thin layer of whipped frosting over the top. Use a plastic food bag with the corner cut off to pipe a thick border of frosting around the outer edge of the layer. Fill the center of this sweet border with your chilled raspberry filling to keep the fruit from squeezing out.
Step 9: Frost and Decorate
Set the second cake layer gently on top, aligning the sides so the cake stands straight and tall on your plate. Cover the entire cake with the remaining whipped frosting, using a simple butter knife to create rustic swirls and swooshes. Finish the top with a few fresh berries and small spoonfuls of the remaining raspberry filling swirled into the white frosting.
Plain-Kitchen Notes

Make sure your butter, eggs, and sour cream are at true room temperature before you begin mixing. Cold ingredients do not emulsify smoothly, which can lead to a dense, heavy sponge rather than a soft, tender crumb. Set these items out on your kitchen counter at least an hour before you plan to start baking.
If your raspberries sink to the bottom of the pans during baking, here is why and how to fix it. The batter might be too thin, or the berries are too wet from washing. To solve this, toss your fresh berries in a tablespoon of flour before folding them into the batter, which helps them cling to the cake mixture and stay suspended.
When working with white chocolate, remember that it is much more delicate than dark or milk chocolate. Melt it slowly and avoid getting even a single drop of water into the bowl, as this will cause the chocolate to seize up. If your chocolate does seize, you can read about a scientific approach to mixing cake batter to understand how fats and liquids interact in baking.
Do not rush the chilling process for your whipped ganache frosting. The mixture must be completely cold to the touch before you attempt to whip it. If you try to whip warm cream and chocolate, it will simply remain a liquid puddle and will never hold those beautiful, rustic frosting swirls.
This cake actually tastes better on the second day after the flavors have had time to meld together. For the absolute best results, assemble the cake the evening before your celebration and keep it under a glass dome. If you enjoy this combination of fruit and chocolate, you might also want to try our classic chocolate raspberry cake for your next gathering.
Frequently Asked Questions
Can you freeze a white chocolate raspberry cake?
Yes, you can freeze this cake quite successfully for up to three months. It is best to freeze the cake layers individually, wrapped tightly in plastic wrap, before assembling them with the frosting. If the cake is already assembled, freeze it uncovered for an hour to set the frosting before wrapping it tightly in layers of plastic.
Should a white chocolate raspberry cake be refrigerated?
Because of the fresh fruit filling and the heavy cream in the frosting, this cake should be stored in the refrigerator. Keep it in an airtight container or under a cake dome to prevent it from picking up other fridge odors. Pull it out about thirty minutes before serving to let the butter soften slightly so the crumb melts in your mouth.
Does white chocolate pair well with raspberries?
White chocolate and raspberries are a classic baking pairing because their flavors balance each other out beautifully. The sweet, buttery richness of the white chocolate mellows the sharp, bright tartness of the fresh red berries. This combination creates a sophisticated flavor profile that does not feel overly heavy or cloying to the palate.
Why do my raspberries sink in my cake batter?
Raspberries usually sink because they are too heavy or wet, or because the cake batter is too thin to support them during the early stages of baking. You can prevent this by gently tossing the berries in a small spoonful of flour before folding them in. The flour coating helps the fruit stick to the batter as the cake rises in the oven.
Can you use white chocolate chips for the frosting?
While you can use high-quality white chocolate chips, baking bars are much better for making a smooth whipped ganache. Chocolate chips often contain stabilizers that prevent them from melting cleanly, which can lead to a grainy frosting. A standard baking bar will melt down into a silky, smooth mixture every single time.
How long will this cake keep on the counter?
This cake should not be left on the counter for more than a few hours due to the fresh cream in the frosting. Always store any leftovers in the refrigerator, where they will remain fresh and delicious for up to four days. The cake layers actually absorb the raspberry moisture, making it taste even better the next morning.
Can I use frozen berries instead of fresh?
Yes, you can use frozen berries for the cooked raspberry filling, but fresh berries are highly recommended for folding into the cake batter. Frozen berries tend to release too much moisture as they melt, which can make the batter soggy and turn it an unappealing gray color. If you must use frozen berries in the batter, do not thaw them first.
Why is my whipped ganache frosting runny?
If your ganache frosting is runny, it is likely because the mixture was not completely cold before you began whipping it. The fat in the white chocolate and heavy cream needs to be thoroughly chilled to hold its structure when whipped. Place the bowl back in the refrigerator for another hour, then try whipping it again on medium speed.
Easy Switch-Ups
If you do not have fresh raspberries on hand, you can easily swap them out for sweet blackberries or blueberries. This simple fruit change gives the cake a completely different look while keeping that wonderful tart contrast. You can follow the same cooking method for the filling regardless of the berry you choose, adjusting the sugar slightly if the fruit is very sweet.
For a lighter, airier dessert, you can skip the heavy ganache and use a fluffy whipped cream instead. This variation is wonderful for warm summer afternoons when you want something a bit less rich. It reminds us of a vintage raspberry fluff cake that our grandmothers used to make for Sunday picnics.
You can also add a hint of lemon zest to the cake batter to brighten up the sweet vanilla notes. A tablespoon of fresh lemon zest folded in with the dry ingredients adds a beautiful citrus aroma that pairs wonderfully with both the white chocolate and the berries. It is a quick way to customize the recipe without changing any of the basic steps.
At the Kitchen Table
Serving a beautiful layer cake should be a relaxed, joyful experience shared with the people you love. Slice this cake with a sharp knife dipped in warm water and wiped clean between each cut to guarantee neat, beautiful slices. Set the plates out on a simple wooden table with a pot of hot chicory coffee or a strong black tea.
This dessert is the perfect centerpiece for a family anniversary, a quiet Sunday supper, or a milestone birthday. It looks lovely sitting under a glass dome on the counter, waiting for whoever drops by for a visit. To make the presentation even more special, you can read our guide on simple white cake decorating for easy tips on styling without fancy tools.
If you have leftovers, they make the absolute best morning treat alongside a warm mug of coffee. The cake settles overnight, allowing the tart raspberry juices to seep gently into the sweet vanilla sponge layers. It is a simple, honest pleasure that reminds us why home baking is always worth the effort.

Keep This One Close
There is something incredibly grounding about pulling a fresh cake out of the oven and sharing it with family. This recipe does not ask for complex skills or expensive equipment, yet it delivers a beautiful, comforting dessert every single time. It is a reliable recipe that you can pass down to the next generation of bakers in your family.
If you are looking for another reliable base for your dessert table, our classic vanilla cake recipe is another excellent place to start. It uses the same honest, straightforward techniques that make home baking so deeply satisfying. Keep these simple recipes written down on index cards in your kitchen box so they are always within reach.
We would love to see how your celebration cake turned out on your kitchen table. Please share your baking photos and stories with our community on our Pinterest and Facebook pages. You can also follow us on TikTok and join our conversation on Telegram for more cozy kitchen inspiration.


