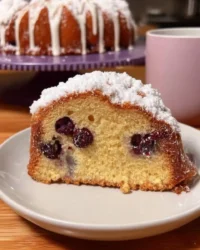
I remember the first time I added fresh strawberries to a classic vanilla cake base. It was a total game-changer that turned a simple treat into a vibrant berry dream with a bright flavor pop! This Hello Kitty cake discovery happened when I wanted to make something that tasted as sweet and happy as it looked.

This recipe is all about bringing a touch of magic to your kitchen with very little extra effort. We are using a special marbling technique with fresh fruit and pink batter to make every single slice of your Hello Kitty cake a joyful surprise. It is the perfect project for a rainy afternoon or a big birthday celebration!
The Ultimate Hello Kitty Cake Flavor Pop
You are going to fall in love with how this recipe balances a tender, velvety crumb with the sudden burst of fresh strawberry goodness. Most character cakes focus so much on the outside that the inside is just an afterthought, but we are changing that today! This cake uses buttermilk for a subtle tang that makes the sweetness of the berries truly shine.
It is also incredibly fun to put together because the marbling effect creates a beautiful visual when you cut into it. The addition of skim milk powder might seem small, but it is one of those smart additions that gives the cake a professional, rich mouthfeel. It is a simple way to take your baking from good to wow! Your friends and family will be so impressed by the texture and the vibrant pink swirls hiding under that cute face.
Print
Hello Kitty Cake
- Total Time: 1 hour 30 mins
- Yield: 12 servings
- Diet: Vegetarian
Description
This adorable Hello Kitty cake features a moist, velvety crumb marbled with vibrant pink swirls and fresh strawberry bits. Perfect for birthdays or special celebrations, it combines a professional texture with a fun character design that tastes as good as it looks.
Ingredients
- 3 cups cake flour
- 2 tsp baking powder
- 1/2 tsp baking soda
- 1/2 tsp salt
- 2 tbsp skim milk powder
- 1 cup buttermilk
- 2 tsp vanilla extract
- 1 cup unsalted butter, softened
- 1 3/4 cups granulated sugar
- 2 large eggs
- 4 large egg whites
- 1 cup fresh strawberries, finely chopped
- Pink food coloring
- Buttercream frosting (white, pink, yellow, and black)
Instructions
- Sift the cake flour, baking powder, baking soda, salt, and skim milk powder together in a medium bowl and whisk to combine.
- In a separate container, whisk together the buttermilk and vanilla extract.
- Cream the softened butter and sugar in a large bowl with an electric mixer until pale and fluffy, about 3 to 5 minutes.
- Beat in the whole eggs and egg whites one at a time, ensuring each is fully incorporated to build a strong emulsion.
- Add the dry flour mixture to the egg mixture in three parts, alternating with the buttermilk mixture, mixing gently until just combined.
- Divide the batter into two bowls, adding pink food coloring to one, then fold the chopped strawberries into both batters.
- Dollop the white and pink batters into a greased Hello Kitty cake pan to create a marbled effect and bake at 350F (175C) for approximately 1 hour.
- Cool in the pan for 10 minutes, then transfer to a wire rack to cool completely before decorating with piped buttercream using a star tip.
Notes
To ensure the best marble effect, avoid over-swirling the batters once they are in the pan. If you find your strawberries are particularly juicy, pat them dry with a paper towel after chopping to prevent excess moisture from affecting the cake’s rise.
- Prep Time: 30 mins
- Cook Time: 1 hour
- Category: Dessert
- Method: Baking
- Cuisine: American
What You Will Need for Pink Perfection

To get that perfect texture and taste, we are using a few simple stars that work together to create something special.
- Cake Flour: This is key for a fine, soft crumb that feels light and airy.
- Fresh Strawberries: Our flavor star! Finely chopping them means you get a little bit of fruit in every bite without weighing down the batter.
- Buttermilk: This adds moisture and a slight acidity that activates the baking soda for a great rise.
- Skim Milk Powder: This is my secret flavor pop that improves the richness of the vanilla base.
- Unsalted Butter: Make sure it is at room temperature so it creams perfectly with the sugar.
- Egg Whites and Whole Eggs: Using a mix gives us the structure we need while keeping the cake light and white enough to show off the pink food coloring.
The Simple Process
Step 1: Prep and Sift
First, grab your bowls and get ready to create some magic. Sift the cake flour, baking powder, baking soda, salt, and skim milk powder into a medium bowl. Sifting is a simple step that makes a huge difference in how light your cake turns out! Once sifted, whisk them together so the leavening agents are evenly spread out.
Step 2: Prepare the Liquids
In a separate small bowl or measuring cup, combine your buttermilk and vanilla extract. The vanilla provides that classic, comforting aroma that everyone loves. Set this aside with your dry ingredients so everything is ready to go when you start mixing.
Step 3: Cream the Butter and Sugar
In a large mixing bowl, use an electric mixer to whip the room-temperature butter and sugar together. You want to keep going until the mixture looks pale and fluffy. This usually takes about 3 to 5 minutes. This step creates tiny air pockets that help the cake rise and stay tender.
Step 4: Add the Eggs
Add your two large eggs and four egg whites one at a time. It is important to mix well after each addition to make sure the fats and liquids emulsify properly. This builds a strong foundation for your batter so it does not separate or become heavy.
Step 5: Combine the Mixtures
Now, add the dry flour mixture to your egg mixture in three separate additions, alternating with the buttermilk mixture. Start with flour, then buttermilk, then flour again until it is all combined. Mix gently after each addition! Overmixing at this stage can make the cake tough, and we want it to stay soft and wonderful.
Step 6: Create the Pink Marble
Divide your batter into two separate bowls. Add a drop or two of pink food coloring to one bowl and stir until you have a beautiful, vibrant shade. Now, divide those finely chopped strawberries between the two bowls and fold them in gently. This is where the magic happens!
Step 7: Fill the Pan and Bake
Grease your Hello Kitty cake pan thoroughly so nothing sticks. Place dollops of the white and pink batters into the pan, alternating them to create a marbled look. Bake at 350F (175C) for about one hour. You will know it is done when a toothpick comes out clean. Let it cool in the pan for 10 minutes before moving it to a wire rack.
Step 8: Decorate with Style
Once the cake is completely cool, it is time for the fun part! Use your favorite buttercream and dye small portions pink, yellow, and black. Use a star-shaped piping tip to fill in the different areas of the face. Use white for the main fur, pink for the bow, yellow for the nose, and black for the eyes and whiskers. It is like coloring with frosting!
Jasmine’s Secret Flavor Tips

For the best results, always ensure your ingredients like eggs and buttermilk are at room temperature before you start. This allows the batter to come together into a smooth, even emulsion that bakes up perfectly. If you want even more of a color boost, check out our guide on how to make a pink cake for extra inspiration on using food coloring and natural fruit juices.
Another trick is to toss your chopped strawberries in a tiny bit of flour before folding them in. This helps prevent them from sinking to the bottom of the pan! For the original inspiration behind this technique, I often look at the wonderful ideas from Panko Bunny. Also, remember to sift your milk powder with the flour to avoid any tiny clumps of dairy in your batter.
Make It Your Own
You can easily swap the flavor pops in this recipe to suit your mood! If you are not a fan of strawberries, try using finely chopped raspberries or even a handful of sprinkles for a funfetti effect. You could also try making a cinnamoroll cake recipe if you want to try another adorable character with a different flavor profile.
For a citrus twist, add a tablespoon of fresh orange zest to the batter. The orange and strawberry combination is absolutely fantastic and adds a sophisticated layer to the sweetness. If you want a more floral note, a tiny drop of almond extract in place of some of the vanilla can provide a unique and surprising flavor that makes people stop and say “wow!”
Simple Serving Ideas

This cake is a showstopper all on its own, but you can make the presentation even more special by serving it on a light pink or pastel yellow platter. It looks amazing next to a tray of themed cute cake pops or cupcakes if you are hosting a larger party.
I love serving this with a cold glass of milk or a light strawberry-infused tea to complement the fruit inside the cake. If you want to go all out, add a few fresh whole strawberries and some edible flowers around the base of the cake for a garden-party vibe that feels fresh and exciting.
Keep Popping those Flavors
I am so excited for you to try this recipe and see the smiles it brings to everyone’s faces! Making a themed treat like this is such a joyful way to share your love for baking. If you enjoyed this character-focused project, you might also want to try making a cartoon cake for your next big event. Don’t forget to share your creations with me and the rest of our community! Check us out on Instagram, Pinterest, and Facebook to see what else we are whipping up in the kitchen. Happy baking!
