I remember the very first time I tried my hand at professional-looking Chocolate Cake Decoration. It was a rainy Tuesday afternoon, and I was determined to turn a standard sponge into something that looked like it belonged in a boutique bakery window. I discovered that by adding just one tiny splash of extra vanilla and focusing on a simple chocolate shard technique, the entire vibe of my dessert changed instantly! It was such a lightbulb moment for me; I realized that you don’t need years of training to make something look absolutely stunning.

This guide is all about taking those easy, reliable ingredients you already have in your pantry and giving them a fresh, modern twist. We are baking a beautifully moist chocolate base that acts as the perfect canvas for your creative journey. Whether you are a total beginner or a seasoned home baker looking for a quick win, these tips will help you create a finished product that makes everyone go ‘wow’ the moment you walk into the room with it.
Simple Magic for Every Baker
You are going to absolutely love this approach to Chocolate Cake Decoration because it focuses on high impact with very little stress. Life is busy enough, so your time in the kitchen should be about joy and flavor pops, not pulling your hair out over complicated techniques! This recipe delivers a cake that is incredibly tender and rich, thanks to the perfect balance of golden caster sugar and softened unsalted butter.
The real beauty here is the versatility; once you master this simple base, the decoration possibilities are truly endless. We are using a ‘one smart addition’ approach—like a touch of espresso powder or a hint of orange zest—to make the chocolate flavor truly sing. It is the kind of recipe that builds your confidence and makes you feel like a kitchen rockstar every single time you preheat the oven. Plus, it is a fantastic way to involve the family or just treat yourself to a little bit of edible art on a weekend afternoon.
Print
Chocolate Cake Decoration
- Total Time: 40 mins
- Yield: 8 servings
- Diet: Vegetarian
Description
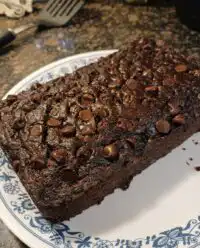
Create a stunning dessert with this moist, reliable chocolate sponge designed to be the perfect canvas for your creative decorating ideas. This recipe balances rich cocoa notes with a velvety texture that holds up beautifully under frosting or Ganache.
Ingredients
- 200g golden caster sugar
- 200g unsalted butter, softened
- 4 large eggs
- 200g self-raising flour
- 2 tbsp cocoa powder
- 1 tsp baking powder
- 1 tsp vanilla extract
- 2 tbsp milk
Instructions
- Preheat your oven to 180°C (350°F), grease your cake tins with butter, and line the bottoms with parchment paper.
- In a large bowl, beat the softened butter and golden caster sugar together for 3 to 5 minutes until the mixture is pale and fluffy.
- Add the eggs one at a time, beating well after each addition, then stir in the vanilla extract.
- Sift the self-raising flour, cocoa powder, and baking powder into the bowl, then gently fold the dry ingredients into the wet mixture using a spatula.
- Stir in the milk to loosen the batter to a dropping consistency, divide evenly between the tins, and smooth the tops.
- Bake for 20-25 minutes until a skewer comes out clean, then cool in the tins for 10 minutes before transferring to a wire rack to cool completely.
Notes
To ensure a perfectly level surface for decorating, use a serrated knife to gently trim the tops of the cakes once they are fully cooled. If you prefer a more intense chocolate profile, try replacing the vanilla with a teaspoon of almond extract or adding a pinch of espresso powder to the dry ingredients.
- Prep Time: 15 mins
- Cook Time: 25 mins
- Category: Dessert
- Method: Baking
- Cuisine: British
The Flavor Stars

To get the best results for your Chocolate Cake Decoration, we start with a foundation of high-quality, simple ingredients. Here is what makes this cake so special:
- Golden Caster Sugar (200g): This adds a subtle caramel note that white sugar just can’t match, giving the chocolate a deeper profile.
- Unsalted Butter (200g): Softened butter is the secret to a velvety crumb that holds up perfectly under any decoration.
- Large Eggs (4): These provide the structure and richness needed for a sturdy yet light sponge.
- Self-Raising Flour (200g): This ensures a consistent rise, making your cake the perfect flat surface for decorating.
- Cocoa Powder (2 tbsp): The heart of the flavor; use a high-quality Dutch-processed cocoa for that deep, dark color.
- Baking Powder (1 tsp): Just a little extra boost to keep the texture airy and light.
- Vanilla Extract (1 tsp): This is our first flavor pop! It rounds out the bitterness of the cocoa and adds a sweet, familiar warmth.
- Milk (2 tbsp): A tiny bit of moisture to keep the batter smooth and the final cake incredibly moist.
I always recommend having your ingredients at room temperature before you start. It makes the mixing process so much smoother and helps the batter emulsify perfectly, which is the first step toward a professional-looking finish.
The Simple Process
Step 1: Prep Your Space
Start by preheating your oven to 180°C (350°F). Lightly grease your cake tins with a bit of extra butter and line the bottoms with parchment paper. This simple step ensures your cake comes out perfectly clean, which is essential for great Chocolate Cake Decoration later on.
Step 2: Cream the Butter and Sugar
In a large bowl, beat the softened unsalted butter and golden caster sugar together until the mixture is pale, light, and fluffy. This usually takes about 3 to 5 minutes with an electric mixer. You want to incorporate as much air as possible at this stage to ensure a light sponge.
Step 3: Add the Eggs and Vanilla
Add the eggs one at a time, beating well after each addition. If the mixture looks like it might curdle, just add a tablespoon of your flour. Stir in the vanilla extract—this is where that lovely aroma starts to fill your kitchen!
Step 4: Fold in the Dry Ingredients
Sift the self-raising flour, cocoa powder, and baking powder into the bowl. Using a large metal spoon or a spatula, gently fold the dry ingredients into the wet mixture. Be careful not to overmix! Finally, stir in the milk to loosen the batter slightly until it reaches a dropping consistency.
Step 5: Bake to Perfection
Divide the batter evenly between your prepared tins and smooth the tops. Bake for 20-25 minutes, or until a skewer inserted into the center comes out clean. Let the cakes cool in the tins for 10 minutes before transferring them to a wire rack to cool completely. Cooling is vital—never try to decorate a warm cake!
Pop It Up with Jasmine’s Tips

When it comes to Chocolate Cake Decoration, temperature is your best friend and your worst enemy! Always make sure your cake is completely cold before you even think about frosting it. If you have the time, wrap your cooled cakes in plastic wrap and pop them in the fridge for an hour; a cold cake is much easier to trim and frost without crumbs getting everywhere.
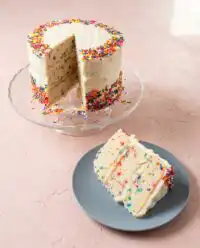
For a truly professional look, try using a bench scraper to get those sides perfectly smooth. If you want to learn more about achieving a clean base, check out my guide on simple white cake decorating for some foundational techniques that work for any color. Another smart addition is to brush your cake layers with a simple syrup (sugar and water) before frosting to lock in moisture for days. For more creative visual ideas, you can also look at chocolate decorating ideas to see how professionals use texture to create interest.
Make It Yours with Flavor Swaps
I love to encourage a bit of flavor experimentation! While this recipe is fantastic as-is, you can easily swap the vanilla extract for almond extract or even orange blossom water for a totally different vibe. If you want a darker, more intense flavor, replace the milk with a shot of strong, room-temperature espresso. This ‘coffee pop’ makes the chocolate taste twice as chocolatey!
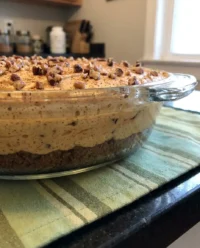
For the decoration itself, don’t feel limited to just frosting. You can use fresh berries, edible flowers, or even crushed honeycomb for a bit of crunch. If you are looking for specific hardware or themes, have a look at our favorite cake toppers to add a personalized touch to your creation. You can even try a white chocolate ganache drip for a stunning contrast against the dark sponge.
Simple Serving for a Wow Moment

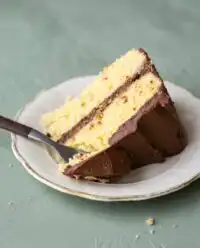
To really make your Chocolate Cake Decoration stand out, think about the presentation on the plate. A simple slice looks incredible when served with a dollop of crème fraîche or a scoop of high-quality vanilla bean ice cream. The tartness of the cream cuts through the richness of the chocolate perfectly. If you are serving this at a party, consider making a multi-tiered version by following the tips in our chocolate layer cake guide.
I also love pairing a slice of this cake with a warm cup of Earl Grey tea or a robust espresso. The bergamot in the tea acts as a secondary flavor pop that complements the chocolate beautifully. For an extra touch of elegance, sprinkle a tiny pinch of flaky sea salt over the chocolate frosting right before serving—it brings out all the hidden notes in the cocoa!
The Sweet Spot
Creating a masterpiece doesn’t have to be a chore! I hope this guide to Chocolate Cake Decoration inspires you to get into the kitchen and play with your food. Remember, the best part of baking is the joy you share with others when they see and taste something you made with love. If you enjoyed this recipe, you might also love our classic yellow cake with chocolate frosting for another nostalgic treat. Don’t forget to share your beautiful creations with me on Instagram, Pinterest, and Facebook. I can’t wait to see your simple flavor pops and gorgeous designs! Keep baking and keep popping!


