My grandmother always said that honest flavor matters more than spending all day in the kitchen. Sometimes, you just need a reliable trick up your sleeve, and this simple fake cake is exactly that. By dressing up basic grocery store staples, you get a beautiful centerpiece without the fuss.

This no-bake assembly method gives you a stunning strawberries and cream dessert in minutes. It is the perfect comfort trick for busy weekends when you want something special but are short on time. Best of all, it tastes absolutely wonderful and requires zero fancy techniques.
Why You Will Love This Simple Fake Cake
There is a special kind of joy in making something beautiful out of everyday ingredients. This fake cake takes ready-made sponges and turns them into a masterpiece. You skip the measuring cups, the flour spills, and the waiting by the oven. It is pure, honest deliciousness assembled in under an hour.
What makes this truly wonderful is how forgiving it is. The frosting seals in the moisture, meaning it tastes better the next day as the flavors settle together. It is the kind of reliable comfort dessert you can pull together right before company arrives.
Print
Fake Cake
- Total Time: 45 mins
- Yield: 8 servings
- Diet: Vegetarian
Description
Transform simple store-bought staples into a stunning strawberries and cream centerpiece with this clever no-bake assembly method. This reliable trick produces a moist, beautiful dessert that tastes like a professional bakery creation with minimal effort.
Ingredients
- 2 small (5-6 inch) ready-made raspberry or vanilla sponge cakes
- 1 tub (14 ounces) strawberry frosting
- 1 strawberry Swiss roll
- 2 bars strawberries & cream chocolate
- 2 to 4 teaspoons warm water
- Pink wafers
- Pink and gold sprinkles
Instructions
- Prepare your decorating station with a cake turntable, angled palette knife, scraper, and cake board.
- Apply a small dollop of frosting to the cake board to secure the first sponge layer in place.
- Stir the ready-made frosting in a bowl to lighten its texture, then spread a generous layer over the first sponge.
- Place the second sponge layer on top and apply frosting to the sides and top, smoothing it out with your palette knife.
- Run a cake scraper along the sides for a clean finish and refrigerate the cake to let it set.
- Melt one and a half chocolate bars in 30-second intervals in the microwave, then stir in warm water until it reaches a dripping consistency.
- Press pink and gold sprinkles around the bottom edge of the chilled cake to create a decorative border.
- Slice the Swiss roll into rounds and top each with a small amount of melted ganache and sprinkles.
- Use a spoon to create a drip effect by nudging small amounts of ganache over the top edges of the cake.
- Pipe decorative swirls of remaining frosting around the top border and arrange the Swiss roll slices and pink wafers for the final assembly.
Notes
To ensure the best results, make sure your frosting is at room temperature and stirred well before you begin, as this makes it much easier to spread over store-bought sponges without tearing them. If your chocolate ganache hardens too quickly, a five-second zap in the microwave will bring back that perfect dripping consistency.
- Prep Time: 20 mins
- Cook Time: 5 mins
- Category: Dessert
- Method: No-Bake Assembly
- Cuisine: American
Basic Ingredients for Your Simple Pantry

You do not need anything complicated to pull off this wonderful treat. Just head to your local grocery store and pick up these familiar items:
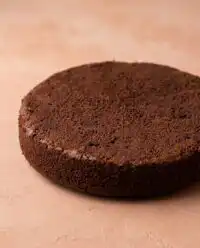
- Ready-made Sponge Cakes: Grab two small 5-inch or 6-inch (12-15 cm) raspberry or vanilla sponges. They are the sturdy, reliable base of our dessert.
- Strawberry Frosting: One standard tub (14 ounces / 400g). Ready-made frosting is thick and holds its shape perfectly.
- Strawberry Swiss Roll: This adds a beautiful, playful texture to the top of the cake.
- Strawberries & Cream Chocolate Bars: You will need two bars (like Hershey’s) to melt into a quick, simple ganache.
- Pink Wafers and Sprinkles: Classic, nostalgic decorations that bring a smile to anyone’s face.
Easy Steps for Honest Comfort
Step 1: Prep Your Decorating Station
Gather a cake turntable, an angled palette knife, a scraper, and a simple cake board. Having your tools ready makes the whole process smooth and peaceful.
Step 2: Set the First Layer
Unbox your cakes. Smear a small dollop of frosting in the middle of your cake board to hold everything steady. Place your first sponge layer on the board. Scoop the frosting into a bowl and give it a good stir to lighten it up, then spread a generous layer over the top of the cake.
Step 3: Stack and Frost
Place the second sponge layer right on top. Pipe or spread the frosting all around the sides and the top of the cake, using your palette knife to smooth it out. It does not have to be perfect; homemade charm is always best.
Step 4: Chill the Cake
Run a cake scraper gently along the sides to tidy up the frosting. Pop the cake into the fridge to chill and set. This helps the cake hold firm for the next steps.
Step 5: Make the Simple Ganache
Break up one and a half of the chocolate bars into a microwave-safe bowl. Heat in 30-second bursts, stirring in between, until melted. Stir in 2 to 4 teaspoons of warm water until you get a nice dripping consistency.
Step 6: Add the Sprinkles
Take the chilled cake out of the fridge and gently press pink and gold sprinkles around the bottom edge for a charming border.
Step 7: Prep the Swiss Roll
Slice your strawberry Swiss roll into neat rounds. Use a spoon to drip a little of your pink ganache over each slice, then finish them with a pinch of sprinkles.
Step 8: Create the Drip
Take a tablespoon of your remaining ganache and carefully pour it along the top edge of the cake. Use the back of the spoon to gently nudge it over the side, creating beautiful, simple drips.
Step 9: Pipe the Swirls
Put any leftover frosting into a piping bag fitted with a small star nozzle. Pipe cozy, simple swirls all around the top border of the cake.
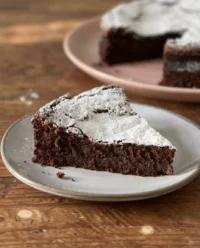
Step 10: Final Assembly
Nestle your decorated Swiss roll slices onto the top of the cake. Finish it off by tucking in a few pink wafers and a final dusting of sprinkles. Your simple masterpiece is ready to serve.
Jesse’s Comfort Secrets

When working with store-bought frosting, giving it a good stir before using makes a world of difference. It softens the texture, making it spread like a dream over your delicate sponge layers. If you find the frosting is too stiff, a single drop of milk mixed in will loosen it up perfectly.
Do not rush the chilling step. A cold cake takes a ganache drip much better than a room-temperature one, stopping the drips right where you want them. If you love playing with fun visual tricks using grocery items, you might also enjoy reading about how to decorate a hyperrealistic cake using basic finds. Keep things simple, trust the process, and remember that slight imperfections just mean it was made with love.
Simple Swaps for Honest Flavor
The beauty of this assembly method is how easily you can change the flavor profile. If strawberry is not your favorite, try using chocolate sponge layers with rich fudge frosting and a chocolate Swiss roll. It is the same reliable technique with a completely different comfort vibe.
You can also use classic vanilla components and colorful funfetti for a birthday celebration. For those who enjoy creative visual tricks, transforming this base into a comic cake 2D cake is a fun weekend project. Just swap the pink accents for bold black piping outlines to get that drawn-on look. Stick to familiar flavors, and you will always have a wonderful dessert.
Casual Comfort Serving

This cake is best enjoyed surrounded by family and friends, served right from the kitchen counter. Because it uses sturdy grocery store sponges, it slices beautifully. Use a sharp, warm knife to get clean cuts through the Swiss rolls and wafers on top.
Serve generous slices alongside a hot cup of black coffee or a tall glass of cold milk. It is a wonderful daytime treat that feels instantly familiar. If you are hosting a themed party and want to pair it with another fun visual treat, a slice of this goes wonderfully with a playful cartoon cake. Leftovers keep wonderfully in an airtight container, and like all good comfort bakes, the texture gets even softer and more delightful the next day.
The Simple Truth About Comfort Baking
Sometimes the smartest thing a baker can do is let go of perfection and embrace a simple shortcut. This easy assembly trick proves that you do not need to spend hours measuring flour to serve a dessert that makes people smile. It is an honest, straightforward approach to bringing sweetness into your home.
Whether you are making this for a casual Sunday supper or just to brighten a rainy afternoon, I hope it brings a bit of simple joy to your kitchen. If you want to learn more about creating beautiful display cakes, read this helpful guide on how to make a fake cake for your home decor, or look at our aesthetic cake ideas for more edible inspiration.
I would love to see how your simple creations turn out! Share your comforting bakes with me on Facebook or pin this simple trick on Pinterest for your next busy weekend. Keep baking simple, and take care of each other.
