If the thought of turning on a hot oven on a humid afternoon makes you want to skip dessert entirely, this stovetop cake is the answer you need.

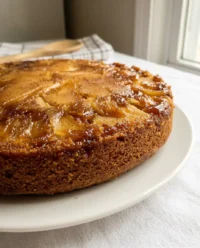
You do not need a bakery or a high-end kitchen to enjoy a tender, golden slice of this No Bake Caramel Peach Upside Down Cake. This recipe relies on a humble non-stick pan and basic pantry staples to create a dessert that looks like it took hours of careful work. The peaches soften into the homemade caramel right on your burner, creating a syrupy topping that soaks into the soft sponge underneath. It is the kind of treat that proves spectacular results are possible without a single piece of fancy equipment or a preheated oven.
What Makes This No Bake Caramel Peach Upside Down Cake Shine
Prep: 15 min · Serves: 8 · Difficulty: Easy
- This recipe requires only one non-stick pan.
- You can skip the hot oven entirely.
- Fresh fruit turns into a rich glaze.
- Pantry basics create a light, fluffy sponge.
- The cleanup takes less than five minutes.
Creating a peach upside down cake recipe right on your stovetop makes baking feel approachable during a busy week.
This is the recipe my family requests every single weekend.
Get The Full Cake Recipe
Print
No Bake Caramel Peach Upside Down Cake
- Total Time: 45 mins
- Yield: 8 servings
- Diet: Vegetarian
Description
Enjoy a moist and golden peach upside down cake prepared entirely on your stovetop. This simple, no-bake method transforms fresh fruit and pantry staples into a decadent, syrupy dessert without ever needing to turn on an oven.
Ingredients
- Fresh peaches, peeled and sliced into eight wedges
- Granulated sugar
- Butter
- Eggs
- All-purpose flour
- Milk
- Vegetable oil
- Baking powder
- Vanilla powder
Instructions
- Prepare peach slices. Peel the fresh peaches and cut them into eight even wedges, setting them aside on a plate until needed.
- Combine liquid ingredients. Beat eggs and sugar in a large bowl until frothy, then whisk in the melted butter, oil, and milk until smooth.
- Prepare the batter. Gently whisk in the flour, baking powder, and vanilla powder until just combined, being careful not to over-mix the batter.
- Create caramel base. Melt the sugar in a cold non-stick pan over low heat until it reaches a deep amber color, then carefully stir in melted butter.
- Arrange and pour. Place the peach slices in the hot caramel in a circular pattern and pour the prepared batter over the fruit, spreading it to the edges.
- Steam the cake. Cover the pan with a tight-fitting lid and cook on the lowest heat setting for 25 to 30 minutes until a toothpick comes out clean.
- Rest and invert. Turn off the heat and let the cake sit for five minutes before placing a plate over the pan to flip it carefully.
Notes
- Use a high-quality heavy-bottomed non-stick pan to ensure even heat distribution and prevent sugar scorching.
- Always keep the lid tightly sealed for the first 20 minutes to trap the steam necessary for the cake to rise.
- Wrap your pan lid in a clean kitchen towel if you need a tighter seal to help the cake cook more efficiently.
- Avoid over-mixing the batter after adding flour to keep the crumb texture light, airy, and tender.
- Prep Time: 15 mins
- Cook Time: 30 mins
- Category: Dessert
- Method: Stovetop
- Cuisine: American
Simple Ingredients

Making a dessert from scratch should not feel like a chemistry experiment. These basic items come together to create a deep, rich flavor and a soft crumb that rivals any traditional oven-baked version.
- Peaches: These provide the natural sweetness and tartness that balances the sugar in the caramel topping.
- Sugar: White granulated sugar transforms into a golden caramel liquid when heated slowly in the pan.
- Butter: This adds a necessary richness to both the caramel sauce and the cake batter for a melt-in-the-mouth texture.
- Eggs: They act as the primary structural component that helps the cake rise without the intense dry heat of an oven.
- Milk: Whole milk keeps the sponge hydrated and tender while it steams under the lid.
- Flour: All-purpose flour provides a sturdy but light base that holds the peach juices beautifully.
| Ingredient | Why It Matters |
|---|---|
| Peaches | Adds moisture and a bright, fruity flavor profile |
| Butter | Creates a silky caramel and a rich cake crumb |
| Baking Powder | Provides the lift needed for a fluffy stovetop sponge |
| Sugar | Essential for the golden caramelization and sweetness |
The Easy Method

Step 1: Prepare the Peach Slices
Start by peeling your fresh peaches and cutting them into eight even wedges. Removing the skin allows the fruit to soften more effectively and ensures the caramel can soak directly into the fruit. Set these slices aside on a small plate while you move on to the batter preparation.
Step 2: Mix Your Liquid Ingredients
In one large mixing bowl, beat your eggs and sugar together until the mixture looks pale and slightly frothy. Whisk in the melted butter, oil, and milk until the liquids are fully combined and smooth. This step creates the foundation for a cake that remains moist even after it cools down on the counter.
Step 3: Cook the No Bake Caramel Peach Upside Down Cake Batter
Add the flour, vanilla powder, and baking powder to your bowl and whisk gently until no large lumps remain. Avoid over-mixing the batter, as you want to keep the crumb light and airy rather than dense or rubbery. Once the mixture is ready, let it rest for a moment while you focus on the caramel base in the pan.
Step 4: Develop the Golden Caramel
Place your sugar into a cold non-stick pan and set the heat to low, waiting patiently until the granules melt and turn a deep amber color. Stir in the melted butter carefully to create a smooth, bubbling sauce that coats the bottom of the pan entirely. This golden liquid will become the beautiful glaze that defines the top of your cake.
Step 5: Arrange the Fruit and Pour
Carefully place your peach slices in a circular pattern directly onto the hot caramel sauce. Pour the prepared cake batter over the fruit, using a spatula to spread it evenly to the edges of the pan. The batter should completely cover the peaches to lock in their moisture and flavor while cooking.
Step 6: Steam the Cake Under a Lid
Cover the pan with a tight-fitting lid and cook on your lowest heat setting for about twenty-five to thirty minutes. It is vital to keep the lid closed for the first twenty minutes to trap the steam that helps the cake rise. You will know it is done when the top looks set and a toothpick comes out clean from the center.
Step 7: Rest and Invert
Turn off the heat and let the cake sit in the pan for five minutes to allow the caramel to stabilize slightly. Place a large, flat plate over the pan and quickly flip it over so the cake releases with the peaches on top. Any caramel remaining in the pan can be scraped out and drizzled over the fruit for extra shine.
Easy-Baker Notes

Using a heavy-bottomed non-stick pan is the best way to prevent the caramel from burning or sticking to the surface. A thin pan can have hot spots that scorch the sugar before the cake has a chance to cook through.
If your cake feels wet or soggy on top after thirty minutes, the heat might be too low or the lid is not trapping enough steam. You can try wrapping the lid in a clean kitchen towel to create a tighter seal, which helps the sponge cook more efficiently.
For a different flavor profile, you can look at this peach cake to see how different fats like sour cream or yogurt might change the density. In this stovetop version, keeping the fat to butter and oil ensures it stays light.
Always peel your peaches for this specific method because the skin can become tough and papery when steamed in caramel. This how to make peach upside down cake guide suggests that uniform slices also help the cake cook evenly across the pan.
Wait until the sugar is fully melted before adding the butter to the pan to avoid a grainy texture in your sauce. If the sugar crystals are still visible, the caramel might seize and create hard lumps that do not melt back down during the cooking process.
If the peaches stick to the pan during the flip, it is likely because the pan was not truly non-stick or the caramel cooled too much. Simply use a small spoon to lift the fruit out of the pan and place it back onto the cake while it is still warm.
Frequently Asked Questions
Do I need to peel the peaches?
Yes, peeling the peaches is highly recommended for this stovetop method. The steam in the pan softens the fruit, but the skins can become chewy and detach from the slices, making the final texture less pleasant. You can easily remove the skins by blanching the peaches in boiling water for thirty seconds before slicing.
Can I use canned or frozen peaches?
Canned peaches work well if they are drained thoroughly and patted dry with a paper towel. Frozen peaches are also an option, but you must thaw them completely and remove any excess water to prevent the caramel from becoming too runny. Fresh fruit typically provides the best structural integrity for the upside-down presentation.
Can I use other fruits for this recipe?
Absolutely, this method is very versatile and works with many stone fruits or even pineapples. Pears or apples can be used, but they may require a slightly longer cook time in the caramel before adding the batter to ensure they are soft. Plums and apricots are excellent alternatives that offer a similar acidity to peaches.
When do I invert the cake?
Wait about five to ten minutes after turning off the heat before you attempt to flip the cake onto a plate. This brief resting period allows the cake to pull away slightly from the sides and lets the caramel thicken just enough to stay on the fruit. If you wait too long, the caramel might harden and cause the peaches to stick to the pan.
Does peach upside-down cake need to be refrigerated?
Because of the fresh fruit and moisture content, it is best to store any leftovers in an airtight container in the refrigerator. It will stay fresh for about three days, though the texture is most tender on the day it is made. You can gently warm individual slices in the microwave for a few seconds to bring back that soft, fresh-baked feel.
Can I freeze this no-bake cake?
Freezing is not recommended for this specific recipe because the caramel and fruit topping can become watery upon thawing. The sponge may also lose its delicate texture when exposed to freezing temperatures. This cake is designed to be eaten fresh, providing a quick dessert solution that does not require long-term storage.
Simple Swaps
If you find yourself without fresh peaches, you can easily use nectarines or even plums for a similar tart and sweet result. The cooking time remains the same, though you should ensure the fruit is sliced to the same thickness to avoid uneven layers.
For those who love a deeper flavor, try using brown sugar in the batter while keeping white sugar for the caramel. This creates a caramel cake vibe that feels much richer and pairs wonderfully with a dash of cinnamon mixed into the flour.
Adding a handful of crushed nuts like pecans or walnuts to the caramel layer adds a wonderful crunch that contrasts with the soft fruit. It provides a texture similar to a peach dump cake but with the elegance of a structured upside-down presentation.
Slice & Serve
This cake is best served slightly warm, allowing the caramel sauce to be at its most fluid and flavorful. A simple dollop of unsweetened whipped cream or a scoop of vanilla bean ice cream provides a cool contrast to the warm peaches and syrupy glaze. For a more indulgent pairing, you might consider the flavors found in a ritz cracker salted caramel icebox cake which balances salt and sugar perfectly.
If you are serving this for a weekend brunch, a cup of strong black coffee or a light herbal tea cuts through the sweetness beautifully. The cake looks lovely on a simple white pedestal or a rustic wooden board, making it a casual yet impressive center-piece for a Tuesday night gathering. You can also garnish the plate with a few fresh mint leaves to add a pop of color and a refreshing scent.

The Wrap-Up
Baking that fits your life should not require a professional oven or hours of preparation. This stovetop method takes the stress out of making a classic dessert, allowing you to focus on the joy of sharing a warm slice with friends or family. It is a testament to the idea that simple ingredients and a single pan can produce something truly spectacular without the fuss of traditional baking.
I hope you find this recipe as helpful and rewarding as I do when the craving for something sweet hits on a busy weekday. If you enjoyed this stovetop treat, you should definitely check out my other ideas for a peach cake to keep your kitchen smelling like summer all year long. Happy baking, and enjoy every golden, syrupy bite of your hard work.


