Forget everything you know about complicated sugar-free baking because this one-bowl recipe removes every hurdle between you and a decadent treat.

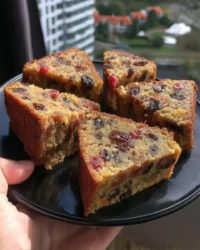
If you have ever worried that removing sugar means losing that rich, tender crumb we all love in a loaf, let this Sugar-Free Chocolate Zucchini Cake change your mind. This recipe uses a simple pantry lineup and garden-fresh zucchini to create a texture so fudgy that nobody will guess it is a better-for-you option. It is the kind of cake you can whip up in minutes, slide into the oven, and enjoy while the house fills with a deep cocoa aroma. Baking that fits your life should always be this rewarding.
What Makes This Sugar-Free Chocolate Zucchini Cake Shine
Prep: 15 min · Serves: 8 · Difficulty: Easy
- Fudgy texture from fresh garden zucchini.
- Simple one-bowl cleanup saves your Tuesday.
- Guilt-free snacking with zero added sugar.
- Basic pantry staples you already own.
This healthy cake is the recipe my family requests whenever we want a chocolate fix without the sugar crash. Baking that fits your life means enjoying every bite.
Get The Full Cake Recipe
Print
Sugar-Free Chocolate Zucchini Cake
- Total Time: 1 hour 15 mins
- Yield: 8 servings
- Diet: Sugar-Free, Vegetarian
Description
This decadent, sugar-free chocolate cake utilizes garden-fresh zucchini to achieve a remarkably fudgy texture and tender crumb. It is a simple one-bowl delight that delivers rich cocoa flavor without the sugar crash, making it a perfect healthy treat for any day of the week.
Ingredients
- 2 cups shredded zucchini
- 1 1/2 cups all-purpose flour
- 1/2 cup unsweetened cocoa powder
- 1 cup monkfruit sweetener
- 1/2 cup Greek yogurt
- 1/2 cup extra virgin olive oil
- 2 large eggs
- 1 teaspoon vanilla extract
- 1 teaspoon baking soda
- 1/2 teaspoon sea salt
- 1 teaspoon instant espresso powder
- 1/2 cup sugar-free chocolate chips
Instructions
- Prep the oven. Heat your oven to 350°F (180°C) and grease a standard loaf tin, lining it with parchment paper for easy removal.
- Whisk dry ingredients. In a medium mixing bowl, combine the flour, cocoa powder, baking soda, and sea salt, whisking thoroughly to remove any lumps.
- Combine wet elements. In a separate bowl, blend the eggs with the monkfruit sweetener, olive oil, yogurt, vanilla, and espresso powder until the mixture is smooth and glossy.
- Merge the mixtures. Pour the wet ingredients into the dry ingredients and stir with a spatula until just combined, being careful not to over-mix.
- Fold in extras. Gently fold in the strained shredded zucchini and half of the chocolate chips into the thick batter.
- Bake the cake. Transfer the batter to the prepared loaf tin, top with the remaining chocolate chips, and bake for 50 to 60 minutes until a toothpick comes out clean.
- Cool before slicing. Allow the cake to rest in the pan for 10 minutes before transferring it to a wire rack to cool completely to ensure a clean slice.
Notes
- Always strain your grated zucchini well with paper towels to prevent the cake from becoming soggy.
- For the best texture, use room-temperature eggs to ensure proper emulsification during mixing.
- When measuring flour, use the spoon-and-level method rather than scooping directly into the bag to avoid a dense crumb.
- Use a fine-mesh grater for the zucchini so it disappears completely into the cake, making it ideal for picky eaters.
- Check the date on your baking soda periodically to ensure the leavening remains active for a proper rise.
- Prep Time: 15 mins
- Cook Time: 60 mins
- Category: Dessert
- Method: Baking
- Cuisine: American
Pantry Lineup

Most of these items are sitting in your kitchen right now, waiting to be turned into a chocolate masterpiece. We rely on moisture-rich garden vegetables and a zero-sugar sweetener to do the heavy lifting for flavor and texture.
- Grated Zucchini: This provides the essential moisture that keeps the loaf tender for days without needing excessive oils.
- Unsweetened Cocoa Powder: Use a high-quality dark cocoa to ensure a deep, chocolatey profile that satisfies every craving.
- Monkfruit Sweetener: This granulated sugar replacement measures exactly like the real thing but keeps the recipe friendly for sugar-conscious bakers.
- Greek Yogurt: A small amount of yogurt adds a subtle tang and contributes to the soft, pillowy structure of the crumb.
- Instant Espresso Powder: You will not taste coffee, but this secret ingredient intensifies the chocolate notes significantly.
- Extra Virgin Olive Oil: This heart-healthy fat choice ensures the cake remains moist even after being refrigerated.
| Ingredient | Why It Matters |
|---|---|
| Zucchini | Adds moisture and fiber without altering the flavor profile. |
| Monkfruit | Provides sweetness with a clean finish and zero grams of sugar. |
| Espresso Powder | Acts as a flavor booster to make the cocoa taste richer. |
| Greek Yogurt | Helps the baking soda react for a better rise in the oven. |
From Bowl to Oven

Step 1: Prep Your Space
Heat your oven to 180℃ or 350℉ and prepare a loaf tin with a quick coat of spray and parchment paper. Lining the pan is a small step that makes lifting the finished loaf out a breeze, preventing any frustrating sticking at the bottom. You want the oven fully at temperature before the batter goes in to ensure the lift begins immediately.
Step 2: Whisk the Dry Components
In a medium mixing bowl, whisk together the flour, cocoa powder, baking soda, and sea salt until the color is a uniform light brown. Sifting is not required, but a vigorous whisking helps break up any cocoa lumps that might hide in the powder. You will know it is ready when the salt crystals are evenly distributed throughout the dark flour mixture.
Step 3: Combine the Wet Elements
Grab a separate bowl and whisk the eggs with the monkfruit sweetener, olive oil, yogurt, vanilla, and that secret espresso powder. The mixture should look glossy and smooth, with the granules of sweetener fully incorporated into the liquid. It will smell like a rich vanilla latte at this stage, which is always the best part of the process.
Step 4: Merge the Mixtures
Pour the wet ingredients directly into the dry bowl and stir with a spatula until the white streaks of flour disappear. Avoid over-mixing here, as we want to keep the gluten relaxed for a soft, cake-like texture rather than a tough bread. The batter will be thick and dark, holding its shape as you move the spoon through it.
Step 5: Fold in the Greenery
Add your strained zucchini and half of the chocolate chips, folding them gently into the thick chocolate base. The zucchini will seemingly disappear into the dark batter, leaving only its moisture behind to work magic in the oven. Seeing those little chocolate chips peppered throughout the bowl is a sign that you are almost to the finish line.
Step 6: Bake Your Sugar-Free Chocolate Zucchini Cake
Transfer the batter into your prepared tin and top it with the remaining chocolate chips for a professional, speckled look. Slide it onto the middle rack of the oven and let it bake for about 50 to 60 minutes while the kitchen fills with warmth. When a toothpick comes out with only a few moist crumbs, your masterpiece is ready to emerge.
Step 7: Cool and Portion
Let the loaf rest in the tin for ten minutes to set its structure before moving it to a wire rack for the final cooling phase. Slicing too early can cause the tender crumb to crumble, so patience is key for those beautiful, clean wedges. Once cooled, you can slice it thick and marvel at how the zucchini has completely vanished into the fudgy interior.
Easy-Baker Notes

When grating your zucchini, use the fine side of the box grater to ensure the vegetable pieces are small enough to melt away during baking. This technique ensures that even the pickiest eaters will never suspect there are greens hidden inside their dessert loaf. If you use a coarse grate, you might see small green flecks, which some people enjoy, but the fine grate is the secret to a stealthy vegetable addition.
Straining the zucchini is the most important part of this whole process because excess water can lead to a soggy bottom. Place your grated squash on a few layers of paper towels to let the gravity do the work, but do not squeeze it dry like you would for fritters. We need that natural hydration to keep the chocolate cake recipe from turning out dry or crumbly after it cools.
If your cake happens to sink in the middle after you pull it out of the oven, it often means the zucchini was too wet or the leavening was old. Check the date on your baking soda every few months to ensure it still has the power to lift heavy, moist batters. You can test your soda by putting a pinch in a spoonful of vinegar; if it does not fizz violently, it is time for a new box.
Measuring flour by scooping the cup directly into the bag is a common mistake that leads to dense, heavy cakes. Instead, use a spoon to fluff the flour and then lightly fill your measuring cup before leveling it off with a flat knife. This method keeps the crumb light and airy, allowing the chocolate flavor to take center stage without being weighed down by extra starch.
Using room temperature eggs will help the batter emulsify more smoothly, resulting in a more consistent bake from edge to center. If you forgot to take them out of the fridge, simply place the eggs in a bowl of warm water for five minutes while you prep the other ingredients. Small temperature adjustments like this can make a noticeable difference in how the yogurt and oil incorporate into the mixture.
For those who want to understand how to bake with cocoa and zero sugar sweeteners correctly, remember that cocoa powder is naturally acidic. This acidity is what reacts with the baking soda to create those tiny air bubbles that make the cake rise. Since we are using monkfruit, which does not caramelize like sugar, the structure depends entirely on this chemical reaction during the first twenty minutes of baking.
Frequently Asked Questions
Can I use a different sweetener instead of monkfruit?
Yes, you can use granulated stevia or erythritol in this recipe as long as they measure one-to-one with sugar. Avoid using liquid sweeteners, as they will change the moisture balance and potentially make the loaf too wet to rise properly. Always check the packaging to ensure your chosen brand is designed for baking.
How do I store this cake to keep it moist?
This loaf stays fresh in an airtight container on the counter for up to four days. If your kitchen is particularly warm, you might want to move it to the refrigerator after the second day to prevent the zucchini moisture from spoiling. It actually tastes even fudgier when chilled, making it a great cold snack.
Do I need to peel the zucchini before grating?
There is no need to peel the zucchini because the skin is very thin and softens completely during the baking process. Peeling would actually remove some of the nutrients and fiber that make this a better-for-you treat. Once the cake is baked, the dark color of the cocoa hides any trace of the green peel.
Can I turn this recipe into muffins instead of a loaf?
Absolutely, this batter works wonderfully in a standard muffin tin for grab-and-go snacking. Simply line the tin with paper liners and bake at the same temperature for 18 to 22 minutes. You will know they are done when the tops spring back lightly when touched with a finger.
Is it possible to freeze this chocolate zucchini loaf?
Yes, this cake freezes beautifully for up to two months when wrapped tightly in plastic wrap and foil. I recommend slicing the loaf before freezing so you can pull out individual pieces whenever the craving strikes. Just let a slice thaw on the counter for twenty minutes or give it a quick zap in the microwave.
What if my zucchini is very large and has big seeds?
If you are using a giant garden zucchini, it is best to slice it in half and scoop out the large, woody seeds before grating. Large seeds can add an unpleasant texture to the cake and hold too much water. The smaller, younger zucchini found at the grocery store are usually fine to grate whole.
Simple Swaps
If you want a little crunch in your loaf, try adding half a cup of toasted walnuts or pecans during the folding stage. The earthy flavor of the nuts pairs beautifully with the dark cocoa and provides a satisfying contrast to the soft, fudgy interior. This is a great way to turn a simple Tuesday night cake into something that feels a bit more substantial for a weekend brunch.
For a citrus twist, add the zest of one medium orange to the wet ingredients before mixing everything together. Chocolate and orange are a classic pairing, and the bright oils from the zest will cut through the richness of the cocoa perfectly. You can find more inspiration for flavor pairings in my homemade chocolate cake guide if you want to get creative with your pantry staples.
Swap the olive oil for melted coconut oil if you prefer a very subtle tropical aroma and a slightly firmer crumb when chilled. Coconut oil behaves similarly to butter in baking, providing a rich mouthfeel that makes sugar-free desserts feel much more indulgent. Make sure your other liquid ingredients are not cold, or the coconut oil might seize up and create small clumps in the batter.
Slice & Serve
This loaf is spectacular when served slightly warm with a dollop of unsweetened Greek yogurt or a smear of almond butter on top. The coolness of the yogurt complements the deep chocolate flavor, creating a breakfast-worthy treat that feels like a dessert. For a more formal presentation, you can serve a thick slice alongside a handful of fresh raspberries or strawberries for a pop of color.
If you are hosting friends, consider serving this as part of a larger dessert spread featuring a chocolate layer cake for those who want traditional sugar. It holds its own perfectly on a platter, especially when sliced into clean, even rectangles that show off the dark, moist crumb. A hot cup of black coffee or an herbal mint tea is the final touch needed to balance the richness of the dark cocoa.
One bowl, one pan, no fuss recipes like this one are meant to be shared without any stress or fancy equipment. You can even toast a slice in a pan with a little bit of butter for a crispy-edged afternoon snack that feels like a gourmet cafe treat. No matter how you choose to serve it, the focus remains on the honest flavors and the simple joy of a home-baked loaf.

The Wrap-Up
Baking a Sugar-Free Chocolate Zucchini Cake is a wonderful way to prove that simple ingredients can lead to spectacular results. Whether you are clearing out the last of the summer garden or just looking for a way to satisfy a chocolate craving without the guilt, this recipe is a reliable winner. It fits perfectly into a busy life because it requires minimal effort but delivers a texture that rivals any traditional bakery loaf.
I hope you find as much joy in this easy process as I do, especially when you take that first fudgy bite. If you enjoy one-bowl recipes, you might also want to try my simple chocolate wacky cake for another pantry-friendly option. This is the kind of baking that brings people together over a shared love of good food that actually makes you feel great.
Please share your baking results with me and join our community of home bakers who believe in keeping things simple and delicious. You can find more inspiration and tips on our social channels where we celebrate every Tuesday night bake. Follow along on Pinterest, Facebook, and Telegram for more easy recipes.


