If you have ten minutes of hands-on time, you have this cake ready to impress without any of the stress typically found in bakery-style desserts.

This Two-Layer Boston Cream Cake is the answer when you want a dessert that looks like it came from a fancy bakery but actually fits into your busy week. We are taking a simple butter cake and turning it into something spectacular with a silky vanilla filling and a glossy chocolate finish. It is the kind of recipe that makes you feel like a pro without needing any special equipment or advanced skills. You can bake this between errands or after dinner while the house is quiet.
What Makes This Two-Layer Boston Cream Cake Shine
Prep: 30 min · Serves: 12 · Difficulty: Medium
- Thick pastry cream stays inside the cake layers
- Pantry staples create a professional bakery result
- Glossy ganache requires only two basic ingredients
- Make the components ahead for easy assembly
- Traditional flavors that everyone at the table loves
This is the recipe my family requests every single weekend because it offers baking that fits your life. You can even use a pre-made yellow cake recipe to save time when the week gets away from you.
Get The Full Cake Recipe
Print
Two-Layer Boston Cream Cake
- Total Time: 1 hour 30 mins
- Yield: 12 servings
Description
This decadent two-layer cake combines light, airy sponge cake with a rich, silky vanilla custard and a luscious chocolate ganache topping. It is the perfect bakery-style dessert that is surprisingly achievable for a busy weeknight kitchen.
Ingredients
- Yellow cake mix or pre-baked yellow cake layers
- 4 large egg yolks
- 1 cup half and half
- 1/2 cup granulated sugar
- 3 tablespoons cornstarch
- 1 pinch salt
- 4 tablespoons unsalted butter
- 1 teaspoon vanilla extract
- 1 cup milk chocolate chips
- 1/2 cup heavy cream
Instructions
- Bake the layers. Prepare your yellow cake rounds according to package or recipe directions, ensuring they cool completely before assembly.
- Mix dry ingredients. In a saucepan, whisk together granulated sugar, cornstarch, and salt while the pan is cool.
- Heat the dairy. Pour in the half and half and add butter, heating over medium-high until the butter melts and edges begin to bubble.
- Temper the eggs. Whisk egg yolks in a bowl, then slowly add a ladle of the hot dairy, whisking constantly to prevent scrambling.
- Combine and thicken. Return the egg mixture to the saucepan, boiling for 60-90 seconds while whisking until it reaches a pudding-like consistency.
- Chill the custard. Transfer to a bowl and press plastic wrap directly onto the surface of the cream, refrigerating until completely cold.
- Prepare for assembly. Once chilled, whisk the custard vigorously until smooth and spreadable.
- Assemble the cake. Place one cake layer on a plate, spread half the custard, top with the second layer, add the remaining custard, and finish with the final cake layer.
- Create the ganache. Melt the milk chocolate chips with heavy cream in short microwave bursts, stirring until smooth and glossy.
- Glaze and set. Pour the slightly cooled ganache over the top of the cake, allowing it to drip down the sides, then refrigerate for 30 minutes before serving.
Notes
- Ensure all cake layers are completely room temperature before applying custard to prevent the filling from thinning.
- Always use a fine-mesh sieve to strain the finished custard to guarantee an ultra-smooth, lump-free texture.
- Run your knife under hot water and wipe it clean between every slice to achieve perfectly clean layers.
- Press the plastic wrap directly onto the warm custard surface to prevent a tough skin from forming during the cooling process.
- Prep Time: 30 mins
- Cook Time: 20 mins
- Category: Dessert
- Method: Baking
- Cuisine: American
Pantry Lineup

Choosing the right components ensures your cake has the structural integrity to hold that heavy vanilla filling while remaining soft on the fork. You likely have most of these items sitting in your kitchen right now, ready to be transformed into a classic American treat. Focusing on quality vanilla and fresh dairy will provide that honest flavor we all crave in a homemade dessert.
- Egg Yolks: These provide the richness and yellow hue essential for a traditional custard filling.
- Half and Half: Using this instead of whole milk creates a much creamier and stable pastry cream.
- Cornstarch: This acts as the thickening agent to keep your filling from running out the sides.
- Butter: Adding this at the end of the custard process gives the filling a velvety mouthfeel.
- Milk Chocolate Chips: These melt into a smooth glaze that remains soft enough to slice easily.
- Heavy Cream: When mixed with chocolate, it creates a pourable ganache that sets with a beautiful shine.
| Ingredient | Why It Matters |
|---|---|
| Egg Yolks | Creates a rich and stable custard base |
| Cornstarch | Ensures the filling holds its shape when sliced |
| Half and Half | Provides a creamy texture without being too heavy |
| Pure Vanilla | Delivers that classic bakery-scented aroma and flavor |
The Easy Method

Step 1: Prepare the Butter Cake Layers
Start by baking your favorite yellow butter cake rounds according to the specific recipe instructions provided in your notes. You want to ensure the cakes are fully baked until a tester comes out clean and the edges pull away from the pan slightly. Allow these to cool completely on a wire rack before you even think about adding the filling or the glaze. Cooling is a vital part of the process because a warm cake will melt your custard and create a messy situation.
Step 2: Mix the Dry Custard Base
In a heavy-bottomed saucepan, whisk together your granulated sugar, cornstarch, and a pinch of salt until no lumps remain. Doing this while the pan is still cold prevents the starch from clumping once you add the liquid components later. This simple step ensures your vanilla filling comes out smooth and professional every single time you bake it. It only takes a minute but makes a significant difference in the final texture of the dessert.
Step 3: Heat the Dairy and Butter
Pour your half and half into the saucepan along with the four tablespoons of unsalted butter and set the heat to medium-high. You want to watch the pan closely until the butter has completely melted and small bubbles start to form around the edges of the liquid. Avoid bringing it to a rolling boil too quickly, as you want the dairy to warm up gradually for the best results. The smell of the warming dairy and melting butter is one of the best parts of this process.
Step 4: Temper the Egg Yolks
Whisk your egg yolks in a separate small bowl until they are pale and smooth before slowly adding a ladle of the hot dairy mixture. This process, known as tempering, raises the temperature of the eggs slowly so they do not scramble when added to the main pot. Continue whisking constantly while you pour the warmed egg mixture back into the saucepan with the remaining half and half. This technique is the secret to a silky custard that feels like it came from a high-end pastry shop.
Step 5: Thicken the Vanilla Filling
Bring the entire mixture to a gentle boil over medium heat while whisking vigorously without stopping for even a second. You will notice the liquid transforming into a thick, glossy pudding as the cornstarch activates and does its work in the heat. Keep the boil going for about sixty to ninety seconds to ensure the starch is fully cooked and the filling will set properly. Remove the pan from the heat immediately once it reaches the consistency of a thick Greek yogurt.
Step 6: Chill the Custard with Contact
Pour the hot custard into a clean glass bowl and immediately press a piece of plastic wrap directly onto the surface of the cream. This contact method prevents a tough skin from forming on top as the mixture cools down in the refrigerator. Let the bowl sit on the counter for a few minutes before moving it to the fridge to chill until it is completely cold. A cold filling is much easier to manage during the assembly phase of your baking project.
Step 7: Smooth the Cold Filling
Once the custard is thoroughly chilled, remove it from the refrigerator and take off the plastic wrap layer. Use a sturdy whisk or a fork to stir the mixture until it regains its creamy and spreadable consistency. It might look a bit stiff at first, but a few seconds of vigorous stirring will bring back that silky texture you need for layering. This is a great time to sneak a small taste to check the balance of the vanilla and sugar.
Step 8: Assembling Your Two-Layer Boston Cream Cake Layers
Place your first cooled cake round on a serving plate and spread about half of your vanilla custard evenly over the top surface. Gently set the second cake layer directly on top of the cream, pressing down very lightly to ensure it stays in place. Add the remaining custard to the top of the second layer, spreading it toward the edges but leaving a small margin. Place the final cake round on top and move the entire assembly to the fridge to set while you prepare the glaze.
Step 9: Prepare the Chocolate Ganache
Combine your milk chocolate chips and heavy cream in a microwave-safe bowl or a small saucepan over very low heat. Heat the mixture in short twenty-second bursts, stirring well between each interval until the chocolate is entirely melted and smooth. The glaze should be glossy and the thickness of a pourable pudding, allowing it to coat the cake without running off completely. Let it sit for a few minutes to cool slightly so it does not melt the custard layers below.
Step 10: Final Pour and Setting
Carefully pour the slightly cooled chocolate ganache over the center of the top cake layer, letting it naturally drift toward the edges. You can use a small spatula to nudge the chocolate over the sides in a decorative dripping pattern if you prefer that look. Return the finished cake to the refrigerator for at least thirty minutes to allow the chocolate to set firmly before slicing. Serving this cake cold makes the contrast between the soft cake and the firm glaze truly shine.
Easy-Baker Notes

When you are making the cake layers, always take the time to weigh your flour with a digital scale for the most accurate results. Measuring by volume often leads to using too much flour, which results in a dry and crumbly cake that cannot support the weight of the custard. If you want a truly tender crumb, consider trying a perfect buttermilk vanilla cake as your base because the acidity in the dairy keeps things soft.
If your custard filling stays thin or soupy after boiling, here is why and how to fix it immediately. This usually happens if the cornstarch did not reach a high enough temperature to fully hydrate and thicken the liquid properly. To fix this, return the mixture to the heat and bring it back to a full boil for another minute while whisking constantly to activate the starch.
Always strain your custard through a fine-mesh sieve after it finishes cooking to remove any tiny bits of cooked egg that might have formed. Even the most careful bakers sometimes end up with a few lumps, and this quick step ensures a professional texture that feels like silk on the tongue. It only takes a moment and saves you from a grainy dessert experience later.
Level your cake layers with a long serrated knife before you start the assembly process to ensure the final product stands straight. A domed cake layer will cause the custard to slide toward the edges, which can result in the top layers slipping off the base. Simply trim the rounded top off each cake so you have a flat surface for the filling to grip onto.
Wait until your ganache is no longer steaming before you pour it over the assembled layers to protect the integrity of the custard. If the chocolate is too hot, it will melt the chilled filling and cause the layers to shift or the custard to leak out. Testing a small drop on your wrist to ensure it is just warm to the touch is a reliable way to know it is ready.
Use a hot knife to slice through the chocolate glaze to get clean and beautiful pieces every time you serve this dessert. Run your knife under hot tap water and wipe it dry before making each cut through the cake. The heat from the metal will melt the chocolate just enough to prevent it from cracking or dragging through the soft layers below.
Frequently Asked Questions
Can I make this cake a day in advance?
Yes, you can certainly prepare the components of this cake ahead of time to make your schedule easier. The cake layers can be baked two days early and kept wrapped in plastic, while the custard can stay in the fridge for up to twenty-four hours. However, for the best texture and appearance, it is best to assemble the layers and pour the ganache on the day you plan to serve it.
Why did my chocolate glaze turn out grainy?
A grainy ganache usually happens if the chocolate was overheated or if a small amount of water found its way into the bowl. Chocolate is very sensitive to high temperatures, so using short bursts in the microwave is essential for a smooth finish. If it does grain up, you can sometimes fix it by whisking in a teaspoon of warm heavy cream until the emulsion comes back together.
What is the best way to store leftovers?
Since this cake contains a dairy-based custard filling, it must be stored in the refrigerator at all times. Place any leftover slices in an airtight container or cover the cut sides of the cake with plastic wrap to prevent the sponge from drying out. When kept cold, the cake will remain fresh and delicious for about three to four days.
Can I use a boxed cake mix for this recipe?
While a homemade butter cake provides the best flavor and structure, you can use a high-quality boxed yellow cake mix if you are in a hurry. Just make sure to bake it in two round pans and allow them to cool completely before assembling. The homemade custard and ganache will still make the dessert feel special and elevated despite using a shortcut for the base.
Why did my custard filling leak out the sides?
If the custard leaks, it usually means it was not chilled long enough or it was not cooked to a sufficient thickness on the stove. The filling needs to be quite cold and firm before you stack the layers to ensure it stays in place. Additionally, leaving a small border around the edge of the cake when spreading the cream helps prevent it from being squeezed out by the weight of the top layer.
Can I freeze the assembled Boston Cream Cake?
Freezing the fully assembled cake is not recommended because the custard filling will change texture as it thaws. Custard made with cornstarch often becomes watery or separated after being frozen and defrosted, which can ruin the cake. You can freeze the individual cake layers for up to a month, but the filling and assembly should always be done fresh.
Simple Swaps
If you prefer a darker flavor profile, you can easily substitute the milk chocolate chips for semi-sweet or bittersweet chocolate in the ganache. This change provides a sophisticated bitterness that balances the sweetness of the vanilla custard beautifully. You can also look into traditional methods for layering cakes to see how different chocolate types affect the final set of the glaze.
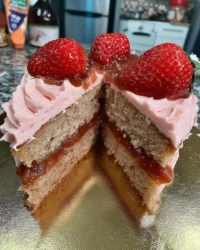
Transform this recipe into a fruit-inspired dessert by adding a thin layer of sliced strawberries or raspberries on top of the custard before adding the second cake layer. The acidity of the fresh fruit cuts through the richness of the dairy and adds a bright pop of color to every slice. You might also try using a classic vanilla butter cake as the foundation if you want a slightly denser texture that holds up well to extra fillings.
For a nutty twist, add a half teaspoon of almond extract to the custard along with the vanilla once you remove it from the heat. This small addition gives the filling a marzipan-like aroma that pairs exceptionally well with the chocolate topping. You can even sprinkle some toasted slivered almonds over the wet ganache before it sets to add a pleasant crunch to the finished cake.
Slice & Serve
This dessert is traditionally served chilled, making it a refreshing end to a hearty family dinner or a Sunday brunch. Because it is quite rich, a thin slice is often enough to satisfy a sweet craving, though most guests will likely ask for seconds. You can pair it with a strong cup of coffee or a cold glass of milk to balance the deep chocolate and creamy vanilla notes.
If you want to add a touch of color to the plate, serve each slice with a few fresh berries or a sprig of mint on the side. This simple addition makes the presentation feel like a special occasion even on a quiet Tuesday night at home. You might even consider using a yellow cake chocolate frosting technique for the sides if you prefer a fully encased cake rather than the traditional exposed custard look.
Always use a clean, sharp knife to cut through the layers and wipe it down between every single slice for the best appearance. This prevents the chocolate from smearing into the yellow cake and keeps the custard layers looking distinct and beautiful on the plate. Hosting a gathering becomes much easier when you have a reliable dessert that looks as good as it tastes without requiring hours of decorating.

A Quick Last Note
Baking this Two-Layer Boston Cream Cake is a wonderful way to bring a classic bakery staple into your own kitchen with very little fuss. It proves that simple ingredients and honest flavor are all you really need to create a dessert that your friends and family will talk about for weeks. Whether you are baking for a holiday or just because you had a craving on a weeknight, this recipe fits perfectly into a busy life.
I hope you find as much joy in the process of whisking that silky custard as you do in taking that first decadent bite. If you find yourself craving more cocoa-heavy treats, you should try my chocolate layer cake for your next big celebration. Please share your baking successes with me and let me know how your cake turned out by visiting our social pages.


