There is a quiet joy in watching a thick slice of fresh cake sit on the weekday counter, waiting for someone to grab it before heading out the door.

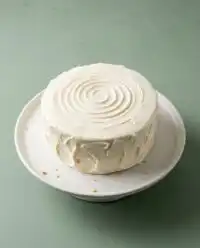
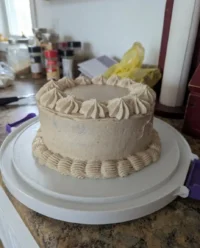
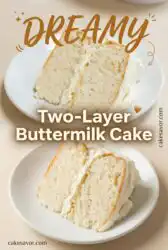
This Two-Layer Buttermilk Cake is the crumbly, vanilla-scented dream you can bake when you only have a sliver of time after dinner. It sits beautifully on your counter, losing slice after slice as family members wander through the kitchen. You do not need fancy decorating tools or hours of tedious chilling to make this look beautiful. It is honest, rustic, and deeply satisfying from the very first bite.
What Makes This Easy Two-Layer Buttermilk Cake Shine
Prep: 40 min · Serves: 12 · Difficulty: Easy
- Baking with basic pantry staples.
- One bowl cleanup keeps evening stress low.
- Acidic buttermilk guarantees a tender crumb.
- Soft vanilla frosting spreads without hassle.
- Even slices make morning coffee pairing easy.
This is the dessert you bake when you want a reliable classic vanilla butter cake without the complicated steps. Baking should never feel like an intensive project that drains your energy after a long day at work. Instead, it should be a therapeutic way to wind down in your pajamas while the kettle boils on the stove. This recipe delivers that comforting experience by using straightforward methods that even beginner bakers can master on their very first try.
You will find yourself baking this cake on quiet nights only to have something sweet for breakfast. It stores beautifully, keeping its tender moisture for days under a standard cake dome. There is nothing quite like waking up to a thick, home-baked slice waiting for you beside your morning cup of coffee.
Get The Full Cake Recipe
Print
Two-Layer Buttermilk Cake
- Total Time: 1 hour 13 mins
- Yield: 12 servings
Description
This classic, two-layer buttermilk cake features a light, tender crumb and a sweet vanilla frosting. Perfect for busy weeknights, it relies on simple pantry staples to deliver a comforting and reliable dessert for any occasion.
Ingredients
- Cake flour
- Kosher salt
- Baking powder
- Baking soda
- Unsalted butter, softened
- Granulated sugar
- Eggs, room temperature
- Buttermilk, room temperature
- Vanilla extract
- Powdered sugar
- Milk
Instructions
- Prep and preheat. Grease two nine-inch cake pans, line with parchment, and preheat your oven to 350°F (325°F for convection).
- Whisk dry ingredients. Sift cake flour twice, then whisk together with salt, baking powder, and baking soda in a medium bowl.
- Cream butter base. Beat softened butter and granulated sugar until fluffy, then incorporate eggs one at a time.
- Combine the batter. Alternately add the dry mixture and buttermilk in three additions, finishing with the flour and stirring in vanilla extract.
- Bake the layers. Divide batter into pans and bake for 30 to 33 minutes until a toothpick comes out clean.
- Cool the cake. Let layers rest in pans for 20 minutes before turning out onto a wire rack to cool completely.
- Prepare the frosting. Beat butter, salt, powdered sugar, milk, and vanilla until smooth and spreadable.
- Assemble and frost. Place one cooled layer on a plate, top with frosting, stack the second layer, and coat the exterior.
Notes
- Ensure all dairy and egg components are at room temperature to prevent the batter from curdling during the mixing process.
- Fluff your flour with a fork before measuring to avoid over-packing the cup and resulting in a dry, dense cake.
- Test your chemical leaveners by adding a pinch to warm water; if it does not bubble, your baking powder or soda is no longer active.
- Use a small amount of lemon juice mixed into whole milk as an effective substitute if you find yourself out of buttermilk.
- Prep Time: 40 mins
- Cook Time: 33 mins
- Category: Dessert
- Method: Baking
- Cuisine: American
Pantry Lineup

Gathering your elements before you begin makes the entire process feel like a breeze. You likely already have most of these ingredients tucked away in your kitchen cabinets right now. Each component plays a vital role in creating that soft, velvety texture we want.
- Cake flour: Sifting this twice gives the cake its delicate, cloud-like crumb.
- Buttermilk: The natural acidity reacts with the leaveners to keep the crumb tender.
- Unsalted butter: Creaming this with sugar builds the structure for a light rise.
- Granulated sugar: This sweetens the layers while keeping them moist and soft.
- Eggs: Using room temperature eggs helps them emulsify cleanly into the batter.
- Baking soda and powder: These dual leaveners work together to give the cake its lift.
- Vanilla extract: A generous splash delivers a warm, comforting aroma to every bite.
| Ingredient | Why It Matters |
|---|---|
| Cake Flour | Sifted twice to build a soft and light structure |
| Buttermilk | Adds moisture and breaks down gluten for tenderness |
| Unsalted Butter | Creates air pockets during creaming for a fluffy texture |
| Powdered Sugar | Dissolves smoothly to create a silky, spreadable frosting |
Having your ingredients at room temperature is the secret key to success with this recipe. When your butter, eggs, and buttermilk are all at the same temperature, they combine into a smooth emulsion. This trapped air expands in the oven, giving you that beautiful, even rise that we all crave in a layered dessert.
The Easy Method

Step 1: Prep Your Pans and Pre-Heat
Prepare two nine-inch cake pans by greasing them thoroughly with butter and lining the bottoms with parchment paper. Dust the sides and bottom with a spoonful of flour, tapping out any excess over the sink. Set your conventional oven to 350 degrees or 325 degrees if using a convection model. Taking this extra time up front prevents any heartbreaking sticking when you try to turn the layers out later.
Step 2: Whisk the Dry Ingredients
Sift your cake flour twice into a medium bowl before measuring out the final amount. Add the kosher salt, baking powder, and baking soda to the bowl. Whisk everything together with a fork until the mixture looks light and uniform. Sifting twice might feel like a chore, but it introduces crucial air into the flour, which makes your finished layers feel light as air.
Step 3: Cream the Butter and Sugar
Combine the softened unsalted butter and granulated sugar in the bowl of your stand mixer. Beat on medium speed for about two minutes using the paddle attachment until it looks pale and fluffy. Add your room temperature eggs one at a time, beating for one minute after each addition to build a strong emulsion. This step should take about five minutes in total, creating a light base that will support the cake’s structure as it bakes.
Step 4: Alternately Add Flour and Buttermilk
Set your mixer to its lowest stir speed to avoid splashing batter across the counter. Add the flour mixture and the room temperature buttermilk alternately in three separate additions, beginning and ending with the flour. Pour in the vanilla extract last, stirring gently until the batter looks smooth and thick. Be careful not to overmix at this stage, as too much stirring can make the finished cake dense instead of fluffy.
Step 5: Bake Your Two-Layer Buttermilk Cake
Divide the batter evenly between your two prepared pans and slide them onto the center rack of your preheated oven. Bake for 30 to 33 minutes, keeping an eye on the oven during the final minutes of baking. The cakes are done when they pull slightly away from the edges and a toothpick inserted in the center comes out clean. You should also smell a sweet, buttery vanilla aroma filling your kitchen when they are ready.
Step 6: Cool the Cake Layers
Let the pans rest on a wire cooling rack for 20 minutes to allow the delicate crumb to settle and firm up. Gently run a thin knife around the edges, invert the pans, and peel away the parchment paper from the bottoms of the cakes. Allow the layers to cool completely on the rack so they do not melt the frosting when you assemble them. Frosting a warm cake is a recipe for a sliding, messy disaster, so patience is key here.
Step 7: Whip Up the Sweet Frosting
Combine the softened butter, kosher salt, powdered sugar, milk, and vanilla in your clean mixer bowl. Beat the ingredients with the paddle attachment, watching for a spreadable consistency to form. Feel free to add a splash more milk if the mixture seems too stiff, or a spoonful of sugar if it looks too runny. Frosting can be a bit fussy, so make these adjustments in very small increments until it is right.
Step 8: Assemble and Frost
Place your first cooled layer on a flat serving plate and spread a generous dollop of frosting across the top. Stack the second layer carefully over the first, aligning the edges as closely as possible to keep the cake level. Spread the remaining frosting smoothly over the sides and top, then cover with a cake dome until you are ready to serve. This cake keeps wonderfully at room temperature, making it a stress-free dessert to prepare ahead of time.
Easy-Baker Notes

Make sure your eggs and buttermilk are truly at room temperature before you begin mixing. Cold ingredients will cause the creamed butter to seize up, resulting in a curdled batter and a dense bake. If you are short on time, place cold eggs in a bowl of warm water for ten minutes to take the chill off quickly.
When you are measuring your flour, always fluff it with a fork first, spoon it into the measuring cup, and level it off with a flat knife. This keeps you from packing too much flour into the cup, which is the most common reason home bakes turn out dry. Investing in a simple kitchen scale is another great way to make sure your measurements are completely accurate every time.
If your cake layers sink in the middle, your baking powder or baking soda might be expired. Test their freshness by dropping a pinch of baking powder in warm water; if it bubbles immediately, it is still active and ready to use. If it does not bubble, replace it before attempting this bake, or your layers will turn out flat and heavy.
You can find more helpful advice in our basic vanilla cake recipe which covers standard mixing speeds in detail. Keeping the mixer speed low during the final additions avoids overworking the gluten. Overworking the flour results in a tough, bread-like texture rather than a melt-in-your-mouth crumb.
If you run out of buttermilk, you can make a quick substitute by adding a tablespoon of lemon juice to a cup of whole milk. Let it sit on the counter for ten minutes until it curdles slightly before adding it to your mixing bowl. While store-bought buttermilk is always best for texture, this quick kitchen hack works beautifully in a pinch.
For more frosting inspiration, check out this classic two-layer buttermilk cake with buttercream frosting recipe on Just a Pinch to see how other home bakers customize their sweet toppings. Giving the frosting a final stir with a wooden spoon removes excess air bubbles. This simple technique leaves you with a silky finish that is extremely easy to spread over your layers.
Frequently Asked Questions
Why is my buttermilk cake dry?
A dry cake usually happens when too much flour is packed into the measuring cup or the cake is left in the oven too long. Always use the spoon-and-level method for measuring flour, and start testing your cake with a toothpick a few minutes before the recipe baking time is up. Over-baking even by a couple of minutes can dry out the delicate crumb, so keep a close eye on the oven.
Can I substitute buttermilk in a cake?
Yes, you can make a quick substitute if you do not have buttermilk on hand. Stir one tablespoon of lemon juice or white vinegar into one cup of whole milk and let it sit for ten minutes until it looks slightly curdled. While store-bought buttermilk has a thicker consistency that provides the best results, this quick pantry alternative works incredibly well in a pinch.
What does buttermilk do to a cake?
Buttermilk brings acidity to the batter, which breaks down the gluten strands in the flour for an incredibly tender crumb. It also reacts with the baking soda to help the cake rise evenly, leaving you with light and fluffy layers. Additionally, it adds a very subtle tanginess that balances out the sweet sugar in the batter.
Should buttermilk cake be served warm or cold?
This cake tastes best when served at room temperature because the butter in the layers is soft and flavorful. If you store the cake in the refrigerator, let it sit on the counter for about thirty minutes before slicing so the texture softens back up. Cold temperatures mask the delicate vanilla flavors and make the crumb feel denser than it actually is.
How many people does a two-layer cake feed?
A standard nine-inch two-layer cake will easily feed twelve people when sliced into generous portions. If you are hosting a larger gathering, you can cut smaller wedges to serve up to sixteen guests comfortably. It is a highly versatile size that works perfectly for small family dinners or medium-sized celebrations.
How long do I bake a two-layer buttermilk cake?
Bake the nine-inch layers for 30 to 33 minutes in a preheated oven at 350 degrees. Always check them with a toothpick in the center around the 28-minute mark since every oven runs slightly differently. The top of the cake should feel springy to the touch and be a beautiful light golden brown color.
Can this recipe be used for cupcakes?
You can definitely use this batter to make cupcakes instead of layers. Line two muffin tins with paper liners, fill them two-thirds full, and bake at 350 degrees for 18 to 22 minutes until springy to the touch. This recipe will make about twenty-four standard-sized cupcakes, making it perfect for school bake sales or casual get-togethers.
Can a buttermilk cake be frozen?
Yes, the unfrosted layers freeze beautifully for up to three months when wrapped tightly in plastic wrap and aluminum foil. Thaw them on the kitchen counter still wrapped before frosting and assembling. Freezing the layers actually locks in moisture, making them extremely easy to frost without creating too many loose crumbs.
Simple Swaps
If you want to try a different flavor profile, you can easily pair these soft layers with a rich cocoa topping. Swapping the vanilla frosting for a dark chocolate version completely changes the mood of this dessert without changing the cake itself. It makes the cake feel ideal for a birthday or a festive weekend gathering.
You can find a great guide on how to balance these rich flavors by looking at our yellow cake chocolate frosting recipe. This combination is a classic for a reason and always pleases a crowd of hungry guests. You can also sprinkle some shaved chocolate on top for a beautiful contrast against the pale cake layers.
During the warmer summer months, you might want to add a fresh, fruity element to your layers. Spreading a thin layer of raspberry jam or strawberry compote underneath the frosting adds a bright, tangy contrast to the sweet cake. It makes the entire dessert feel lighter and fits beautifully on a sunny afternoon table.
Make sure to chill the jam slightly before spreading so it does not run off the sides of your layer. You can garnish the top with a handful of fresh berries right before serving for a beautiful rustic look. This addition turns a simple weekday treat into a stunning centerpiece for a backyard brunch.
If you love citrus, adding the fresh zest of one lemon to your dry ingredients will brighten up the entire cake. You can also swap the milk in the frosting for fresh lemon juice to create a tart glaze-like frosting that cuts through the sweetness beautifully. It is a simple modification that makes the cake taste like a warm afternoon in a garden. This twist is especially wonderful in the spring when everyone is craving bright, refreshing flavors after a long winter.
Slice & Serve
Serving this dessert should be as relaxed as baking it. This cake looks beautiful sitting on a simple pedestal stand or a rustic wooden cutting board in the middle of your kitchen table. You do not need any elaborate decorations; a simple slice served on a small plate is more than enough to make the moment feel special. It is a wonderful centerpiece for a casual Sunday dinner or a small birthday celebration with close friends.
If you want to create a grander dessert spread, you can serve this alongside our famous chocolate layer cake to give your guests options. Offering both a rich chocolate option and this light vanilla version makes sure every sweet tooth at the party is satisfied. This combination is especially wonderful for graduation parties, baby showers, or holiday gatherings where you want a classic dessert table.
A warm cup of black coffee or a strong mug of tea pairs beautifully with the sweet, buttery crumb of this cake. It makes for a comforting afternoon treat or a quiet slice after the kids have gone to bed. You can also serve it with a small scoop of vanilla bean ice cream or a dollop of unsweetened whipped cream to balance out the sweet frosting.

Bake It Soon
There is no need to wait for a major milestone or a holiday to bake something delicious for your family. This simple cake is designed to fit into your busy life, offering maximum comfort with minimal effort. It is the type of baking that reminds us why we love spending time in the kitchen in the first place, focusing on simple ingredients and honest flavors.
If you enjoyed working with these ingredients, you should definitely try our perfect buttermilk vanilla cake next for another straightforward baking project. Both recipes focus on honest flavors and easy cleanup so you can spend less time scrubbing pans and more time enjoying your dessert. Sharing these treats with your loved ones is the best part of being a home baker.
Please let me know how your cake turned out by leaving a comment below. You can also share photos of your baking on Pinterest, follow our kitchen updates on Facebook, or join our friendly baking community on Telegram. I love seeing what you bake in your own kitchen!

