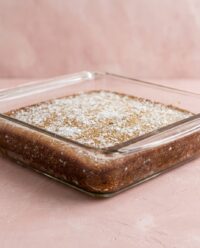
A warm Cinnamon Canned Peach Dump Cake sits on the kitchen counter, its sweet spiced aroma filling the air as family members slice piece after piece until only crumbs remain.

Making a cozy dessert should never feel like a chore at the end of a long day. This simple Cinnamon Canned Peach Dump Cake is my favorite way to bring everyone to the table without washing a dozen dirty bowls. With a few pantry staples and a single baking dish, you can create a bubbly, golden dessert that tastes like hours of effort. It is a sweet treat that fits into your busiest weeks.
What Makes This Easy Cinnamon Canned Peach Dump Cake Shine
Prep: 15 min · Serves: 8 · Difficulty: Easy
- Requires only a single baking dish.
- Uses basic pantry ingredients you already own.
- Bakes into a beautiful golden brown crust.
- Filled with warm cinnamon and sweet spices.
- Ready for the oven in fifteen minutes.
This cozy peach dump cake is the simple baking project you will turn to week after week when comfort calls.
Get The Full Cake Recipe
Print
Cinnamon Canned Peach Dump Cake
- Total Time: 1 hour 10 mins
- Yield: 8 servings
- Diet: Vegetarian
Description
This effortless dessert combines juicy canned peaches with a buttery yellow cake mix topping and warm aromatic spices. It is a perfect, crowd-pleasing treat that delivers professional bakery flavor using only a single baking dish and basic pantry staples.
Ingredients
- 2 cans (15 oz each) sliced peaches in juice
- 1 teaspoon ground cinnamon
- 1/4 teaspoon ground nutmeg
- 1 teaspoon vanilla extract
- 1 package (15.25 oz) yellow cake mix
- 1/4 cup light brown sugar
- 1/2 cup unsalted butter, thinly sliced
Instructions
- Prep the oven. Preheat your oven to 350°F and grease a 9×13-inch baking dish with nonstick spray.
- Spice the peaches. Pour the undrained peaches into the prepared dish, then stir in the cinnamon, nutmeg, and vanilla extract until evenly combined.
- Layer cake mix. Sprinkle the dry yellow cake mix over the peach layer, using a spoon to gently press the powder into the juices so it absorbs moisture.
- Add topping elements. Scatter the light brown sugar across the top and distribute thin slices of cold butter evenly over the surface of the cake mix.
- Bake the cake. Bake uncovered for 45 to 55 minutes until the top is deep golden brown and the fruit juices are bubbling around the edges.
- Cool before serving. Remove from the oven and let the dessert rest on a wire rack for 15 minutes to allow the syrupy filling to thicken before serving.
Notes
- Use a glass or ceramic dish for superior heat retention and better caramelization along the pan edges.
- Grate cold butter directly over the cake mix using a box grater for more even coverage and a crispier golden crust.
- Press any remaining dry pockets of cake mix into the fruit juice halfway through baking to ensure every bite is perfectly moist.
- Always keep the fruit juices in the pan, as this liquid is essential for hydrating the dry cake mix into a soft, cobbler-like topping.
- Prep Time: 15 mins
- Cook Time: 55 mins
- Category: Dessert
- Method: Baking
- Cuisine: American
Grab These From the Kitchen

Opening a can of fruit is the quickest path to a comforting dessert when the baking craving strikes after dark. You do not need a culinary degree or fancy kitchen tools to make something that tastes like a professional bakery made it. Keeping these basic pantry items on hand means you can whip up a warm dessert whenever the mood strikes.
- Canned Sliced Peaches: These provide the sweet, juicy base of our entire dessert.
- Ground Cinnamon: This pantry staple brings a warm, cozy element that balances the sweetness of the fruit.
- Ground Nutmeg: A small pinch adds a complex, warm depth that makes the filling taste like Grandma’s homemade cobbler.
- Vanilla Extract: Adding vanilla transforms the fruit juice into a rich, flavorful syrup.
- Yellow Cake Mix: Our effortless shortcut to a tender, golden topping.
- Light Brown Sugar: Sprinkling this over the top helps create a caramelized, crunchy crust.
- Unsalted Butter: Melted during baking to bind the cake mix and create a rich, buttery flavor.
| Ingredient | Why It Matters |
|---|---|
| Canned Sliced Peaches | Provides the juicy fruit base and the liquid required to bake the dry cake mix topping. |
| Ground Cinnamon | Adds a comforting, warm spice flavor that pairs beautifully with sweet peaches. |
| Ground Nutmeg | Offers a subtle bakery-style complexity that rounds out the fruit filling. |
| Vanilla Extract | Enhances the natural fruit notes and adds a fragrant sweetness to the juices. |
| Yellow Cake Mix | Serves as the easy, pre-measured topping that bakes into a tender cobbler crust. |
| Light Brown Sugar | Melts into the butter to create a caramelized, crunchy top crust during baking. |
| Unsalted Butter | Moistens the dry ingredients and gives the topping a rich, melt-in-your-mouth texture. |
From Bowl to Oven

Step 1: Prep the Oven and Baking Pan
Before you touch a single ingredient, set your oven to 350 degrees Fahrenheit. Grab a standard nine-by-thirteen-inch baking dish and coat the bottom and sides with nonstick baking spray. The light mist of oil prevents the sticky peach juices from burning along the edges of the pan.
Step 2: Layer and Spice the Peaches
Open your cans of sliced fruit and pour them directly into the bottom of the prepared baking dish, juices and all. Scatter the warm cinnamon, ground nutmeg, and vanilla extract over the fruit. Stir the mixture gently with a wooden spoon until the spices are evenly distributed and the aroma of sweet vanilla fills the air.
Step 3: Add the Cake Mix
Carefully sprinkle the dry yellow cake mix over the spiced peach layer, making sure it covers the fruit completely. Use the back of a wooden spoon to press the dry mix gently into the peach juice, helping it absorb the liquid so it bakes evenly. You will see some of the peach juices start to peek through the dry powder, which is exactly what you want.
Step 4: Add the Brown Sugar and Butter
Scatter the light brown sugar evenly over the moistened cake mix layer to encourage a caramel crust. Slice your cold unsalted butter into thin, even pats and arrange them in rows across the very top. Try to cover as much of the surface as possible so that every bite receives a portion of rich butter.
Step 5: Bake Your Cinnamon Canned Peach Dump Cake to Golden Perfection
Slide the baking dish onto the middle rack of your preheated oven and let it bake uncovered for forty-five to fifty-five minutes. As the timer counts down, your kitchen will fill with the smell of caramelized sugar and warm spices. The dessert is ready when the top is a deep golden brown and the peach juices bubble lazily around the edges.
Step 6: Cool and Set before Serving
Remove the hot baking dish from the oven using sturdy oven mitts and place it on a wire rack or a heatproof mat. Allow the hot dessert to rest for fifteen minutes before you scoop into it. This brief cooling period helps the sweet juices thicken up so your portions are beautifully saucy rather than runny.
Easy-Baker Notes

If your baked dessert has dry, chalky patches of cake mix on top, it means the butter and fruit juices did not make contact with those spots. To fix this, use a spoon to press any dry pockets of cake mix down into the bubbling juices about halfway through the baking time. This redistributes the moisture and guarantees a soft, uniform crumb across the entire surface.
Grating cold butter on a box grater is a fantastic alternative to slicing if you want complete coverage. Keep your butter in the freezer for ten minutes before grating it directly over the dry cake mix layer. This creates a fine, snowy layer of butter that melts incredibly evenly, eliminating any risk of dry spots.
While a metal baking pan works fine, a glass or ceramic casserole dish is the preferred choice for this dessert. Ceramic and glass retain heat beautifully, which helps caramelize the fruit juices along the sides of the pan. It also makes for a lovely presentation when you bring the dish straight to the dinner table.
If you prefer a less sweet dessert, you can reduce the brown sugar topping or use peaches packed in light syrup or natural juice. Adjusting the sweetness does not affect the baking science of this recipe, so feel free to tailor it to your personal taste. If you love variety, you might also want to try making our delicious apple dump cake for a different autumn spin.
Do not feel limited to yellow cake mix when putting this dessert together. A white cake mix works beautifully for a lighter flavor, while a spice cake mix adds a deep, autumnal warmth that complements the fruit. For more helpful baking guidance, you can read about how to bake the best peach dump cake to achieve the absolute best results.
Always include the juices from the canned fruit, as this moisture is what actually cooks the dry ingredients. Draining the cans will result in a dry, powdery mess that cannot bake properly in the oven. The liquid combined with the melting butter mimics a traditional cake batter during the baking process.
Frequently Asked Questions
Do you drain the canned peaches?
No, you should never drain the canned fruit for this recipe. The liquid in the cans is absolutely essential because it hydrates and cooks the dry cake mix as the dessert bakes. Draining the fruit will leave you with a dry, chalky layer of flour on top of your dessert.
Do you mix the cake mix with the peaches?
You do not need to mix them together completely. Only sprinkle the dry cake mix evenly over the peaches, and use the back of a spoon to lightly press the powder into the peach juices. This keeps the layers distinct, creating a juicy fruit bottom and a crisp, cake-like top.
What is the best cake mix to use?
A standard yellow or white cake mix is the best option for a traditional cobbler flavor. However, a spice cake mix is an excellent choice if you want to emphasize the warm autumn flavors. Butter pecan cake mix also works beautifully, adding a rich, nutty depth to the finished dessert.
How much butter do you need?
This recipe calls for twelve tablespoons of unsalted butter, which is one and a half sticks. It may seem like a lot, but this fat is necessary to moisten the dry cake mix and create a rich, golden crust. Slicing the butter thinly ensures even coverage across the entire pan.
Do you serve it warm or cold?
This dessert is best served warm, about fifteen minutes after it comes out of the oven. The warm fruit and spiced cake topping pair perfectly with a scoop of cold vanilla ice cream. However, cold leftovers are also delicious straight from the refrigerator the next morning.
How do you store leftovers?
Allow the baking dish to cool completely to room temperature before covering it tightly with plastic wrap or aluminum foil. You can store the leftovers in the refrigerator for up to four days. Reheat individual portions in the microwave for twenty to thirty seconds to restore that fresh-baked warmth.
Can I use fresh peaches instead of canned?
Yes, you can use fresh fruit, but you will need to add extra liquid and sugar to compensate for the canned juices. Toss four cups of sliced fresh fruit with half a cup of sugar and a third of a cup of water or peach nectar before layering. This ensures there is enough moisture to cook the dry cake mix properly.
Simple Swaps
The Spiced Pecan Crunch
Add a delightful texture to your dessert by stirring half a cup of chopped pecans or walnuts into the brown sugar topping before baking. The nuts toast beautifully in the oven heat, adding a savory crunch that pairs wonderfully with the soft peaches. You can also toss in a handful of rolled oats to give the topping a rustic, oatmeal-cookie texture that makes it feel like a cozy breakfast crumble.
The Red Berry Swirl
Introduce a bright pop of tartness by adding a cup of fresh raspberries or blackberries to the canned fruit base. The berries break down during baking, creating beautiful ribbons of red juice and a lovely tart contrast to the sweet peaches. If you enjoy combining different fruits, you should also try our popular cherry dump cake for another crowd-pleasing dessert that takes almost zero effort.
The Creamy Ginger Twist
Give your dessert a modern bakery flair by folding two tablespoons of finely chopped crystallized ginger into the canned peaches. The spicy bite of ginger pairs beautifully with the warm cinnamon and sweet peach syrup, creating a mature flavor profile. This simple addition makes the dessert feel special enough for holiday gatherings while remaining easy enough for a busy weeknight.
Slice & Serve
Serving this warm dessert is all about embracing comfort. Scoop generous portions into wide shallow bowls while the cake is still warm from the oven. The saucy peach base will mingle with the buttery crust, creating a dessert that feels like a big hug at the end of a long day. If you want to expand your fruit baking repertoire, you can also bake a classic peach cake for a more traditional sliced dessert.
A scoop of high-quality vanilla bean ice cream is the ideal partner for this warm treat. As the ice cream melts into the golden crust, it creates a rich, creamy sauce that balances the warm cinnamon spices. If you prefer something lighter, a dollop of unsweetened whipped cream or a drizzle of cold heavy cream works wonderfully too.
For an elegant touch at a casual dinner party, garnish each bowl with a sprig of fresh mint or a light dusting of powdered sugar. You can also serve this alongside a hot pot of black tea or dark roast coffee to cut through the sweetness. It is a dessert that encourages slow spoonfuls and second helpings among friends.

Bake It Soon
There is something deeply satisfying about baking a dessert that requires so little effort but delivers such high rewards. When your kitchen fills with the scent of sweet peaches and warm spices, you will know this recipe is a keeper. It is the perfect reminder that you do not need hours of free time or complicated techniques to share something delicious with the people you love.
If you find yourself with an abundance of summer fruit, do not stop here. You can try our gorgeous peach upside down cake recipe for another beautiful way to celebrate this sweet fruit. No matter which recipe you choose, the goal is always to keep baking fun, simple, and completely stress-free.
We love seeing your kitchen creations, so please share your baking triumphs with us. Connect with our baking community on Pinterest, Facebook, TikTok, and Telegram to find more simple recipe inspiration. Let us know how your dessert turned out and what variations your family loved best!


