I still remember the first time I realized that a tiny change could make a massive impact on a simple Fairy Cake. Sitting in my grandmother’s sun-drenched kitchen, she handed me a warm, delicate cake that smelled deeply of real vanilla bean and sweet butter. It wasn’t just a treat; it was a revelation that taught me how the simplest bakes often hold the most magic. This recipe captures that exact feeling of discovery and joy in every single bite.

These cakes are light as air and topped with a sweet, nostalgic icing that brings a smile to everyone’s face. We are focusing on that perfect vanilla pop today to turn a basic pantry staple into something truly special. You won’t believe how easy it is to create this much happiness with just a handful of ingredients and a little bit of love.
The Simple Magic of the Fairy Cake
You are going to fall in love with these because they are the ultimate expression of simple baking done right. Unlike heavy cupcakes, a Fairy Cake is designed to be delicate, light, and perfectly portioned for a midday pick-me-up or a fancy tea party. The texture is wonderfully soft, thanks to the specific way we cream the butter and sugar to trap all that lovely air.
The real star here is the flavor pop of vanilla that cuts through the sweetness of the icing. It is a classic for a reason, but when you use high-quality extract, it transforms from ordinary to fantastic. They are also incredibly quick to whip up, meaning you can go from a craving to a finished treat in less than forty minutes. Kids and adults alike find them irresistible because they aren’t overwhelming—they are just right.
Another reason to adore this recipe is its versatility. Once you master the basic sponge, you have a foundation for a hundred different flavors. But for now, let’s focus on that perfect, traditional crumb that makes these so iconic. It is about celebrating the joy of a small, well-made thing that brings people together.
Print
Fairy Cake
- Total Time: 35 mins
- Yield: 12 cakes
Description
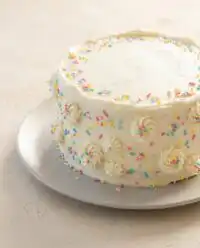
These delicate fairy cakes are a timeless classic, offering a light-as-air sponge topped with a smooth, sweet vanilla icing. They are the perfect, easy-to-bake treat for afternoon tea or any special celebration, bringing a touch of nostalgic magic to your kitchen.
Ingredients
- 110g unsalted butter, softened
- 110g caster sugar
- 2 large eggs
- 1 tsp high-quality vanilla extract
- 110g self-raising flour
- 200g icing sugar
- 2–3 tbsp milk
- Assorted sprinkles or marshmallows for decoration
Instructions
- Preheat your oven to 180C (160C fan or Gas Mark 4) and line a 12-hole cupcake tin with paper liners.
- In a large bowl, cream the softened butter and caster sugar together until the mixture is pale and fluffy.
- Beat in the eggs one at a time, followed by the vanilla extract, until well combined.
- Sift the self-raising flour into the bowl and gently fold it into the mixture until the batter is smooth.
- Divide the batter evenly among the 12 paper cases and bake for 20 minutes until golden and springy.
- To make the icing, sift the icing sugar into a bowl and gradually stir in the milk until you reach a thick, drizzlable consistency.
- Once the cakes are completely cool, spoon the icing over the tops and add decorations while the icing is still wet.
Notes
To ensure the lightest sponge possible, make sure your eggs and butter are at room temperature before you start mixing. If your icing becomes too runny, simply whisk in a little more sifted icing sugar until it reaches a consistency that coats the back of a spoon.
- Prep Time: 15 mins
- Cook Time: 20 mins
- Category: Dessert
- Method: Baking
- Cuisine: British
The Flavor Stars

To make these cakes truly shine, we are using ingredients that work together to create a light, bouncy texture and a vibrant taste. Here is what you will need to gather for your baking session:
- Unsalted Butter: Make sure it is softened to room temperature so it creams perfectly with the sugar.
- Caster Sugar: This finer sugar dissolves much faster than granulated, giving you a smoother batter and a lighter cake.
- Eggs: These provide the structure and richness that every good sponge needs.
- Vanilla Extract: This is our flavor pop! Use the best quality you can find for that deep, aromatic warmth.
- Self-Raising Flour: This contains the perfect amount of leavening to help our cakes rise into little golden domes.
- Icing Sugar: The base for our smooth, drizzly topping.
- Milk: Just a splash to get the icing to that perfect, ribbon-like consistency.
- Decorations: This is where you make it yours with sprinkles, marshmallows, or even a drop of food coloring.
The Simple Process
Step 1: Prep Your Space
Heat your oven to 180C (fan 160C or gas mark 4) to get it nice and hot. Line a 12-hole cupcake tin with paper cases so you are ready to go as soon as the batter is mixed. Preparing your tin early prevents the air from escaping the batter while you hunt for liners later.
Step 2: Cream the Butter and Sugar
In a large bowl, beat the softened butter and caster sugar together until the mixture looks pale and fluffy. This step is where you build the foundation for a light cake, so don’t rush it. You want to see a visible change in color and texture as the sugar and butter incorporate.
Step 3: Incorporate Eggs and Vanilla
Gradually add the eggs one at a time, beating well after each addition to keep the emulsion stable. Pour in that wonderful vanilla extract and watch how it transforms the scent of the batter. If the mixture looks like it might curdle, just add a tablespoon of your flour to bring it back together.
Step 4: Fold in the Flour
Sift the self-raising flour into the bowl to remove any lumps and keep things airy. Gently fold it in using a large spoon or spatula until the batter is smooth and no streaks of flour remain. Be careful not to overmix here, as we want to keep all that beautiful air we just worked so hard to create.
Step 5: Bake to Perfection
Divide the batter evenly among the 12 paper cases using two spoons. Pop them into the oven for about 20 minutes until they are golden brown and spring back when touched. You can also check by inserting a skewer; if it comes out clean, your cakes are ready to cool.
Step 6: Mix the Icing
While the cakes are cooling, sift the icing sugar into a clean bowl. Stir in the milk one tablespoon at a time until the icing is thick enough to coat the back of a spoon but still loose enough to drizzle. This is the moment to add a tiny drop of food coloring if you want a vibrant look.
Step 7: Decorate and Enjoy
Once the cakes are completely cold, spoon the icing over the top of each one. Let it naturally find its way to the edges for a relaxed, homemade feel. While the icing is still wet, add your favorite sprinkles or marshmallows for that final touch of magic.
Jasmine’s Flavor Tips

To get the absolute best results, always use room temperature eggs. Cold eggs can cause your butter and sugar mixture to seize, which prevents the cake from rising as high as it should. If you want a more intense flavor pop, try using vanilla bean paste instead of extract; those tiny black seeds look beautiful in the pale sponge. For more small-scale inspiration, check out our guide on mini-cakes to see how size affects baking times.
Don’t forget to sift your icing sugar twice if you want a finish that is as smooth as glass. Lumps in the icing are the only thing that can distract from the delicate texture of the cake. If you find the icing is too runny, just add another tablespoon of sugar until it reaches the right thickness. You can also reference this guide for more technical advice on achieving the perfect classic sponge.
Make It Yours
You can easily swap out the vanilla for a different flavor pop to suit your mood. Try adding the zest of one lemon or orange to the batter for a bright, citrusy zing that is perfect for summer. Another fantastic option is to use almond extract, which gives the cakes a sophisticated, cherry-like aroma. If you want to get creative with the shape, you can transform these into a butterfly-cake by cutting off the top and repositioning the pieces like wings.
For a cozy autumn twist, add a half teaspoon of chai spice or ground cardamom to the flour. These warm spices pair beautifully with a cup of tea. You can even swap the milk in the icing for lemon juice to create a tart contrast to the sweet cake. Experimenting with different food colors for the icing can also turn these simple bakes into a themed treat for any holiday.
Simple Serving

These cakes are the perfect companion for a mid-afternoon tea or coffee break. Arrange them on a tiered stand to create a beautiful focal point for a brunch or a birthday celebration. They look especially wonderful when paired with other small treats, and you can find more inspiration in our collection of cute-cake designs.
If you are serving these at a party, try using different colored paper liners to match your theme. They also make wonderful gifts when packed into a pretty box with a ribbon. Because they are so light, they pair excellently with fresh berries or a small dollop of whipped cream on the side. For a really fancy presentation, you might even consider edible flowers as a topping instead of sprinkles.
Flavor Fun
I hope you feel inspired to head into the kitchen and create these delightful treats today. There is something so rewarding about mastering a classic and adding your own unique flavor pop to make it your own. If you enjoyed this dainty bake, you might also love our princess-cake for another touch of whimsical sweetness.
Don’t forget to share your beautiful creations with me! I love seeing how you make these recipes your own. Follow us on Instagram, Pinterest, and Facebook for more simple baking secrets and flavor inspiration. Happy baking, and keep popping that flavor!

