My grandmother’s kitchen always smelled of sugar and summer fruit on Sunday afternoons when she brought out her worn yellow cake tin.

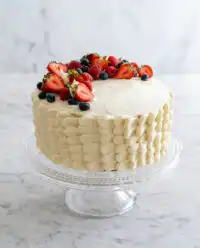
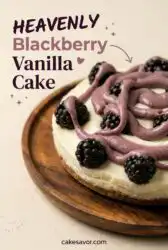
This Blackberry Vanilla Cake is the ideal solution for your next celebration, bringing together the natural sweetness of summer and the warmth of home. Every slice features tender, golden crumb layered with a deep purple berry filling that tastes like it came straight from a country orchard. You do not need any fancy tools or modern techniques to make this honest dessert stand out on your table. As the layers rest, the sweet berry juices seep gently into the crumb, creating a dessert that actually tastes better the next day.
Why This Blackberry Vanilla Cake Has Stayed in the Family
Prep: 40 min · Serves: 16 · Difficulty: Medium
- Tender crumb that stays moist and soft for days.
- Simple ingredients easily found in any country pantry cupboard.
- No complicated decorating tools or high-tech mixers needed.
- Rich blackberry filling paired with warm, comforting vanilla beans.
- Growing even more flavorful when left until the next morning.
This quiet kitchen staple has graced our Sunday table for three generations, cementing its place among our Classic Favorites that never go out of style.
Get The Full Cake Recipe
Print
Blackberry Vanilla Cake
- Total Time: 1 hour 13 mins
- Yield: 16 servings
- Diet: Vegetarian
Description
This rustic Blackberry Vanilla Cake features tender layers of vanilla-bean-flecked crumb, filled with a sharp, sweet blackberry curd. It is a perfect, moist dessert for summer celebrations that tastes even better when made a day in advance.
Ingredients
- 2 1/2 cups all-purpose flour
- 1 tablespoon baking powder
- 1/2 teaspoon baking soda
- 1 cup unsalted butter, softened
- 1 1/2 cups granulated sugar
- 3 large eggs
- 1 cup whole milk
- 1/2 cup sour cream
- 1 tablespoon vanilla extract
- 2 cups fresh blackberries
- 1/2 cup blackberry curd
- 1 cup powdered sugar (for frosting)
Instructions
- Prepare the pans. Preheat oven to 350F and grease three six-inch pans, lining the bottoms with parchment paper.
- Cream butter and sugar. Beat butter and sugar on medium speed for three minutes until the mixture is pale, fluffy, and airy.
- Incorporate the eggs. Turn mixer to low and add eggs one at a time, ensuring each is fully blended before adding the next.
- Mix dry ingredients. Sift flour, baking powder, and baking soda into a bowl, and whisk milk, sour cream, and vanilla in a separate container.
- Combine the batter. Alternate adding the flour mixture and wet ingredients to the creamed butter, mixing on low speed until just combined.
- Coat the berries. Toss fresh blackberries with one tablespoon of flour, then fold gently into the batter or scatter across the pans.
- Bake the layers. Bake for 28-33 minutes until golden and a toothpick inserted in the center comes out clean.
- Whip the frosting. Beat softened butter and vanilla bean seeds until creamy, then gradually add powdered sugar and milk until smooth.
- Assemble the cake. Layer the cooled cakes with frosting and blackberry curd, finishing with a thin crumb coat and final layer of frosting.
Notes
- Ensure all dairy and eggs are at room temperature to prevent the batter from curdling.
- Toss fresh berries in flour before adding to the batter to prevent them from sinking to the bottom.
- Use a kitchen scale to ensure each pan contains the same amount of batter for even baking.
- Chill the assembled cake for thirty minutes before slicing to keep the layers stable and the curd clean.
- Clean your knife in hot water between each cut to prevent colors from smudging.
- Prep Time: 40 mins
- Cook Time: 33 mins
- Category: Dessert
- Method: Baking
- Cuisine: Southern
Pantry Basics

Gathering your ingredients beforehand makes the baking process peaceful and organized. These humble components work together to create a cake that is remarkably tender and full of deep, rustic flavor. You likely have most of these items sitting in your cupboards right now, ready to be transformed into a beautiful dessert.
- Fresh Blackberries: These plump berries provide a sharp, tart contrast to the sweet cake layers, breaking up the richness of the buttercream with a burst of summer flavor.
- Sour Cream: This thick ingredient adds rich moisture and keeps the crumb incredibly tender, helping the cake stay fresh for several days on your counter.
- Vanilla Bean Seeds: Using real vanilla beans imparts tiny black specks and a deep, comforting aroma that synthetic flavorings cannot duplicate.
- Blackberry Curd: A smooth, concentrated spread that brings intense berry brightness between the layers, acting as a tart surprise in every single bite.
- Unsalted Butter: Softened butter is essential for creaming with sugar to build a light structure and ensure a velvety frosting that spreads easily.
- Whole Milk: This dairy staple adds the right amount of liquid to keep the batter smooth and ensure the dry ingredients incorporate fully.
- Baking Powder and Soda: These leavening agents work together to lift the heavy batter, giving you light, fluffy layers that rise beautifully in the oven.
| Ingredient | Why It Matters |
|---|---|
| Fresh Blackberries | They release sweet juices during baking and offer a beautiful, tart contrast to the vanilla crumb. |
| Sour Cream | It keeps the crumb extremely tender, provides acidity for rise, and prevents the cake from drying out. |
| Vanilla Bean Seeds | They provide a warm, authentic flavor with lovely black specks that run throughout the layers and frosting. |
| Blackberry Curd | This acts as a thick, intensely fruity filling that holds the layers together and adds a sharp berry punch. |
| Unsalted Butter | It provides the classic, rich flavor base for both cake layers and the fluffy whipped frosting. |
The Simple Method

Step 1: Prepare the Pans and Oven
Begin by heating your oven to 350F so it reaches the right temperature before your cakes go inside. Take three six-inch round pans and grease them generously with softened butter or vegetable shortening. Line the bottoms with circles of parchment paper to make sure your layers release cleanly after baking. This step is the key to preventing any stubborn sticking later on when you turn the hot pans over.
Step 2: Cream the Butter and Sugar
Place your room-temperature butter and granulated sugar into a large mixing bowl. Beat them together on medium speed for about three minutes until the mixture turns pale yellow and fluffy. You will see it change from a gritty paste into a light, airy cream that does not cling to the sides of your bowl. This process incorporates the air needed for a high, even rise in your finished cake layers.
Step 3: Incorporate the Eggs One by One
Turn your mixer down to low speed before you add the three large eggs to the creamed mixture. Drop them in one at a time, letting each egg blend fully before sliding the next one in. If you rush this step, the batter may separate and look curdled. A slow, steady addition keeps the emulsion smooth and ensures a light, consistent crumb throughout.
Step 4: Mix the Dry and Wet Ingredients
Sift your flour, baking powder, and baking soda into a medium bowl to remove any lumps. In another small bowl, whisk together the milk, sour cream, and vanilla extract until smooth. Having these components measured and ready keeps your kitchen workflow peaceful and organized. You will alternate adding these mixtures to your creamed butter in the next step to keep the batter light.
Step 5: Combine the Blackberry Vanilla Cake Batter
Add the dry flour mixture in two parts, alternating with the wet ingredients in one single part. Mix on your lowest setting until the flour disappears into the batter. Overmixing at this stage will make your cake tough instead of tender and soft. The finished batter should look thick, smooth, and pale gold, ready for the oven.
Step 6: Coat and Add the Blackberries
Toss your fresh blackberries with one tablespoon of flour in a small bowl until they are lightly dusted. This thin coating keeps the berries from sinking directly to the bottom of your pans during the baking process. Divide your thick batter evenly among the three prepared pans, using about three hundred grams for each layer. Scatter the floured berries evenly across the top of the batter in each pan so every slice gets plenty of fruit.
Step 7: Bake Until Golden and Warm
Slide the pans onto the middle rack of your preheated oven and bake for twenty-eight to thirty-three minutes. You will know they are finished when the tops look golden brown and spring back lightly when touched. Insert a clean wooden toothpick into the center of each layer; it should come out with only a few moist crumbs. Let the pans cool on a wire rack covered with a clean kitchen towel to retain their moisture.
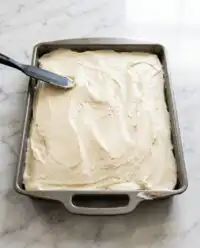
Step 8: Whip Up the Vanilla Frosting
Beat your softened butter and vanilla bean seeds on high speed for six minutes until pale and creamy. Gradually add the powdered sugar on low speed, then turn it up to fluff the mixture into a cloud-like texture. Add a tablespoon or two of milk if the frosting feels too stiff to spread smoothly on the delicate cake. It should look satiny, thick, and show beautiful black flecks of vanilla throughout.
Step 9: Assemble the Layers
Place your first cooled layer on a serving plate and spread a thin coating of frosting over the top. Use a spoon to create a shallow well in the center, leaving a thick border around the edge to hold the filling. Spoon half of your rich blackberry curd into this well, then set the second layer on top. Repeat this process, then cover the entire cake with a thin crumb coat before finishing with the remaining frosting.
Plain-Kitchen Notes

Always check that your dairy and eggs are at room temperature before you begin mixing. Cold ingredients do not combine smoothly, which can lead to a dense, heavy cake with uneven pockets. Set them out on your counter about an hour before you plan to start baking. If you are in a rush, you can warm cold eggs quickly by placing them in a bowl of warm water for ten minutes.
If your cake layers sink in the middle of your Blackberry Vanilla Cake, here is why and how to fix it. This common issue usually happens when the oven door is opened too early or the baking soda has lost its strength. Check that your leavening agents are fresh, and keep that oven door shut tight until at least twenty-five minutes have passed. If a layer does sink slightly, you can level it off with a bread knife to create a flat surface.
Weighing your cake pans on a basic kitchen scale is the most reliable way to get even layers. When the layers are the same size, they bake at the exact same rate, preventing one from drying out while the others finish. This simple step saves you from having to trim away too much cake later. It also helps make sure your assembled cake looks stable when stacked high on a plate.
For a clean slice that shows off the beautiful layers, chill the assembled cake for at least thirty minutes before serving. A cold cake cuts much cleaner than one kept at room temperature because the buttercream and curd have time to firm up. Dip your sharp knife in hot water and wipe it clean between every single cut. This prevents the dark purple curd from smudging across the clean white frosting.
When working with fresh berries, make sure they are completely dry after washing them. Excess moisture on the fruit will create soggy pockets of batter around the berries and cause them to sink. Roll them gently on a dry kitchen towel to remove every drop of water before dusting them with flour. This helps them stay suspended in the cake layer as it bakes.
Learn more about working with seasonal ingredients in our guide on Fruit & Garden baking to make the most of summer harvests. Using fresh, local berries always yields the deepest flavor and most beautiful color in your rustic desserts. If you find your berries are particularly tart, you can adjust the sugar in your frosting slightly to balance the flavors.
Frequently Asked Questions
Can I use frozen blackberries for this Blackberry Vanilla Cake?
Yes, you can use frozen berries if fresh ones are not available in your local stores. Do not thaw them before adding them to the batter, as this will bleed purple juice throughout the white cake. Toss them in flour while still frozen and bake for an extra two to three minutes to account for the cold fruit.
How should I store the leftover cake?
Store any leftover slices in the refrigerator to keep the fresh blackberry curd from spoiling. Press a piece of plastic wrap directly against the exposed cut edges to keep them from drying out in the cold air. Bring the slices to room temperature for twenty minutes before eating so the butter in the cake softens up.
Can I make this cake ahead of time?
You can easily bake the cake layers a day in advance to save time on the day of your event. Wrap the cooled layers tightly in plastic wrap and keep them in the refrigerator overnight. This actually makes them much easier to slice and assemble because the crumb becomes firmer and less prone to tearing.
What can I use if I do not have sour cream?
Plain whole-milk Greek yogurt makes an excellent substitute for sour cream in this recipe. It provides the same acidity and fat content needed to keep the cake crumb incredibly tender and moist. Avoid using fat-free or low-fat options, as they will make the finished cake taste dry and heavy.
Why did my blackberries sink to the bottom of the pan?
Berries sink when they are too wet or if the cake batter is mixed too thin to support them. Coating them in a tablespoon of flour helps them cling to the batter and stay suspended during baking. Be sure to scatter them on top of the batter in the pan rather than stirring them in.
Can I freeze the assembled cake?
It is best to freeze the un-iced cake layers rather than the fully assembled cake with the curd filling. Wrap each individual cooled layer tightly in plastic wrap and heavy foil, then freeze for up to three months. Thaw them in the refrigerator overnight before frosting and assembling with fresh curd.
How do I make my frosting completely smooth?
Beat your buttercream frosting on low speed for about ten minutes after incorporating the powdered sugar. This slow mixing knocks out any large air pockets, leaving you with a silky texture that spreads like a dream. Using room-temperature butter is critical for this process to succeed.
Family Variations
For an autumn twist, you can easily substitute the blackberries with fresh red raspberries or deep black raspberries. The tartness of raspberries pairs beautifully with the warm vanilla bean base and provides a bright red contrast. This variation follows the exact same baking times and methods, making it a simple switch when blackberries are out of season. You can even use a mix of both berries for a forest-blend cake.
If you decide to use raspberries, look for firm berries that are not overly ripe or soft. Soft berries tend to release too much juice, which can make the batter soggy around the fruit. Gently pat them dry with a paper towel after washing, in the same way you would with blackberries. This ensures your layers bake up light, fluffy, and perfectly structured.
If you prefer a simpler finish, skip the buttercream frosting entirely and opt for a rustic glaze. Whisk together powdered sugar, a splash of milk, and a drop of vanilla extract until smooth and pourable. Drizzle this glaze over the warm cake layers for a quick dessert that goes beautifully with your morning coffee. This approach is reminiscent of a classic blackberry cake recipe guidelines that focuses on the cake’s natural texture.
A glaze is also a wonderful option for warm summer days when heavy buttercream might feel too rich. It allows the natural flavor of the blackberries to shine through without being masked by sugar. You can even stir a tablespoon of berry juice into the glaze to give it a beautiful pink hue. This simple touch adds a splash of color to your kitchen table.
You can also bake this Blackberry Vanilla Cake recipe as a simple sheet cake in a standard rectangular pan. Spread the batter into a greased nine-by-thirteen pan, scatter the floured berries on top, and bake for slightly longer. This style is highly portable and perfect for church socials or family reunions where slicing is done on the fly. Discover more simple party options in our collection of Party Cakes & Events recipes.
Sheet cakes are incredibly forgiving and require much less assembly time than layered cakes. You do not have to worry about leveling layers or preventing curd from leaking out of the sides. Frost the top of the cake right in the pan and serve it with a spoon. This is a wonderful, no-fuss way to feed a hungry crowd at your next backyard gathering.
At the Kitchen Table
This rustic Blackberry Vanilla Cake looks beautiful sitting under a glass dome on the counter, waiting for friends to drop by. Serve generous slices on vintage plates with simple silver forks for an afternoon treat that feels special. The bright contrast of the purple filling against the white frosting makes every slice look like a celebration. It is the kind of cake that draws people into the kitchen just by sitting on the table.
Pair each slice with a hot cup of black coffee or a tall glass of cold milk. The bitterness of the coffee cuts through the sweet frosting, while the milk complements the rich vanilla notes. It is also wonderful alongside a warm pot of Earl Grey tea on a quiet Sunday afternoon when you have time to linger. The floral notes of the tea pair beautifully with the tartness of the blackberries.
If you are hosting a larger gathering, consider displaying this along with some of our Cute & Quick Bakes for a full dessert spread. Guests love having a variety of sweets to choose from, especially when they are all made from scratch. Keep things relaxed, set out a stack of clean plates, and let everyone help themselves to seconds. It is a wonderful way to bring family together over simple, honest food.

From the Kitchen Card
This recipe has a way of turning quiet afternoons into lasting memories that stay with you. It does not require any special skills, only a bit of patience and honest ingredients from your pantry shelves. I hope this cake finds a permanent home in your recipe tin, passed down to the next generation of family bakers. It is a reliable comfort that never fails to bring smiles to the table.
If you find yourself baking this for a special occasion, please share your creation with our community. We love seeing how these traditional bakes bring comfort and joy to your own kitchen tables. You can join our family on Pinterest and Facebook to stay connected and find new ideas. Sharing your baking journey is a beautiful way to keep these traditional recipes alive.
For more comforting inspiration, check out our full selection of Rich Chocolate Treats that are perfect for any weekend baking project. Thank you for letting me share a piece of my Southern kitchen with you today. Keep your mixing bowls ready, and we will bake together again very soon. Until then, enjoy the quiet comfort of a homemade slice with those you love most.
