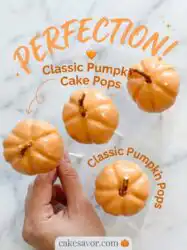
A platter of cute, spiced pumpkin treats sits on the kitchen counter after school, their glossy orange shells shining under the warm lights as hands reach out to claim them one by one.

Making festive treats for autumn gatherings does not mean spending hours in front of a hot stove or wrestling with complicated pastry bags. These Classic Pumpkin Cake Pops come together with a shortcut base that keeps things completely stress-free. The combination of spiced pumpkin puree and smooth cream cheese frosting creates a tender center that tastes exactly like autumn in every single bite. You will love how easily this dessert shapes up without any special baking tools or professional decorating skills required.
When the leaves begin to change, our kitchens naturally draw us in to create comforting desserts that share the warmth of the season. This recipe offers a beautiful way to enjoy baking with children or friends on a slow Sunday afternoon. The single-pan cleanup at the end of the night means you get to enjoy the sweet rewards without a mountain of dirty dishes waiting in the sink.
Why These Classic Pumpkin Cake Pops Are a Keeper
Prep: 20 min · Serves: 28 · Difficulty: Easy
- Uses a simple yellow box cake base.
- One bowl mixing makes cleanup a breeze.
- Real pumpkin puree adds natural moisture.
- Fun shaping process requires no special molds.
- Classic autumn flavors shine in every bite.
If you enjoy rolling sweet cake balls on a quiet weekday evening, you will find this process incredibly relaxing. This is the simple baking project that fits beautifully into your busy schedule, whether you are preparing for a school event or just satisfying a sudden sweet craving. I promise this simple recipe will become your new favorite autumn tradition that you return to year after year.
Get The Full Cake Recipe
Print
Classic Pumpkin Cake Pops
- Total Time: 55 mins
- Yield: 28 servings
- Diet: Vegetarian
Description
These delightful pumpkin-shaped cake pops combine the warmth of seasonal spices with a moist, cream cheese-infused crumb. They are an easy, no-mold project perfect for adding a touch of autumn charm to any dessert table.
Ingredients
- 1 box yellow cake mix
- 1 cup pumpkin puree
- 2 large eggs
- 1 tablespoon pumpkin pie spice
- 3–4 tablespoons cream cheese frosting
- 12 ounces orange candy melts
- 28 treat sticks
- 28 chocolate chips
- 2 ounces green candy melts
Instructions
- Prep and bake. Preheat oven to 350°F, grease a 9×13 pan, and whisk cake mix, pumpkin puree, eggs, and spice; bake for 22-25 minutes.
- Cool the cake. Allow the cake to cool completely on a wire rack before crumbling to ensure the frosting does not melt.
- Crumble the cake. Break the cooled cake into chunks and process until fine, uniform crumbs remain without any large lumps.
- Bind with frosting. Mix in the cream cheese frosting until the crumbs hold together like play-dough when squeezed.
- Shape the pops. Portion dough into one-ounce balls, roll until smooth, and use a stick to press eight ridges around the surface.
- Insert the sticks. Melt a small amount of orange coating, dip the sticks, and insert into each ball; let set for three minutes.
- Dip and decorate. Submerge the pops in melted orange coating, tap off excess, and immediately add a chocolate chip stem.
- Finish with vines. Pipe green candy vines onto the top and allow the pops to dry completely in a stand before serving.
Notes
- Ensure the pumpkin puree is plain 100% pumpkin and not pre-sweetened pumpkin pie filling.
- Use a small cookie scoop to keep all cake balls uniform in size for consistent dipping.
- Keep your dipping cup deep and narrow to minimize the amount of candy coating needed for full coverage.
- Store finished cake pops at room temperature in a cool, dry place for up to three days.
- Prep Time: 20 mins
- Cook Time: 25 mins
- Category: Dessert
- Method: Baking and Dipping
- Cuisine: American
Pantry Lineup

Preparing a batch of autumn treats starts with a handful of basic ingredients that you likely already have tucked inside your kitchen cupboards. We are skipping the complicated scratch recipes and focusing on a combination that guarantees a moist texture and deep spice. Every element plays a crucial role in ensuring your shaped treats hold together perfectly and taste like a professional bakery creation.
- Yellow Cake Mix: This convenient box mix acts as our reliable, pre-measured foundation. It provides the ideal structure and sweetness without requiring multiple bags of flour or measuring spoons of baking powder. The yellow crumb blends beautifully with the natural orange color of the pumpkin.
- Pumpkin Puree: Real canned pumpkin brings incredible moisture and natural color to the batter. Do not use pumpkin pie filling here, as we want pure pumpkin without added sugars, starches, or extra liquids. This ingredient replaces the oil or butter normally found in cake recipes.
- Pumpkin Pie Spice: A warm blend of cinnamon, nutmeg, ginger, and cloves gives these treats their characteristic autumn flavor. This single spice jar saves you from opening multiple containers while delivering a comforting aroma that fills your entire home while baking.
- Cream Cheese Frosting: A few tablespoons of this sweet spread bind the baked crumbs into a shapeable dough. It adds a subtle tang that balances the sweet coating and mimics a classic frosted autumn cake.
- Orange Candy Melts: These colorful wafers melt down into a smooth, liquid coating that sets quickly at room temperature. They give each treat its vibrant autumn hue without the risk of seizing like standard white chocolate.
- Treat Sticks: Sturdy sticks turn our shaped cake dough into portable treats that are clean and fun to eat. They provide the essential support needed for dipping and serving without messy fingers.
- Chocolate Chips: Dark or semi-sweet chocolate chips provide the perfect miniature stems for our shaped pumpkins. Placing them upside down on top of the wet coating gives each treat a realistic, charming finish.
- Green Candy Melts: A small amount of melted green coating allows you to add delicate leafy details and vines to your creations. This quick decorating step makes the finished treats look incredibly professional.
| Ingredient | Why It Matters |
|---|---|
| Yellow Cake Mix | Provides a consistent and sweet structural base for baking. |
| Pumpkin Puree | Adds rich moisture and natural autumn flavor to the crumb. |
| Pumpkin Pie Spice | Delivers warm, aromatic spices in one simple measurement. |
| Cream Cheese Frosting | Binds the cake crumbs together into a pliable dough. |
| Orange Candy Melts | Creates a smooth, quick-setting shell with festive color. |
Step-by-Step (Promise It’s Quick)

Step 1: Prep and Bake the Pumpkin Cake Base
Preheat your oven to 350°F and grease a standard 9×13 baking dish with non-stick cooking spray. In your favorite large mixing bowl, combine the yellow cake mix, pumpkin puree, eggs, and pumpkin pie spice. Whisk the mixture until the batter looks thick, fragrant, and completely uniform with no dry streaks of flour. Pour the thick batter into your prepared baking pan, smoothing the top with a spatula, and bake for 22 to 25 minutes until a toothpick inserted into the center comes out clean.
Step 2: Cool the Baked Cake Completely
Remove the warm baking dish from the oven and place it on a wire cooling rack. Let the cake rest undisturbed until the pan feels cool to the touch and the steam stops rising. If the cake is still warm when you crumble it, the frosting will melt, resulting in a soggy, greasy texture instead of a light dough. This cooling period is an excellent time to wash your mixing bowl and prep your workspace for the shaping steps ahead.
Step 3: Crumble the Cake Into Fine Pieces
Break the cooled cake into large chunks and place them into the bowl of a stand mixer fitted with the paddle attachment. Mix on low speed for two to three minutes until the cake transforms into tiny, uniform crumbs with no large lumps remaining. You can also do this step with your hands in a large bowl, rubbing the cake chunks together until they look like soft, damp sand. Ensure there are no crusty edges left uncrumbled, as they will create lumps in your finished treats.
Step 4: Bind the Dough with Frosting
Add three tablespoons of cream cheese frosting to the fine crumbs in the mixing bowl. Mix on medium-low speed until the crumbs absorb the frosting and clump together, forming a dough that feels exactly like play-dough when squeezed. If the mixture still feels dry or crumbles when you press it, add an extra teaspoon of frosting at a time. Be careful not to add too much frosting, or the dough will become heavy and slip off the sticks later.
Step 5: Shape the Classic Pumpkin Cake Pops
Portion the sweet dough into one-ounce portions using a small kitchen scale or cookie scoop for precise consistency. Roll each portion between your palms until you have a smooth, round ball with no visible cracks. Use a treat stick to press a gentle cross into the top of the ball, then divide those sections in half to create eight distinct ridges around the sides. Gently flatten the ball slightly with your palm, then use your pinky finger to press a small indent in the top center where the ridges meet.
Step 6: Insert the Treat Sticks
Melt a small handful of the orange candy melts in a microwave-safe bowl using thirty-second intervals, stirring well between each heat session. Dip the top half-inch of a treat stick into the melted orange coating, then push it gently into the bottom of a shaped dough ball. Repeat this process for all twenty-eight portions, then let them rest for three minutes until the coating hardens like glue. This simple trick creates a secure seal that prevents the dough from falling off when you dip the whole pop.
Step 7: Dip in Orange Coating
Pour the remaining melted orange candy melts into a deep, narrow cup or microwave-safe bowl until the coating runs smoothly off your spoon. Hold a treat stick by the end and dip the shaped dough ball straight down into the warm coating until it is fully covered. Pull the pop straight out, gently tap your wrist to release any excess coating, and watch the surface turn glossy and smooth. Immediately place a single chocolate chip onto the top indent of each pop while the coating is still wet to act as a sweet little stem.
Step 8: Add the Green Vines and Set
Heat the green candy melts in a small bowl, then transfer the warm liquid into a plastic piping bag with a tiny corner snipped off. Draw small, squiggly vine details next to the chocolate chip stem on the top of each hardened orange shell. Let the decorated treats sit undisturbed in a cake pop stand or styrofoam block for ten minutes until the coating feels dry to the touch. Once the outer shells are firm, your autumn creations are ready to be shared and enjoyed.
Little Things That Help

Using room temperature eggs when baking the cake base ensures that the ingredients emulsify evenly. Cold eggs can shock the batter, leading to an uneven bake that affects the final texture of the crumbs. This small step makes a noticeable difference in how your dough binds together later.
If your cake pops slide down the sticks during the dipping process, the dough is likely too warm or contains too much frosting. Fix this by placing the shaped dough balls in the freezer for ten minutes to firm them up before dipping. This rapid cooling helps the cake hold its shape when submerged in the warm candy coating.
When melting your candy melts, avoid getting any water droplets into the bowl or the coating will seize and turn chunky. If this happens, stir in a teaspoon of coconut oil or vegetable shortening to restore the smooth, pourable texture. Keeping your bowls and utensils completely dry is the secret to a flawless shell.
To expand your seasonal baking lineup beyond cake pops, you can apply these same dipping techniques to a larger sliced pumpkin spice cake for a festive party spread. The combination of warm spices and sweet chocolate coating works beautifully across different formats. You will find that family members love the contrast of textures.
Keep the dipping container deep and narrow, like a glass measuring cup or a clean jelly jar, rather than a wide bowl. This depth allows you to submerge each treat in one smooth motion without hitting the sides. It also reduces the amount of wasted coating at the end of the project.
Tap the stick gently against your wrist rather than the edge of the bowl to remove excess coating. Tapping the bowl can vibrate the stick too much, causing the dough ball to break or slip off the stick entirely. This gentle tapping motion ensures a clean, dripless finish on every single treat.
For a detailed guide on melting chocolate to a flawless consistency, you can refer to this professional pumpkin cake pops tutorial which offers excellent melting methods. Keeping the heat low and stirring frequently is the secret to a professional finish.
Frequently Asked Questions
How to prevent cake pops from cracking?
Cracking happens when there is a large temperature difference between the cold cake dough and the warm candy coating. To prevent this, let your chilled dough balls sit at room temperature for ten minutes before dipping them. This ensures the dough does not expand rapidly and crack the delicate outer shell.
What is the best frosting-to-cake ratio for cake pops?
The ideal ratio is about three tablespoons of frosting for one full 9×13 cake. You want just enough frosting to bind the crumbs together without making the dough heavy or greasy. Always start with a small amount and add more only if the dough fails to hold its shape when rolled.
How do you make the pumpkin shape for cake pops?
Roll the portioned dough into a smooth ball, then use a clean treat stick to press eight vertical ridges around the sides. Press a small indent into the top center where the ridges meet to mimic a real pumpkin shape. Flatten the ball slightly to complete the realistic look.
Can you use a box mix for cake pops?
Yes, using a standard yellow or spice box cake mix is a fantastic shortcut that saves time and guarantees a consistent texture. The box mix provides a reliable crumb structure that holds together beautifully when combined with the frosting. It makes the entire process incredibly straightforward.
How do you make the stems and vines for pumpkin cake pops?
Place a single chocolate chip upside down into the wet orange coating at the top indent to create a clean stem. Once the orange shell sets, use melted green candy coating in a piping bag to draw delicate squiggly vines next to the stem. This simple combination looks incredibly festive.
What is the best way to coat cake pops smoothly?
Dip each pop in a single, smooth motion into a deep glass of warm candy coating. Do not stir or move the pop around in the coating, as this creates air bubbles and lumps. Lift the pop straight out and tap your wrist gently to let the excess liquid drip away.
How long should cake pops be chilled before dipping?
Chill the shaped dough balls in the refrigerator for about twenty minutes, or the freezer for ten minutes, before dipping them. This chilling period helps the dough hold its shape on the stick when submerged in the warm coating. Do not leave them in the freezer too long, or they will become too cold and crack the warm coating.
Can cream cheese frosting be used in pumpkin cake pops?
Cream cheese frosting is the ideal choice because its tangy flavor cuts through the sweetness of the candy melts. It pairs beautifully with the warm spices in the pumpkin cake crumbs. Just be sure to use a store-bought or thick homemade version so the dough remains firm and shapeable.
Simple Swaps
If you want to change up the flavor profile, swap the cream cheese frosting for a rich caramel sauce or a scoop of maple buttercream. This swap adds a deep, buttery sweetness that complements the spiced pumpkin cake crumbs beautifully. It is an excellent option for those who prefer a sweeter, warmer flavor note.
For those who love the tangy flavor of a classic baked pumpkin cheesecake, you can blend a spoonful of softened cream cheese and a dash of vanilla extract directly into the cake crumbs. This creates a dense, rich filling that tastes like a miniature slice of pie on a stick. It pairs beautifully with the sweet candy coating.
You can also create a dark chocolate version by substituting chocolate cake mix for the yellow cake mix. The combination of dark chocolate and warm pumpkin spices creates a sophisticated dessert that pairs wonderfully with a hot cup of coffee. This variation looks stunning on a Halloween party platter.
Bring It to the Table
These festive treats look wonderful when arranged on a rustic wooden platter or a clean white ceramic stand. You can fill a decorative glass jar or small vase with dried orange lentils, coffee beans, or colorful sprinkles to hold the sticks upright on a dessert table. This presentation keeps the round shapes safe from bruising while adding a touch of autumn charm to your kitchen counter.
For a larger party spread, pair these cute creations with other portable desserts like sweet cheesecake push pop cakes or mini pumpkin tarts. Guests love having individual-sized treats that are easy to grab and enjoy while chatting. They are the perfect addition to school bake sales, cozy weekend brunches, or late-night dessert tables.
If you are gifting these treats to friends or neighbors, you can wrap each one in a small cellophane bag tied with a piece of baker’s twine. This simple touch keeps them clean and makes them feel like a special handmade gift. They are guaranteed to bring a smile to anyone’s face during the autumn season.

Save This One
Baking during the autumn months should feel cozy and relaxing, rather than stressful or overly technical. With a simple box mix and some warm spices, you can create a treat that brings genuine smiles to everyone around your table. I hope this recipe helps you find a moment of creative peace in your busy week.
If you enjoyed making these festive shapes, be sure to view our classic vanilla cake pops story for more visual inspiration and quick decorating ideas. Let me know how your batch turns out by sharing your baking pictures online.
You can connect with our friendly baking community and find more simple dessert ideas on Pinterest, Facebook, or Telegram. Happy baking, and enjoy every sweet bite!

