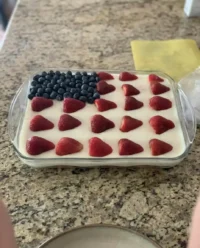
Between the summer heat and a busy schedule, I am always on the lookout for a dessert that doesn’t involve turning on the oven. Last July, I needed a fast treat for a neighborhood block party, and this Red White & Blue Mixed Berry Yum Yum was the total star of the show. It is the kind of honest, simple dessert that makes everyone smile without keeping you stuck in the kitchen all day.

This no-bake wonder layers a creamy cheesecake filling with bright strawberry and blueberry pie fillings for a festive look. It is remarkably light and refreshing, perfect for those humid afternoons when you just want a sweet, chilled bite that feels special. Since it uses pantry staples and easy fruit fillings, it is a reliable win for any summer gathering.
Why This Red White & Blue Mixed Berry Yum Yum is a Keeper
This recipe is the definition of baking that fits your life because it requires zero time in the oven. I love it because the salty-sweet graham cracker crust provides the perfect base for the airy, cloud-like cream cheese layers. It is a fantastic alternative to a traditional cake when you want something that feels lighter but still delivers on flavor. The vibrant red and blue layers make it naturally beautiful without any complicated decorating techniques. Plus, it is incredibly forgiving; whether you are a seasoned baker or a total beginner, this dessert comes together with ease every single time. It truly celebrates honest flavor over elaborate presentation, making it a Tuesday night possibility or a weekend star.
Print
Red White & Blue Mixed Berry Yum Yum
- Total Time: 8 hours 25 mins
- Yield: 15 servings
- Diet: Vegetarian
Description
This vibrant no-bake dessert features luscious layers of whipped cream cheese and festive strawberry and blueberry fillings. Perfectly set on a salty-sweet graham cracker crust, it is a refreshing and effortless treat for any summer celebration.
Ingredients
- 2 1/2 cups (300g) graham cracker crumbs
- 12 tablespoons (170g) unsalted butter, melted
- Two 8-ounce (450g) blocks cream cheese, softened
- 1 cup (120g) confectioners’ sugar
- 4 cups (960ml) heavy whipping cream
- 2 teaspoons vanilla extract, divided
- 6 tablespoons (75g) granulated sugar
- One 21-ounce (595g) can strawberry pie filling
- One 21-ounce (595g) can blueberry pie filling
Instructions
- In a medium bowl, combine graham cracker crumbs and melted butter until the mixture resembles wet sand; reserve 3 tablespoons of this mixture for a garnish.
- Press the remaining crumb mixture firmly into the bottom of a 9×13-inch pan and set aside.
- In a large bowl, beat the softened cream cheese, confectioners’ sugar, and 1 teaspoon of vanilla extract with an electric mixer until smooth.
- In a separate chilled bowl, whip the heavy whipping cream, granulated sugar, and remaining 1 teaspoon of vanilla until stiff peaks form, then gently fold this into the cream cheese mixture.
- Spread 1/3 of the cream mixture over the crust, followed by the strawberry pie filling.
- Top with another 1/3 of the cream mixture, then the blueberry pie filling, and finish with the remaining cream mixture.
- Sprinkle the reserved graham cracker crumbs over the top, cover, and refrigerate overnight to set.
Notes
For the best results, use full-fat cream cheese at room temperature to ensure a silky, lump-free filling. Always chill the dessert for the full suggested time, as this allows the fruit layers to stabilize and makes slicing much easier for a beautiful presentation.
- Prep Time: 25 mins
- Cook Time: 0 mins
- Category: Dessert
- Method: No-Bake
- Cuisine: American
Simple Ingredients for a Festive Treat

You likely have most of these items in your pantry already, which is the best kind of baking. For the crust, you will need 2 1/2 cups (300g) of graham cracker crumbs and 12 tablespoons (170g) of melted unsalted butter. I prefer unsalted butter so I can control the saltiness of the base. For the creamy filling, gather two 8-ounce (450g) blocks of softened cream cheese, 1 cup (120g) of confectioners’ sugar, and 4 cups (960ml) of heavy whipping cream. You will also need 2 teaspoons of vanilla extract and 6 tablespoons (75g) of granulated sugar to sweeten that whipped cream.
- Graham Cracker Crumbs: The foundation of our no-bake dream.
- Cream Cheese: Ensure it is softened to room temperature for a smooth texture.
- Heavy Whipping Cream: This provides the volume and light texture.
- Strawberry Pie Filling: One 21-ounce (595g) can for that bright red layer.
- Blueberry Pie Filling: One 21-ounce (595g) can for the deep blue layer.
- Vanilla Extract: For that classic, warm aroma.
How to Make This Simple Layered Dessert
Step 1: Prepare the Graham Cracker Crust
In a medium bowl, combine your graham cracker crumbs and the melted unsalted butter. Use a fork to stir them together until the mixture looks like wet sand. Before you do anything else, set aside 3 tablespoons of these moistened crumbs in a small dish to use as a garnish later. Press the remaining mixture firmly into the bottom of a 9×13-inch pan that has been lightly sprayed with non-stick cooking spray. I like to use the flat bottom of a measuring cup to press it down evenly.
Step 2: Mix the Creamy Filling
In a large bowl, use an electric mixer to cream together the softened cream cheese, confectioners’ sugar, and 1 teaspoon of the vanilla extract until the mixture is perfectly smooth and free of lumps. In a separate chilled bowl, whip your heavy whipping cream with the granulated sugar and the remaining 1 teaspoon of vanilla extract until stiff peaks form. Gently fold the whipped cream into the cream cheese mixture by hand using a spatula. This keeps the filling light and airy.
Step 3: Layer the Berries and Cream
Spread about 1/3 of your cream cheese and whipped cream mixture (roughly 3 cups) evenly over the prepared graham cracker crust. Next, drop the strawberry pie filling by large spoonfuls over the cream layer. Gently spread it out to cover the cream entirely. Top the strawberry layer with another 1/3 of the cream mixture, spreading it carefully so you don’t disturb the berries below. Repeat this process with the blueberry pie filling, then finish with the final 1/3 of the cream mixture on top.
Step 4: Chill and Set
Sprinkle those reserved 3 tablespoons of graham cracker crumbs over the top of the final cream layer for a little extra texture. Cover the pan tightly with plastic wrap or a lid and refrigerate the dessert overnight. This long chill time is essential for the layers to set and meld together, ensuring clean slices when you are ready to serve.
Meagan’s Easy Wins

The biggest secret to success with this recipe is patience during the chilling phase. Overnight is truly best because it allows the moisture from the cream and fruit to slightly soften the crust and firm up the filling. If you are a fan of these no-cook methods, you should also try my strawberry icebox cake for another refreshing summer option. To get those perfectly clean squares, wipe your knife with a warm, damp cloth between every single cut. If you are in a massive rush, you can technically use store-bought whipped topping, but the flavor of real whipped cream is so much better.
Simple Swaps and Easy Twists
You can easily customize this recipe based on what you have on hand. If you want a different citrus profile, try swapping one of the fruit layers for lemon curd, which creates a flavor profile similar to my lemon blueberry cake. For a different base, you can use crushed golden vanilla wafers or even chocolate sandwich cookies for a darker, richer crust. Some people love adding a layer of sliced fresh bananas at the very bottom for a bit of extra sweetness. You can also find more inspiration for fruit-forward desserts on The Kitchen is my Playground where this classic combination is celebrated.
Everyday Enjoyment

Serve this dessert chilled right from the refrigerator. I love cutting it into large squares and serving it on simple white plates to let the colors pop. It is the perfect companion to other themed treats, like my flag cake, at a holiday party. For a casual Tuesday night treat, a simple scoop into a bowl is just as satisfying. It pairs wonderfully with a cold glass of lemonade or a simple cup of decaf coffee in the evening.
The Sweet Spot
I hope this Red White & Blue Mixed Berry Yum Yum becomes a new favorite in your home. It proves that you don’t need fancy equipment or hours of work to create something truly memorable and delicious. For more patriotic baking ideas, check out my red white and blue cake which is another crowd favorite. If you make this, I would love to see it! Come say hi and share your photos with me on Instagram, Pinterest, or Facebook. Happy baking!


