I found myself staring at a box of tea at nine o’clock last Tuesday, craving something more sophisticated than a biscuit but every bit as comforting.

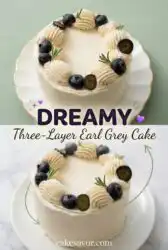
This Three-Layer Earl Grey Cake is exactly what you need when you want the elegance of a specialty bakery without the stressful techniques. The soft, tea-infused sponge layers come together using basic pantry staples and your favorite loose-leaf tea. When paired with the tangy orange cream cheese buttercream, the result is a balanced dessert that feels like a quiet afternoon in a sunny kitchen. It is a reliable recipe that proves simple can be spectacular even on a busy weekday night.
Why This Three-Layer Earl Grey Cake Shine
Prep: 180 min · Serves: 12 · Difficulty: Medium
- Basic pantry staples create incredible floral depth.
- One bowl mixing keeps cleanup very light.
- Silky orange frosting balances the tea flavor.
- Three layers provide a beautiful tall height.
- Bakes quickly in standard round cake tins.
This recipe makes the process of building a classic vanilla bean layer cake story feel much more approachable for home bakers. This is the dessert that will make your guests believe you spent hours in a professional kitchen.
Get The Full Cake Recipe
Print
Three-Layer Earl Grey Cake
- Total Time: 3 hours 10 mins
- Yield: 12 servings
- Diet: Vegetarian
Description
Experience the sophisticated elegance of a bakery-style dessert with this tender Earl Grey-infused sponge. Finished with a tangy orange cream cheese buttercream, this cake strikes the perfect balance between floral aroma and bright citrus notes.
Ingredients
- 2 cups whole milk
- 3 tablespoons loose-leaf Earl Grey tea
- 2 cups granulated sugar
- 1 cup water
- 3 cups all-purpose flour
- 2 teaspoons baking powder
- 1/2 teaspoon salt
- 1 cup unsalted butter, softened
- 4 large eggs
- 1/2 cup sour cream
- 1 teaspoon vanilla extract
- 8 ounces cream cheese
- 2 tablespoons orange juice
- 1 tablespoon orange zest
Instructions
- Infuse the liquids. Simmer milk with tea for 20 minutes, then strain. Boil water with additional tea and sugar to create a syrup, straining once thickened.
- Prepare the oven. Preheat oven and grease three 6-inch round tins, lining bottoms with parchment paper.
- Combine dry ingredients. Whisk flour, baking powder, and salt in a medium bowl until uniform and free of lumps.
- Cream butter mixture. Beat softened butter, sugar, and cooled earl grey syrup for 3 minutes until pale and fluffy.
- Add wet ingredients. Mix in eggs one at a time, then incorporate the infused milk, sour cream, and vanilla extract until smooth.
- Mix the batter. Fold dry and wet ingredients into the butter mixture in three additions, mixing just until streaks disappear.
- Bake the layers. Distribute batter into tins and bake for 25 minutes; cool completely on a wire rack before frosting.
- Create buttercream. Cook milk, sugar, flour, and salt into a thickened pudding, cool, then beat with butter, cream cheese, orange juice, and zest.
- Assemble cake. Spread frosting between layers, crumb coat the exterior, chill for 30 minutes, and apply final decorative layer.
Notes
- Ensure all dairy and egg components are at room temperature to prevent the batter from curdling during mixing.
- Use a kitchen scale when portioning batter into cake tins to ensure perfectly even layers and consistent bake times.
- Strain your infused milk through a fine-mesh sieve to remove stray tea leaves for a perfectly smooth cake crumb.
- Chill the buttercream for ten minutes if it becomes too soft for piping during warmer kitchen temperatures.
- Apply a thin crumb coat and chill the cake before final frosting to seal in moisture and prevent loose crumbs.
- Prep Time: 30 mins
- Cook Time: 40 mins
- Category: Dessert
- Method: Baking
- Cuisine: Modern Fusion
Simple Ingredients

Building this cake requires a few specific components to ensure the tea and citrus flavors shine through without being overwhelming. You likely have most of these in your cupboard right now, making it a great candidate for a weekend baking session.
- Earl Grey Tea: Use loose-leaf for the strongest and most fragrant infusion in both the milk and the sugar syrup.
- Sour Cream: This provides a necessary richness and moisture that ensures the sponge remains tender for several days.
- Unsalted Butter: Using softened butter allows for a fluffier crumb when creamed with the homemade tea syrup.
- Orange Zest: The natural oils in the zest provide a bright, citrusy punch that cuts through the rich cream cheese.
- All-Purpose Flour: Provides the stable structure needed to hold three layers together without becoming dense or heavy.
- Whole Milk: A higher fat content in the milk carries the tea flavor much better than skim or low-fat options.
| Ingredient | Why It Matters |
|---|---|
| Loose Leaf Tea | Delivers the signature floral and citrus aroma |
| Sour Cream | Keeps the cake layers moist and tender |
| Orange Juice | Adds a refreshing tang to the buttercream |
| Buttercream Pudding | Creates a silky, professional texture without excess sugar |
| Tea Syrup | Infuses the sponge with extra flavor and moisture |
The Easy Method

Step 1: Infuse Your Milk and Syrup
Begin by bringing your whole milk to a light simmer in a small pot before adding the loose-leaf tea. Cover the pot and let it steep for twenty minutes to ensure the floral notes are fully extracted. For the syrup, boil water with more tea, strain it into a saucepan with sugar, and cook until it thickens slightly. Both of these liquids need to reach room temperature before they enter your batter to prevent the butter from curdling.
Step 2: Prepare the Pans and Dry Ingredients
Preheat your oven and grease three six-inch round cake tins, lining the bottoms with parchment paper for a clean release. In a medium bowl, whisk together your flour, baking powder, and salt until the mixture is uniform and free of lumps. This step ensures that the leavening agents are distributed evenly, which leads to a flat and stable cake layer. You will notice the flour feels light and airy after a good whisking.
Step 3: Cream the Butter and Tea Syrup
Place your softened butter, granulated sugar, and the cooled earl grey syrup into your stand mixer bowl. Beat the mixture on medium-high speed for about three minutes until it looks pale, fluffy, and significantly increased in volume. Use a spatula to scrape down the sides of the bowl frequently so every bit of butter is incorporated. This aeration is the secret to a light Three-Layer Earl Grey Cake that does not feel heavy.
Step 4: Incorporate Eggs and Wet Ingredients
Turn the mixer to a lower speed and add your eggs one at a time, allowing each to disappear into the batter before adding the next one. In a separate jug, whisk together your infused milk, sour cream, and vanilla extract until smooth. This combination of wet ingredients will provide the moisture and fats that define the final texture of the cake. The batter should look glossy and smell faintly of bergamot.
Step 5: Mix the Final Batter
Add your dry and wet ingredients to the butter mixture in three additions, starting and ending with the flour. Mix for no more than fifteen seconds between each addition to avoid overworking the gluten, which can make the cake tough. Once the last streak of flour disappears, stop the mixer immediately. Divide the batter evenly between your three prepared tins, using a scale if you want them to be identical.
Step 6: Bake Your Three-Layer Earl Grey Cake
Slide the tins into the center of the oven and bake for about twenty-five minutes or until a skewer comes out clean. Your kitchen will fill with the scent of toasted tea and sweet vanilla as the layers rise. Once finished, let the cakes rest in their pans for ten minutes before moving them to a wire rack. Cooling them completely is vital before you even think about starting the frosting process.
Step 7: Create the Pudding Buttercream Base
In a heavy-bottomed saucepan, whisk together milk, sugar, flour, and salt over medium-high heat. You must stir constantly for about fifteen minutes until the mixture thickens into a gloopy, pastry-cream consistency. Strain this through a fine-mesh sieve to remove any lumps and cover the surface with plastic wrap. Let this pudding base cool to room temperature; this is what gives the orange frosting its unique, silky stability.
Step 8: Assemble and Decorate
Beat your butter until pale, then add the pudding base one spoonful at a time until the frosting is smooth. Fold in the cream cheese, orange juice, and zest before spreading a thick layer between each cake layer. Crumb coat the cake and chill it for thirty minutes to lock in the moisture before adding the final decorative layer. For a beautiful finish, pour a white chocolate ganache drip over the cold cake and top with frosting rosettes.
Easy-Baker Notes

If your tea-infused milk appears to have a slightly grainy texture after steeping, do not worry; this is common and will not affect the batter. Simply strain it through a fine-mesh sieve to remove the leaves and any solids before measuring it for the recipe. This ensures your Three-Layer Earl Grey Cake remains perfectly smooth.
Always use room temperature eggs and sour cream to ensure they emulsify properly with the creamed butter. If these ingredients are too cold, the batter may appear broken or curdled, which leads to an uneven bake. You can quickly warm cold eggs by placing them in a bowl of warm water for five minutes.
For a much deeper flavor profile, try to how to properly steep tea for baking recipes by using high-quality loose leaf tea rather than tea bags. The larger leaves provide a more nuanced bergamot aroma that persists even after the cake is baked. This small swap makes a massive difference in the final taste of the dessert.
If your buttercream feels too soft to pipe rosettes, place the bowl in the refrigerator for ten minutes to firm up the fats. The pudding base and cream cheese can become quite loose if the kitchen is warm or if the butter was too soft. A quick chill helps the frosting hold its shape beautifully on top of the cake.
When preparing the white chocolate ganache, ensure you chop the chocolate into very small, uniform pieces. This allows the warm cream to melt the chocolate evenly without needing extra heat that might burn the cocoa butter. If the ganache is too thin, let it sit on the counter for a few minutes to thicken before doing the drip.
To keep your layers even and professional, I recommend using a kitchen scale to weigh the batter into each tin. This guarantees that all three layers will bake at the exact same rate and reach the same height. You can find more helpful advice in my guide for a chocolate layer cake which covers similar assembly techniques.
If the tea syrup becomes too thick to pour, heat it slightly in the microwave for five seconds to loosen it up. It should have the consistency of honey so it blends easily into the butter during the creaming stage. Using it while it is too cold or thick will result in lumps of sugar throughout your cake batter.
Frequently Asked Questions
Can I make this cake in two 8-inch pans instead of three 6-inch pans?
Yes, you can easily use two 8-inch round tins for this recipe. You will need to increase the baking time by about five to eight minutes, as the layers will be slightly thicker. Always use a skewer to check for doneness before removing them from the oven.
How should I store the leftover cake to keep it moist?
The cake is best stored in an airtight container or wrapped tightly in plastic wrap in the refrigerator. Because of the cream cheese in the frosting, it should not sit at room temperature for more than two hours. Take it out thirty minutes before serving so the butter can soften.
Why did my tea-infused milk turn a dark brown color?
This is a natural result of steeping strong black tea in warm milk for twenty minutes. The color will lighten significantly once it is mixed with the flour and other light-colored ingredients. The flavor will be rich and floral, which is exactly what you want for this sponge.
Can I freeze the cake layers before assembling them?
Freezing the layers is a wonderful way to save time and actually makes them easier to frost. Wrap the cooled layers twice in plastic wrap and once in foil before placing them in the freezer for up to three months. Thaw them in the refrigerator overnight before you plan to decorate.
What happens if I do not have a stand mixer for the buttercream?
You can use a hand mixer to achieve a great result, though it may take a few extra minutes of beating. Ensure your butter is perfectly softened so the hand mixer can incorporate the pudding base without leaving lumps. Keep scraping the bowl to ensure a uniform texture throughout the frosting.
Is it possible to use a different type of tea for this recipe?
While Earl Grey is the star here, you can certainly experiment with Chai or Lady Grey for a different flavor profile. Just ensure you follow the same infusion steps for the milk and the syrup to maintain the correct moisture balance. Stronger black teas usually work best for baking because their flavor survives the heat.
Simple Swaps
If you prefer a more floral experience, you can swap the orange zest in the frosting for a teaspoon of culinary lavender. This creates a London Fog style dessert that pairs beautifully with the bergamot notes of the tea. You might enjoy seeing how these floral notes work in a rose water layer cake story as well.
For those who enjoy a bit of crunch, consider adding toasted pistachios between the layers for extra texture. The nutty flavor complements the citrus and tea without distracting from the softness of the sponge. Simply chop the nuts finely and sprinkle them over the buttercream before adding the next cake layer.
If you do not have loose-leaf tea on hand, you can use the contents of four tea bags for the infusion. Be sure to strain the milk thoroughly to prevent any fine tea dust from making the cake layers look gray or muddy. This is a great way to use what you already have in the pantry for a quick weekday bake.
Slice & Serve
This cake is a natural centerpiece for a weekend afternoon tea or a quiet birthday celebration at home. I love to serve thick slices on vintage china plates with a side of lightly sweetened whipped cream. The extra cream helps to highlight the citrus notes in the orange frosting and adds a beautiful contrast to the tea-infused sponge.
If you are hosting a larger gathering, this dessert pairs wonderfully with a three layer italian cream cake story for a diverse dessert table. The light floral notes of the Earl Grey provide a refreshing alternative to heavier chocolate or nut-based desserts. It is a sophisticated choice that guests always find surprising and delightful.
For a simple touch of elegance, garnish the top with a few dried orange slices or a sprinkling of fresh tea leaves. This gives your guests a hint of the flavors hidden inside before they even take their first bite. Always serve the cake at room temperature to ensure the buttercream is silky and the sponge is at its most tender.

The Wrap-Up
Baking a three-layer cake does not have to be an all-day ordeal that leaves you exhausted. This recipe fits into your life, whether you are baking it on a slow Sunday morning or preparing the layers on a quiet Tuesday night. The combination of fragrant tea and bright orange creates a dessert that is as comforting as a warm mug of tea on a rainy afternoon.
I hope you find as much joy in the process of infusing the milk and whisking the silky frosting as I do. There is something truly special about seeing basic pantry ingredients transform into such an elegant centerpiece. If you find yourself in the mood for something even more playful, you might want to try my funfetti birthday layer cake recipe story for your next big occasion.
If you bake this cake, I would love to see how your layers turned out and hear about your experience in the kitchen. Please share your photos and tag us on our social channels so we can celebrate your baking wins together. Happy baking and enjoy every single floral bite.

