We all know a good vanilla cake is comforting, but a truly great one needs a smart addition that makes guests stop mid-bite and ask for your secret.

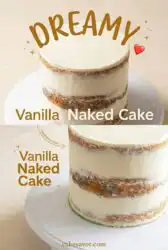
This is the cake that bridges the gap between simple baking and memorable pastry art. By using a generous tablespoon of pure vanilla extract, we let the warm, floral notes bloom directly in the creamed butter. The naked styling of this Vanilla Naked Cake keeps things rustic and approachable, showing off the tender crumb and fresh berries rather than hiding them under mounds of heavy frosting.
Why the Flavor Pop Works for a Vanilla Naked Cake
Prep: 45 min · Serves: 12 · Difficulty: Medium
- Generous vanilla creates a warm, floral crumb.
- Buttermilk keeps the cake layers tender.
- Less frosting highlights the cake’s natural beauty.
- Fresh berries add a bright, citrusy splash.
- Simple assembly makes baking feel like play.
We often think of vanilla as a background flavor, a quiet supporter of other showier ingredients. In this recipe, we turn that idea on its head by letting vanilla take center stage. When you bake this cake, the kitchen fills with a comforting, toasted aroma that signals something special is happening. It is a wonderful alternative to a traditional white velvet cake story because it celebrates the golden, buttery edges of the layers.
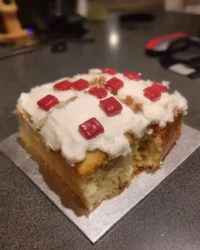
The naked decoration style is not only beautiful but also highly practical for home bakers. You do not have to worry about achieving flawless, smooth sides with your icing spatula. Instead, you scrape the edges clean, allowing the golden cake and white frosting to peek through in gorgeous, rustic stripes. This approach reduces the overall sweetness, making each bite balanced and refreshing.
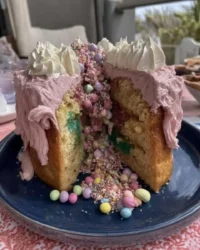
Adding fresh raspberries around the cake layers introduces a tart, juicy contrast to the sweet buttercream. As you assemble the cake, you can see the red berries peeking out, hinting at the fresh flavors inside. This creates a striking visual contrast that looks sophisticated without requiring advanced decorating skills. It is all about making creative flavor feel easy and fun.
I promise this rustic beauty will become your go-to centerpiece for every simple celebration.
Get The Full Cake Recipe
Print
Vanilla Naked Cake
- Total Time: 6 hours
- Yield: 12 servings
- Diet: Vegetarian
Description
A stunning, rustic three-layer vanilla cake filled with rich vanilla buttercream and fresh, juicy raspberries. This simple design lets the beautiful golden crumbs peek through for an elegant centerpiece.
Ingredients
- 3 and 3/4 cups (443g) sifted all-purpose flour
- 2 teaspoons baking powder
- 3/4 teaspoon baking soda
- 1 teaspoon salt
- 1 and 1/2 cups (340g) unsalted butter, softened
- 2 cups (400g) granulated sugar
- 5 large eggs, room temperature
- 1 Tablespoon pure vanilla extract
- 1 and 1/4 cups (420g/ml) buttermilk, room temperature
- 1–2 cups (120–250g) fresh raspberries
- 1 and 1/2 cups (340g) unsalted butter, softened (for frosting)
- 5.5–6 cups (660–720g) confectioners’ sugar
- 5–6 Tablespoons (75–90g/ml) heavy cream
- 1 teaspoon pure vanilla extract (for frosting)
- 1/4 teaspoon salt (for frosting)
Instructions
- Preheat and Prep: Preheat oven to 350°F (177°C). Grease three 9-inch round cake pans, line with parchment paper rounds, then grease the parchment paper.
- Whisk Dry Ingredients: In a large bowl, whisk the sifted flour, baking powder, baking soda, and salt together. Set aside.
- Cream Butter and Sugar: Beat 1.5 cups of butter and granulated sugar together on medium-high speed until smooth and creamy, about 3 minutes.
- Add Eggs and Vanilla: Add eggs 1 at a time, beating well after each addition. Beat in the tablespoon of vanilla extract.
- Combine Batter: With the mixer on low speed, add the dry ingredients in three additions, alternating with the buttermilk, mixing just until incorporated.
- Bake Layers: Pour batter evenly into the prepared pans. Bake for 25–26 minutes or until a toothpick inserted in the center comes out clean. Cool completely.
- Make Frosting: Beat 1.5 cups of butter on medium speed until creamy. Add confectioners’ sugar, heavy cream, vanilla extract, and salt on low speed, then beat on high for 3 minutes.
- Assemble Cake: Slice thin layers off the tops of the cakes to level them. Place the first layer down, spread 1.5 cups of frosting, and arrange half the raspberries. Repeat with the second layer.
- Finish and Chill: Top with the third layer. Spread remaining frosting on top and scrape the sides with a bench scraper for a naked look. Refrigerate for at least 2–3 hours before serving.
Notes
- Make sure all refrigerated ingredients are at room temperature to prevent the batter from splitting.
- Sift your flour before measuring to make sure you get a light, delicate crumb structure.
- If you do not have buttermilk, make a DIY version by adding 1 tablespoon of lemon juice to milk and letting it sit for 5 minutes.
- Avoid using frozen berries, as they will release excess moisture and cause the layers to slide.
- Prep Time: 45 mins
- Cook Time: 25 mins
- Category: Cake
- Method: Baking
- Cuisine: American
Simple Ingredients + One Smart Add

Our pantry shelf is where simple cakes get their wow, and this recipe relies on everyday staples used with a light hand. The magic lies in how these basic components interact to create a soft, velvety crumb. Let us look at the key players that make this cake sing.
- Pure Vanilla Extract: This is our one smart addition, used in a generous tablespoon to fill the crumb with warm, floral, and woody notes.
- Sifted All-Purpose Flour: Sifting before measuring provides a light, airy structure that prevents the layers from becoming dense or heavy.
- Buttermilk: The natural acidity breaks down gluten, resulting in an incredibly tender and moist texture that lasts for days.
- Unsalted Butter: Softened to room temperature, it beats with the sugar to trap tiny air pockets for a fluffy rise.
- Fresh Raspberries: These berries offer a sharp, citrusy contrast that cuts through the rich, creamy vanilla buttercream layers.
- Heavy Cream: Added to the frosting, it creates a luxurious, spreadable texture that holds its shape beautifully on the cake.
| Ingredient | Why It Matters |
|---|---|
| Vanilla Extract | Delivers the warm, floral signature flavor that defines the cake. |
| Buttermilk | Softens the crumb and adds a subtle, pleasant tang. |
| Sifted Flour | Creates a delicate, uniform structure for even baking. |
| Room-Temp Eggs | Emulsify smoothly into the butter to prevent batter separation. |
Building the Flavor

Step 1: Prep Your Pans and Preheat
Start by heating your oven to 350°F (177°C) so it reaches the proper temperature before baking. Grease three nine-inch round cake pans thoroughly, then line the bottoms with parchment paper rounds. Grease the parchment paper as well to guarantee the baked layers release cleanly without tearing. This simple preparation step saves you from heartbreak later when removing the cakes.
Step 2: Whisk the Dry Base
In a large mixing bowl, combine your sifted all-purpose flour, baking powder, baking soda, and salt. Use a wire whisk to stir these dry ingredients together until they are completely uniform. This distribution of leavening agents prevents uneven rising and unsightly air pockets in your finished layers. Set the dry mixture aside while you prepare the wet base.
Step 3: Cream Butter and Sugar
Fit your stand mixer with the paddle attachment and place your room-temperature butter and granulated sugar in the bowl. Beat these together on medium-high speed for about three full minutes until the mixture looks pale, fluffy, and creamy. Scrape down the sides of the bowl with a flexible spatula to gather any unmixed butter. This step incorporates the air needed for a light, soft cake structure.
Step 4: Add Eggs and Vanilla
With the mixer running on medium speed, add your large room-temperature eggs one at a time. Beat well after each addition to make sure the egg is fully incorporated before adding the next one. Pour in your tablespoon of pure vanilla extract, letting its sweet, floral aroma blend into the creamed mixture. Scraping the bottom of the bowl now prevents dense streaks in your finished batter.
Step 5: Mix the Vanilla Naked Cake Batter
Turn your mixer to low speed to add the dry ingredients and buttermilk in alternating batches. Start with one-third of the flour mixture, follow with half of the buttermilk, and repeat, ending with the dry ingredients. Mix each addition only until it is combined to avoid overworking the gluten. The resulting batter should look smooth, velvety, and thick enough to hold its shape slightly.
Step 6: Bake the Cake Layers
Divide the batter evenly among your three prepared pans, using a kitchen scale for precision if you want identical layers. Smooth the tops with an offset spatula so they bake evenly across the pans. Bake for twenty-five to twenty-six minutes, testing the centers with a toothpick until it comes out clean. Let the cakes cool in their pans on a wire rack until they are completely cold to the touch.
Step 7: Whip the Vanilla Buttercream
While the cakes cool, beat your softened butter in a clean bowl on medium speed for two minutes until light. Gradually add the confectioners’ sugar, heavy cream, vanilla, and salt with the mixer running on low. Once incorporated, increase the speed to high and beat for three minutes until the frosting is fluffy and spreadable. Adjust the texture with a splash of cream or extra sugar if necessary.
Step 8: Assemble and Layer the Berries
Trim the cooled cake tops with a long serrated knife to create flat, level surfaces. Place your first layer on a cake turntable and spread one and a half cups of frosting evenly over the top. Arrange fresh raspberries around the edge, pressing them gently into the buttercream to keep the layer stable. Repeat this process with the second cake layer, stacking them carefully.
Step 9: Scrape the Sides and Chill
Place the final cake layer on top and spread the remaining frosting over the top and down the sides. Use a clean bench scraper held at a ninety-degree angle to smooth the sides, leaving a thin layer of icing. This creates the classic naked look where the golden cake layers peek through the white frosting. Chill the assembled cake for at least two hours to set the structure before slicing.
Small Tweaks, Big Wow

Sifting your flour is not an optional chore; it is the secret to a delicate crumb. When you sift, you introduce air into the flour, which helps it blend smoothly into the wet ingredients without clumping. If you skip this, your cake may turn out dense, resembling a heavy pound cake rather than a light layer cake. Take the extra minute to run your flour through a fine-mesh strainer.
Always bring your eggs, butter, and buttermilk to room temperature before starting your batter. Cold ingredients do not emulsify properly, which can cause your batter to look curdled and split. If your batter splits, the oven heat will not distribute evenly, leading to a coarse, oily texture. Leave your ingredients on the counter for at least an hour before you begin.
If your cake layers sink in the middle during baking, here is why and how to fix it. This common issue usually happens because the oven door was opened too early, letting cool air disrupt the rising process. It can also occur if your baking powder or baking soda is expired and has lost its lifting power. To fix this, test your leaveners for freshness before baking and keep the oven door closed until the last five minutes of baking.
Never skip lining your cake pans with parchment paper rounds. Even the best non-stick pans can grip onto a cake layer, causing it to tear when you try to turn it out. By greasing both the pan and the paper, you create a double barrier that lets the cake slide out effortlessly. For more tips on preparing your baking pans, check out this guide on how to line cake pans with parchment paper.
Leveling your cake layers is essential for a sturdy, upright naked cake. If you stack domed cakes, the pressure will cause the layers to slide, and your frosting will squeeze out the sides. Use a long serrated knife to gently saw off the rounded top of each cooled cake. You can save these sweet scraps for snacking or crumbling over vanilla ice cream.
If you love the clean, sweet taste of vanilla in your baked goods, check out our vanilla pound cake story for another simple cake with unforgettable flavor. It uses a similar focus on high-quality vanilla to make a basic recipe feel incredibly luxurious. It is an excellent companion recipe to keep in your baking repertoire.
Frequently Asked Questions
What is the difference between a “naked” cake and a “semi-naked” cake?
A naked cake has no frosting at all on the outer sides, leaving the cake layers completely exposed to show off their texture and color. A semi-naked cake, on the other hand, features a very thin layer of buttercream scraped around the sides. This thin layer lets the golden cake peek through while helping to seal in moisture, giving it a rustic, wispy appearance.
What frosting works best for a naked cake?
A sturdy, crusting frosting like American buttercream or a thick cream cheese frosting works best for naked cakes. These frostings hold their shape under the weight of the stacked layers and do not slide off the sides. Avoid using very soft frostings like whipped cream or thin glazes, as they cannot support the structure of a multi-layered cake.
How do you assemble a naked cake without it collapsing?
The key to a stable naked cake is leveling each layer so they are completely flat before stacking. When adding fresh berries between the layers, press them firmly into the buttercream so they do not roll around or create uneven gaps. Chilling each cake layer before assembly also helps make them firm and much easier to stack securely.
What are the best decorations for a vanilla naked cake?
Fresh berries, edible flowers, and a simple dusting of powdered sugar are classic choices that highlight the cake’s rustic charm. You can also use fresh herbs like rosemary sprigs or mint leaves to add a touch of green. For a festive look, try using candied citrus slices or a gentle drizzle of caramel over the top layer.
Can I make this cake ahead of time?
Yes, you can prepare the components of this cake in advance to save time on the day of your event. Bake the cake layers, let them cool completely, wrap them tightly in plastic wrap, and store them at room temperature overnight. You can also whip up the buttercream and keep it in an airtight container in the fridge, letting it come to room temperature before assembling.
How do I store leftover naked cake so it does not dry out?
Because the sides of a naked cake are exposed to the air, it can dry out faster than a fully frosted cake. Store leftovers in a cake carrier or loosely cover the sliced areas with plastic wrap pressed directly against the cake crumb. Keep the cake at room temperature for up to two days, or refrigerate it for up to a week.
Can I use frozen berries instead of fresh berries?
It is best to stick to fresh berries for this recipe because frozen berries release a lot of excess moisture as they thaw. This extra juice can bleed into the white buttercream, making the frosting runny and causing the cake layers to slide. If you must use frozen berries, thaw and drain them thoroughly on paper towels before placing them on the cake.
Swap Your Spice
For a deep, nutty twist, you can swap the regular butter in this cake for brown butter. Melt your unsalted butter in a saucepan over medium heat until it foams and develops golden-brown specks. Let it cool completely until it solidifies back to a soft, room-temperature state before creaming it with the sugar. This simple swap adds a toasty flavor that pairs beautifully with the warm vanilla. It is a technique we also love in our brown butter chocolate chip cookie cake story for adding rich depth.
If you want to bring a cozy warmth to your kitchen, try adding a blend of chai spices to your dry ingredients. Whisk two teaspoons of ground cinnamon, one teaspoon of ground cardamom, and half a teaspoon of ground ginger into your flour mixture. This small change transforms the cake into a spiced autumn treat that tastes wonderful with a cup of hot tea. The warm spices bloom beautifully in the buttery batter, giving each bite a comforting kick.
You can easily introduce a bright, floral note by adding a splash of orange blossom water to your buttercream. Replace half a teaspoon of the vanilla extract in the frosting with a quarter teaspoon of orange blossom water. Pair this floral icing with fresh blackberries or sliced strawberries between the layers instead of raspberries. This combination feels incredibly fresh and elegant, ideal for a spring afternoon gathering.
Bringing the Wow to the Table
This stunning cake deserves a presentation that matches its rustic elegance. Place it on a clean white cake stand or a raw wooden platter to emphasize the natural, organic textures of the naked layers. Serve it alongside a bowl of extra fresh berries and a small pitcher of warm vanilla custard for guests to drizzle over their slices. It makes a beautiful centerpiece for baby showers, intimate weddings, or casual backyard dinner parties.
When it comes to pairing, this cake goes wonderfully with light, refreshing beverages. Offer your guests a selection of herbal teas, such as chamomile or Earl Grey, which complement the warm notes of the vanilla. For a warm-weather gathering, a cold glass of sparkling lemonade or a light prosecco cuts through the rich buttercream beautifully. If you enjoy multi-layered desserts, you might also love exploring our three layer coconut cream cake story for another stunning option.
To get clean, beautiful slices, use a long, sharp chef’s knife instead of a serrated one. Dip the knife in hot water and wipe it clean with a kitchen towel before making each cut. This melts through the buttercream smoothly and prevents the fresh berries from dragging through the cake layers. Your guests will appreciate the neat, defined layers of cake, frosting, and fruit in every single serving.

Your Turn to Riff
Now that you have the blueprint for this beautiful vanilla naked cake, it is time to head to the kitchen and play. Baking is at its best when you treat it as an adventure rather than a strict set of rules. Feel free to adjust the berries, play with the spices, or try a different extract to make this recipe your own. For more inspiration on creative cake designs, check out our chocolate rosette cake story to see how a simple frosting technique can transform a dessert.
We would love to see how your beautiful creations turn out and what clever twists you decide to add. Share your baking photos with our community and let us know what simple additions made your cake a success. You can follow us on Pinterest and join our conversation on Facebook to connect with fellow home bakers. Let us keep sharing the joy of simple cakes with unforgettable flavor.
